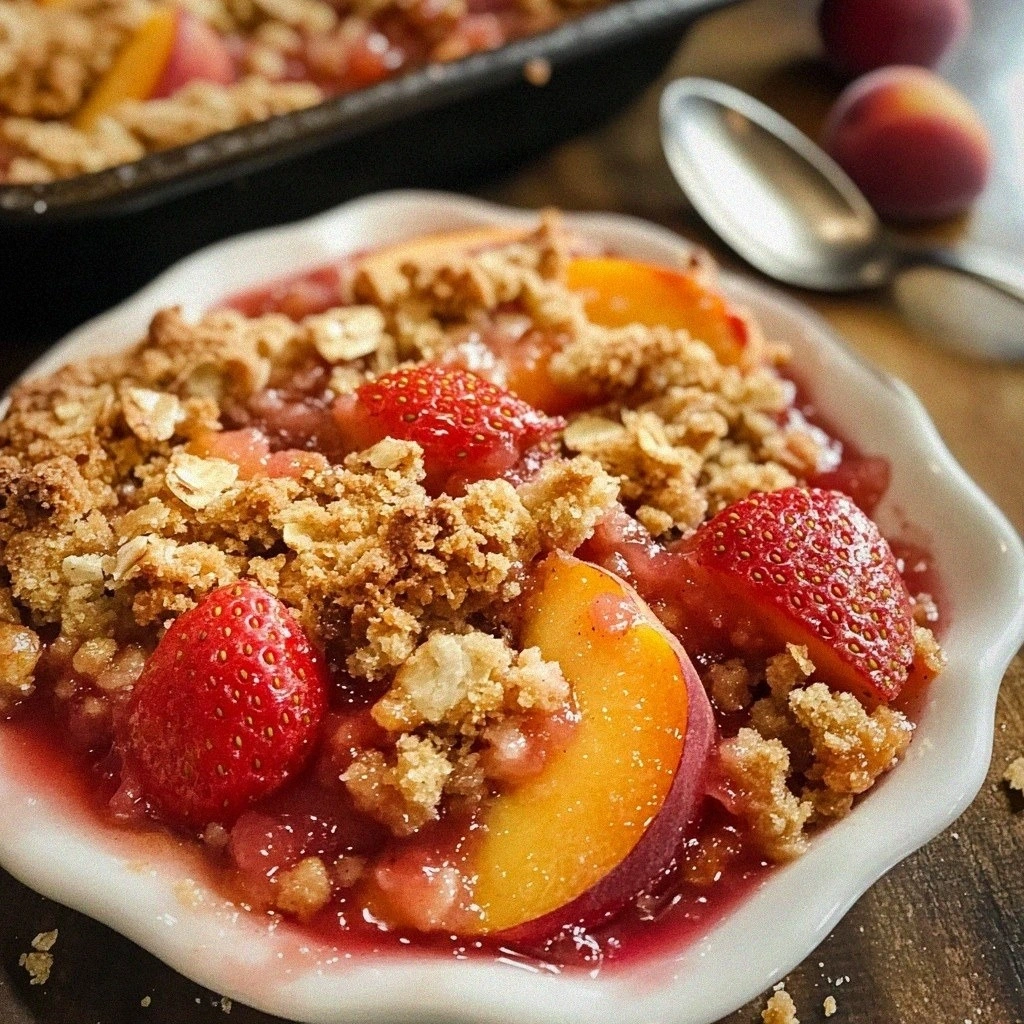
Strawberry Peach Crisp
 Save
Save
It was a warm Saturday afternoon in early June, the kind of day when the garden smells like sunshine and the kitchen feels like a sanctuary. I was pulling the last ripe strawberries from the vine, their red skins glistening with dew, and then I heard the soft thud of a peach falling onto the patio table, its fuzzy skin catching the light. The moment I sliced that first peach, a sweet, buttery aroma rose from the cutting board, and I knew I had the perfect canvas for a dessert that could capture the essence of summer. Imagine a golden, buttery crumble topping that gives way to a bubbling, fragrant fruit filling—each bite a harmonious blend of tart strawberries and honey‑kissed peaches, with a whisper of vanilla that lingers on the palate.
What makes this Strawberry Peach Crisp so special is that it doesn’t just rely on sugar to be delicious; it leans on the natural sugars of the fruit, the slight acidity of lemon, and the comforting crunch of oats and butter. The crisp topping is a textural masterpiece: it’s crisp on the edges, yet buttery and slightly chewy in the middle, creating a delightful contrast that keeps you reaching for another spoonful. The fruit filling, on the other hand, is a glossy, jewel‑like mixture that holds the berries together without turning mushy, thanks to a precise balance of cornstarch and lemon juice. Have you ever wondered why a restaurant version of a fruit crisp always seems to have that perfect glaze? The secret lies in the starch‑lemon combo, and I’ll reveal how you can master it at home.
But wait—there’s a twist that elevates this humble dish from a simple family favorite to a show‑stopping centerpiece. I discovered a little trick involving a quick butter‑oil mash that gives the topping an extra layer of richness without making it greasy. You’ll see exactly how I incorporate that secret in step four, and trust me, the result is pure magic. The best part? This recipe is forgiving enough for beginners yet sophisticated enough to impress guests at a dinner party. So, if you’re ready to create a dessert that sings with summer flavors and leaves a lingering memory of sunshine, keep reading.
Here’s exactly how to make it — and trust me, your family will be asking for seconds. Grab a bowl, a baking dish, and let’s dive into the world of strawberry‑peach bliss. The journey from raw fruit to golden crisp is filled with aromas, textures, and a few pro tips that will turn you into the crisp‑making champion of your household. Ready? Let’s get started.
🌟 Why This Recipe Works
- Flavor Depth: The combination of strawberries and peaches creates a natural sweet‑tart balance, while the vanilla extract adds a subtle, lingering warmth that deepens the overall flavor profile.
- Texture Contrast: A crunchy oat‑butter topping meets a silky, slightly thickened fruit filling, giving you a satisfying bite that keeps you coming back for more.
- Ease of Preparation: With only a handful of pantry staples and a short prep time, this crisp can be assembled in under 20 minutes, making it perfect for busy weeknights or impromptu gatherings.
- Time Efficiency: The baking time is a quick 30 minutes, allowing the fruit to soften and the topping to brown without demanding constant attention.
- Versatility: While the recipe shines with strawberries and peaches, you can swap in other seasonal fruits, making it a year‑round crowd‑pleaser.
- Nutrition Boost: Fresh berries are packed with antioxidants, peaches add fiber and vitamin C, and oats bring heart‑healthy beta‑glucan, giving the dish a nutritious edge.
- Ingredient Quality: Using fresh, ripe fruit ensures natural sweetness, reducing the need for excessive added sugar and allowing the true flavors to shine.
- Crowd‑Pleasing Factor: The golden, caramelized topping is visually stunning, and the comforting aroma draws people to the table before the first bite.
🥗 Ingredients Breakdown
The Foundation: Fresh Fruit
The heart of this crisp is the fruit duo—strawberries and peaches. Strawberries bring a bright, ruby‑red color and a natural tartness that cuts through the sweetness, while peaches contribute a mellow, honeyed flavor and a soft, juicy texture. When selecting strawberries, look for firm, deep‑red berries with a glossy sheen; they’ll hold their shape during baking. For peaches, choose ones that yield slightly to gentle pressure—ripe enough to be fragrant but still firm enough to slice without turning mushy. If you can’t find fresh peaches, frozen sliced peaches work well; just thaw them and pat dry to avoid excess moisture.
Aromatics & Spices: Sweeteners and Balance
Granulated sugar is the primary sweetener, but it also helps to draw out the juices from the fruit, creating that luscious syrupy base. Lemon juice adds a bright acidity that balances the sugar and enhances the fruit’s natural flavors, preventing the filling from becoming cloyingly sweet. Cornstarch is the thickening hero—it turns the bubbling fruit mixture into a glossy, sauce‑like consistency without turning it gummy. Finally, vanilla extract rounds out the flavor profile with a warm, aromatic undertone that ties the whole dessert together.
The Secret Weapons: Oats and Butter
Old‑fashioned oats provide the unmistakable crunch and chewiness that define a classic crisp topping. Their hearty texture holds up well during baking, creating those golden, caramelized edges we all love. Unsalted butter, melted, binds the oats, flour, and sugar, delivering a rich, buttery flavor while ensuring the topping spreads evenly. For a dairy‑free version, coconut oil works beautifully, adding a faint tropical note that complements the fruit.
Finishing Touches: Flour, Brown Sugar, and Spice
All‑purpose flour (or a gluten‑free blend) adds structure to the topping, helping it set into a cohesive crust. Brown sugar contributes a deep, molasses‑like sweetness that caramelizes beautifully, giving the topping a rich amber hue. Ground cinnamon introduces a warm, comforting spice that pairs perfectly with summer fruit, while a pinch of salt amplifies all the flavors, ensuring the sweet and savory balance is spot‑on.
With your ingredients prepped and ready, let's get cooking. Here's where the fun really begins...
🍳 Step-by-Step Instructions
🔐 Expert Tips for Perfect Results
The Taste Test Trick
Before you commit to the oven, give the fruit mixture a quick taste. If it feels too tart, sprinkle a little extra sugar; if it’s overly sweet, a dash more lemon juice will bring back balance. Trust your palate—your taste buds are the ultimate judge, and a small adjustment now prevents a bigger correction later.
Why Resting Time Matters More Than You Think
Allowing the crisp to rest after baking is crucial because the cornstarch continues to set as the fruit cools. This step prevents a runny sauce and ensures each slice holds together. I once served a crisp straight from the oven and the sauce was a beautiful mess; a ten‑minute rest saved the presentation and the texture.
The Seasoning Secret Pros Won’t Tell You
A pinch of ground nutmeg hidden in the topping adds a subtle depth that many home cooks overlook. It pairs wonderfully with cinnamon, creating a warm, autumn‑like undertone even in a summer dish. I discovered this trick while watching a pastry chef on a cooking show, and it’s become my go‑to for any fruit crumble.
Butter Temperature Matters
Melted butter should be warm, not hot, when you combine it with the dry topping ingredients. If the butter is too hot, it can partially cook the oats, leading to uneven browning. I once used butter straight from the microwave at full power and ended up with a soggy bottom—lesson learned!
The Crunch Factor
For an extra crunch, toast the oats lightly in a dry skillet for two minutes before mixing them with the flour and sugar. This step brings out a nutty aroma that elevates the entire dish. The toasted oats also create a more pronounced crunch that holds up better after cooling.
Serving with a Twist
A drizzle of balsamic reduction over the warm crisp adds a sophisticated tang that cuts through the sweetness. I experimented with this at a dinner party, and the guests were thrilled by the unexpected depth. Pair it with a glass of chilled Riesling for a truly memorable dessert experience.
🌈 Delicious Variations to Try
One of my favorite things about this recipe is how versatile it is. Here are some twists I've tried and loved:
Berry‑Mixed Medley
Swap half the strawberries for blueberries and a quarter for raspberries. The mix adds a burst of color and a slightly different tartness, creating a more complex fruit profile that still pairs beautifully with the buttery topping.
Tropical Breeze
Add diced mango and pineapple in place of half the peaches. The tropical fruits bring a sunny, caramelized sweetness that transports you to a beachside café, and the extra juice helps keep the filling extra moist.
Nutty Crunch
Fold in a handful of chopped toasted almonds or pecans into the oat topping. The nuts add an extra layer of crunch and a buttery, nutty flavor that complements the fruit’s natural sweetness.
Spiced Autumn
Introduce a pinch of ground ginger and a splash of maple syrup into the topping mixture. This variation leans into warm, cozy spices, making the crisp feel like a perfect fall dessert even when served in summer.
Chocolate Delight
Stir in a quarter cup of dark chocolate chips into the fruit mixture before baking. As the crisp bakes, the chocolate melts into pockets of rich, bittersweet goodness that contrast delightfully with the sweet fruit.
Savory Sweet
Add a teaspoon of fresh rosemary finely chopped to the topping and a pinch of smoked paprika to the fruit. This savory twist creates a sweet‑savory balance that’s perfect for a brunch or a sophisticated dinner finale.
📦 Storage & Reheating Tips
Refrigerator Storage
Allow the crisp to cool completely, then cover it loosely with foil or a reusable silicone lid. Store in the refrigerator for up to three days. The topping may lose some crispness, but you can revive it by reheating briefly.
Freezing Instructions
Portion the crisp into individual servings, wrap each tightly in plastic wrap, then place them in a freezer‑safe bag. Freeze for up to two months. To serve, thaw overnight in the fridge and reheat as described below.
Reheating Methods
For the best texture, reheat in a preheated 350°F (175°C) oven for 10‑12 minutes, or until the topping regains its golden crunch. If you’re short on time, a microwave on medium power for 45 seconds will warm the fruit, but the topping will be softer—add a quick broil for 1‑2 minutes to restore crispness.
❓ Frequently Asked Questions
Can I use frozen strawberries and peaches?
What can I substitute for cornstarch?
How do I keep the topping from getting soggy?
Can I make this crisp gluten‑free?
What’s the best ice cream to serve with this crisp?
Can I add a crumble topping instead of a crisp?
Is it okay to use brown sugar instead of white sugar for the fruit?
How long can leftovers be kept at room temperature?
Similar Recipes
 Desserts
Cherry Pie Crumble Bars: The Perfect Dessert
Delicious Cherry Pie Crumble Bars: The Perfect Dessert
 Desserts
Frozen Strawberry Crunch Cups: A Delightful Dessert Experience
Delicious Frozen Strawberry Crunch Cups: A Delightful Dessert Experience
 Desserts
Cotton Candy Sushi: A Fun and Whimsical Dessert Everyone Loves
Learn how to make delicious Cotton Candy Sushi: A Fun and Whimsical Dessert Everyone Loves. Easy…
 Desserts
Chocolate Banana Frozen Yogurt Clusters: A Sweet Delight!
Learn how to make delicious Chocolate Banana Frozen Yogurt Clusters: A Sweet Delight!. Easy recipe with…
 Desserts
Tropical Key Lime Coconut White Chocolate Chip Cookies
Delicious Tropical Key Lime Coconut White Chocolate Chip Cookies
 Desserts
Strawberry Dreams Fluff Salad: A Whimsical Summer Delight
Delicious Strawberry Dreams Fluff Salad: A Whimsical Summer Delight
 Desserts
Heavenly Fig Jam Delight: A Step-by-Step Guide
Delicious Heavenly Fig Jam Delight: A Step-by-Step Guide
 Desserts
Blueberry-Filled Almond Snowball Cookies
Learn how to make delicious Blueberry-Filled Almond Snowball Cookies. Easy recipe with step-by-step instructions.

Victoria
I cook these recipes at home before they ever land here — simple ingredients, clear steps.
Other Reader Favorites
 Dinner
Traditional Mexican Birria
Learn how to make delicious Traditional Mexican Birria. Easy recipe with step-by-step instructions.
 Appetizers
Crispy Air Fryer Garlic Parmesan Fries: A Delicious and Healthy Twist on a Classic Favorite
Delicious Crispy Air Fryer Garlic Parmesan Fries: A Delicious and Healthy Twist on a Classic Favorite
 Dinner
Cozy Crockpot Chicken Corn Enchilada Soup
Delicious Cozy Crockpot Chicken Corn Enchilada Soup
 Desserts
Apple Crisp Cheesecake Recipe: A Sweet Fusion of Flavors
Delicious Apple Crisp Cheesecake Recipe: A Sweet Fusion of Flavors