Introduction
If you’re a fan of classic desserts, you will absolutely love Cherry Pie Crumble Bars. This delightful treat captures the essence of traditional cherry pie while offering a convenient, portable bar format that’s perfect for any occasion. Whether you’re hosting a family gathering, looking to impress guests with a dessert tray, or simply craving a sweet indulgence at home, these bars are a fantastic choice.
The beauty of Cherry Pie Crumble Bars lies in their versatility. They are perfect for summer picnics, holiday celebrations, or as a sweet snack for a cozy night in. Plus, they are easy to prepare, making them a go-to recipe for both novice and seasoned bakers. One of the most important aspects of this recipe is the use of fresh or frozen cherries. The quality of your cherries directly influences the flavor of the bars, so selecting the best cherries you can find is key to achieving that rich, sweet-tart cherry taste everyone loves.
Cherry Pie Crumble Bars: A Perfect Dessert
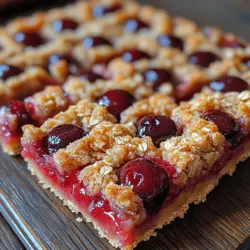
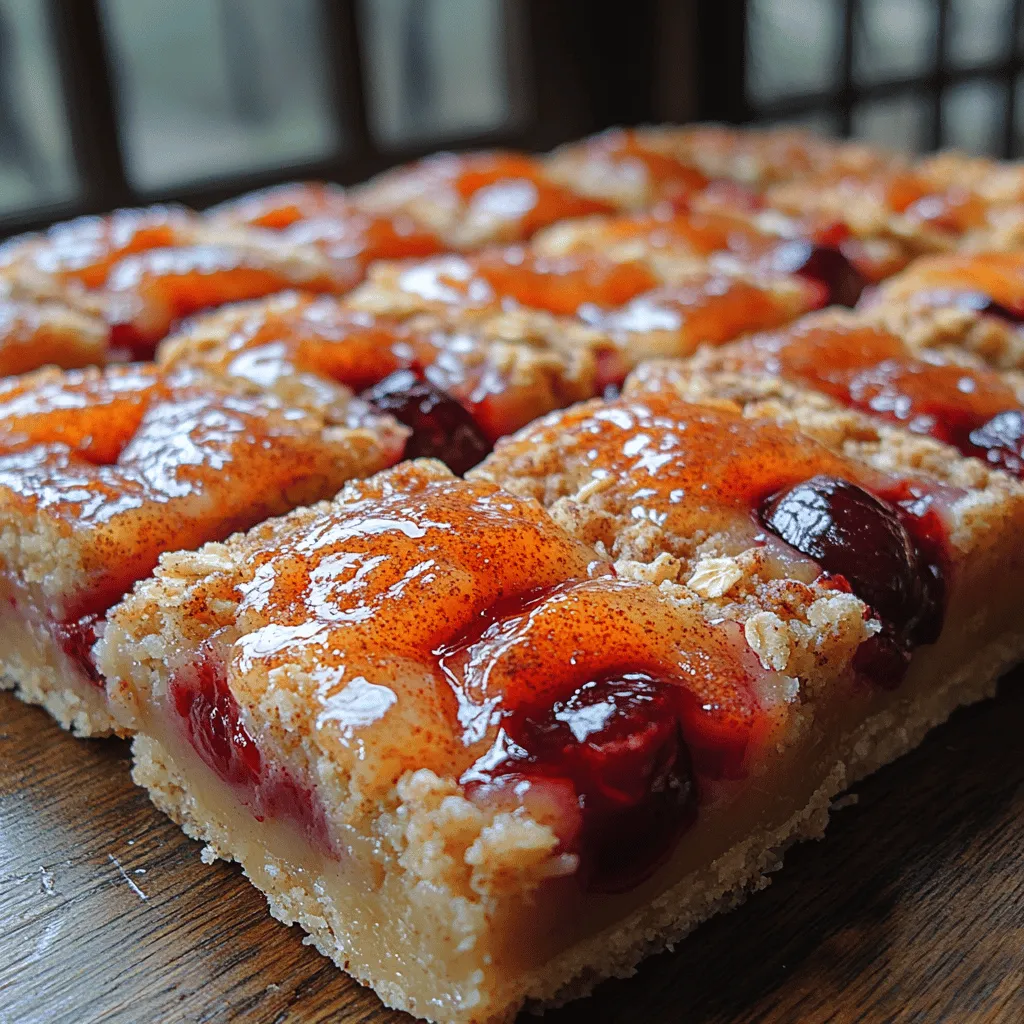
The texture and taste profile of Cherry Pie Crumble Bars are truly irresistible. Imagine biting into a soft, buttery crust that crumbles in your mouth, giving way to a luscious cherry filling that balances sweetness with a hint of tartness. The crumble topping adds a delightful crunch that perfectly complements the smooth filling, creating a satisfying contrast in every bite.
Crumble bars have gained immense popularity among home bakers for their ease of preparation. Unlike traditional pies, which can require meticulous crust work and careful baking, crumble bars simplify the process without sacrificing flavor or presentation. They provide all the nostalgic comfort of cherry pie but in a format that’s easy to cut and serve, making them ideal for sharing.
Many people have fond memories associated with cherry pie—perhaps it was a family recipe passed down through generations or a beloved dessert enjoyed during summer gatherings. These bars evoke that same sense of nostalgia, reminding us of simpler times spent with loved ones and the joy of homemade treats.
Understanding the Ingredients
To create the best Cherry Pie Crumble Bars, understanding the ingredients is essential. Let’s break down the key components that will bring this dessert to life.
Cherry Filling Ingredients
The cherry filling is the heart of these bars, and it consists of a few critical ingredients:
– Cherries: Fresh or frozen cherries are the stars of this recipe. Fresh cherries provide a bright, vibrant flavor, while frozen cherries can be used year-round, capturing the essence of summer even in the dead of winter. When using fresh cherries, make sure to pit and slice them appropriately. If opting for frozen cherries, allow them to thaw and drain excess liquid to avoid a soupy filling.
– Sugar: This ingredient is crucial for sweetening the cherries. The amount of sugar can be adjusted based on the natural sweetness of the cherries you use, as some varieties are sweeter than others.
– Cornstarch: Cornstarch acts as a thickening agent, helping the filling achieve the right consistency. It binds the juices released from the cherries, creating a luscious, cohesive filling that won’t run all over the place when you cut into the bars.
– Lemon Juice: A splash of lemon juice enhances the flavor of the cherries while adding a necessary tang to balance the sweetness. It also helps to brighten the overall flavor profile.
– Vanilla Extract: A touch of vanilla extract deepens the flavor of the cherry filling, adding warmth and complexity.
– Optional Almond Extract: If you’re looking to elevate the flavor even further, a few drops of almond extract can provide a delightful nutty undertone that pairs beautifully with cherries.
Crust and Topping Ingredients
The base and topping of the bars are just as important as the filling. Here’s what you’ll need:
– All-Purpose Flour: The backbone of both the crust and the crumble topping, all-purpose flour provides structure and support to the bars.
– Oats: Rolled oats add a hearty texture to the crumble topping, giving it that signature crunch and chewiness.
– Brown Sugar: Using brown sugar in the crust and topping not only sweetens the bars but also adds a rich, caramel-like flavor that enhances the overall taste.
– Baking Powder: A leavening agent that helps the crust and topping rise slightly, giving them a light, airy texture.
– Butter: Butter is essential for creating a rich, flavorful crust and crumble topping. It adds moisture and richness, making the bars deliciously decadent.
– Optional Cinnamon: A sprinkle of cinnamon can elevate the flavor profile, adding warmth and a hint of spice that complements the cherries beautifully.
Step-by-Step Guide to Making Cherry Pie Crumble Bars
Preparing the Cherry Filling
The first step in creating your Cherry Pie Crumble Bars is preparing the cherry filling. This step is crucial for ensuring that your filling has the right consistency and flavor.
1. Cook the Filling: Begin by placing your pitted and chopped cherries in a medium saucepan. Add the sugar, cornstarch, lemon juice, and vanilla extract. If you’re using almond extract, this is the time to add it as well.
2. Heat the Mixture: Over medium heat, cook the cherries while stirring gently. As the mixture heats up, the cherries will release their juices, and the sugar will begin to dissolve.
3. Achieve the Right Consistency: Continue cooking until the mixture starts to thicken and bubble. This process usually takes about 5-7 minutes. You want the filling to be thick enough to hold its shape but still pourable. Be sure to taste the filling as you go; adjust the sweetness with more sugar or acidity with more lemon juice if necessary.
4. Cool the Filling: Once the filling has reached the desired consistency, remove it from the heat and let it cool slightly while you prepare the crust and topping.
Tips for Achieving the Perfect Balance of Sweetness and Tartness
– Taste as You Go: One of the most effective ways to ensure a well-balanced filling is to taste it as you prepare it. Adjust the sweetness and acidity according to your preference, keeping in mind that the filling will become sweeter as it bakes.
– Use Seasonal Cherries: If possible, use fresh, in-season cherries for the best flavor. If using frozen cherries, ensure they are high-quality and have not been sweetened.
– Mix and Match: If you find that your cherries are particularly sweet or tart, consider mixing in other fruits, such as blueberries or raspberries, to create a more complex flavor profile.
By following these detailed guidelines and understanding the ingredients, you are well on your way to creating delicious Cherry Pie Crumble Bars that will delight your family and friends. In the next section, we will discuss how to assemble and bake these delightful bars to perfection.
Crafting the Crust and Topping
Creating the perfect crust and topping for your Cherry Pie Crumble Bars is essential for achieving that delightful balance of texture and flavor. Begin by gathering your ingredients: all-purpose flour, oats, brown sugar, granulated sugar, and of course, butter.
Techniques for Mixing Ingredients for Optimal Texture
For the crust and topping, the mixing technique is crucial. Start by combining the flour, oats, brown sugar, and granulated sugar in a large bowl. Use a whisk to blend these dry ingredients thoroughly, ensuring that there are no lumps. This step is key to a uniform texture in your crumble.
Next, it’s time to incorporate the butter. The temperature of the butter plays a significant role in the final texture of your bars. For the best results, use cold, unsalted butter. Cut the butter into small cubes and add it to the dry mixture. Using a pastry cutter or your fingertips, mix the butter into the dry ingredients until the mixture resembles coarse crumbs. Be cautious not to over-mix; you want to maintain some texture for that signature crumble.
Importance of Butter Temperature and Mixing Methods to Achieve a Crumbly Texture
The cold butter creates a flaky texture as it melts during baking, which is integral to the crumble topping. If your butter is too warm, the mixture will become too soft and lose that desirable crumbly texture. Once your mixture is properly combined, you should be able to pinch it together, and it should hold its shape. Aim for a balance between the butter and dry ingredients to create a rich and flavorful topping.
Assembling the Bars
With your crust and topping ready, it’s time to assemble the bars. Preheat your oven to 350°F (175°C) and prepare a 9×13 inch baking pan by greasing it lightly or lining it with parchment paper.
Tips for Layering the Filling and Crust for Even Distribution
Begin by reserving about one-third of your crumble mixture for the topping. Press the remaining two-thirds firmly into the bottom of your prepared baking pan. Ensuring an even layer at this stage is crucial for structural integrity, as it will hold the filling in place.
Once the crust is evenly pressed into the pan, it’s time to add the cherry filling. Pour your prepared cherry filling over the crust, spreading it out evenly with a spatula. This helps to ensure that every bite has a sweet burst of cherry flavor.
Finally, sprinkle the reserved crumble mixture over the cherry filling. Try to distribute it as evenly as possible, covering the filling without leaving large gaps. This will create a beautiful topping that bakes up golden and crisp.
Importance of Pressing the Crust Firmly for Structural Integrity
Pressing the crust firmly not only helps with structural integrity but also prevents it from crumbling apart when you cut the bars. A well-pressed crust acts like a sturdy foundation, supporting the juicy filling and crumbly topping above.
Baking to Perfection
Now that your Cherry Pie Crumble Bars are assembled, it’s time to bake them to perfection. Place the pan in the preheated oven and set your timer.
Recommended Baking Times and Temperatures
Bake the bars at 350°F (175°C) for 30 to 35 minutes. Keep an eye on them as they approach the end of the baking time. You want to see a beautiful golden-brown color on the topping, and the cherry filling should be bubbling slightly around the edges.
Signs to Look for to Determine When the Bars Are Done
To check for doneness, insert a toothpick into the center of the bars. It should come out clean or with just a few moist crumbs clinging to it. If you see wet batter, give them a few more minutes in the oven. Remember, every oven is different, so slight adjustments may be necessary based on your specific appliance.
Cooling and Serving Suggestions
Once your bars are perfectly baked, remove them from the oven and allow them to cool in the pan for about 10-15 minutes. Then, transfer them to a wire rack for complete cooling.
Importance of Cooling for the Best Texture
Cooling is an essential step in ensuring the bars maintain their structure. If you try to cut them while they are still warm, the filling may ooze out, resulting in a messy presentation. Allowing the bars to cool completely enhances their texture, making them easier to slice and serve.
Creative Serving Ideas
When it comes to serving your Cherry Pie Crumble Bars, the possibilities are endless. For an indulgent treat, consider pairing them with a scoop of vanilla ice cream or a dollop of whipped cream. The creamy textures complement the tart cherry filling beautifully. Alternatively, fresh fruit, like strawberries or raspberries, can add a refreshing contrast to the sweetness of the bars.
For a unique twist, serve the bars with a drizzle of caramel sauce or a sprinkle of powdered sugar on top. These additions can elevate your dessert and impress your guests.
Storage Tips to Maintain Freshness and Flavor
To store your Cherry Pie Crumble Bars, cut them into squares and place them in an airtight container. They can be kept at room temperature for up to three days. For longer storage, consider refrigerating them, where they can last for up to a week. If you wish to keep them even longer, you can freeze the bars. Just make sure to wrap them tightly in plastic wrap and aluminum foil before placing them in the freezer. They will maintain their flavor and texture for up to three months.
Nutritional Information
These Cherry Pie Crumble Bars not only satisfy your sweet tooth but also provide some nutritional benefits. Each bar is a delightful mix of carbohydrates, fiber, and essential vitamins from the cherries.
Overview of the Nutritional Profile of Cherry Pie Crumble Bars
A typical serving contains approximately 200-250 calories, depending on how you cut the bars and the specific ingredients used. They offer a good balance of sweetness and tartness, making them a perfect dessert option without being overly indulgent.
Discussion on Potential Variations for Dietary Preferences
If you have dietary preferences or restrictions, there are several ways to adapt this recipe. For a gluten-free version, substitute regular flour with a gluten-free all-purpose blend. You can also use gluten-free oats to maintain the integrity of the crumble topping. For a vegan option, replace the butter with coconut oil or a vegan butter substitute, and use a flax egg or applesauce in place of the egg in the cherry filling if needed.
Highlight the Balance of Indulgence and Nutrition in This Dessert
These Cherry Pie Crumble Bars strike a lovely balance between indulgence and nutrition. While they are certainly a treat, the use of whole ingredients and fruit helps to make them a more wholesome dessert choice. Enjoying them in moderation allows you to indulge without straying too far from healthy eating habits.
Conclusion
In summary, making Cherry Pie Crumble Bars is a rewarding experience that brings joy not only to the baker but also to everyone who gets to enjoy them. Their delightful combination of sweet-tart cherries and crumbly topping makes them a hit at any gathering, from casual family dinners to festive celebrations.
These bars are not just a dessert; they are a way to create memories and share love through baking. Whether you’re making them for a special occasion or just to enjoy at home, they are sure to please a crowd. So gather your ingredients, embrace the baking process, and savor the delicious results of your hard work. Enjoy the process of baking and sharing these delightful bars with your loved ones – a treat that truly brings everyone together.