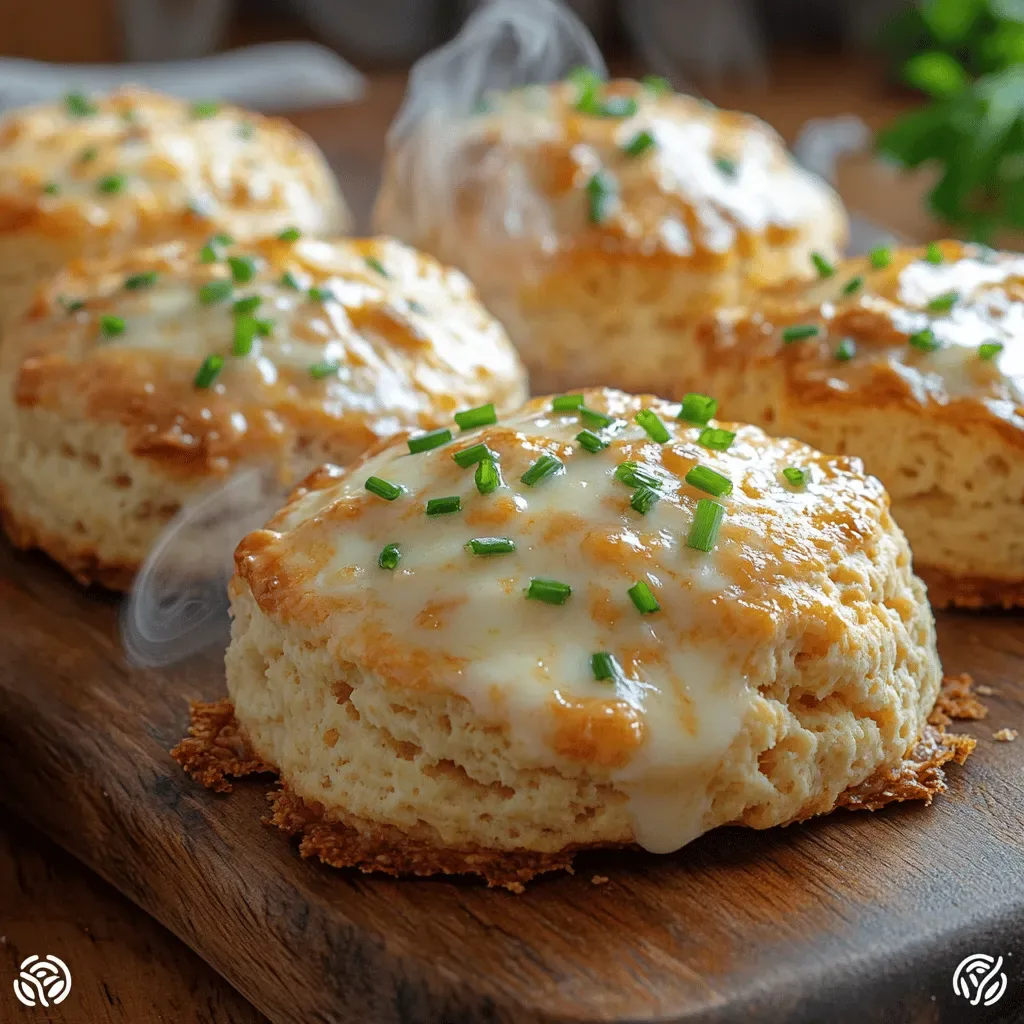
Imagine biting into a warm, flaky scone that bursts with sharp cheddar, fresh chives, and just the right hint of pepper. This Savory Cheddar Chive Scones recipe delivers that experience every single time, turning a humble snack into a star‑worthy treat.
What sets these scones apart is the balance between a tender crumb and a slightly crisp edge, achieved by chilling the butter and handling the dough just enough to keep it light. The generous amount of sharp cheddar adds depth, while the chives lend a bright, herbaceous lift.
Perfect for brunch, afternoon tea, or a quick bite before dinner, these scones will please both cheese lovers and herb enthusiasts alike. Serve them warm from the oven, paired with a dollop of sour cream or a drizzle of honey‑mustard for extra indulgence.
The process is straightforward: mix dry ingredients, cut in cold butter, stir in cheese and chives, then combine with a buttermilk‑egg wash before baking until golden. In just 35 minutes you’ll have a batch of irresistible scones ready to share.
Why You'll Love This Recipe
Bold Cheese Flavor: Sharp cheddar melts into the dough, creating pockets of gooey richness that keep every bite exciting and satisfying.
Herb‑Fresh Finish: Fresh chives add a subtle oniony brightness that cuts through the cheese, delivering a perfectly balanced savory profile.
Quick & Easy: With minimal prep and a single bake, these scones fit seamlessly into busy mornings or last‑minute gatherings without compromising taste.
Versatile Serving: Enjoy them plain, with a smear of butter, or paired with soups and salads—these scones adapt to any occasion.
Ingredients
The foundation of a great scone is a simple, well‑balanced ingredient list. Flour provides structure, while a leavening agent gives lift. Cold butter creates flaky layers, and the combination of sharp cheddar and fresh chives delivers the signature savory punch. Buttermilk adds tenderness and a slight tang, and a beaten egg helps bind everything together for a cohesive dough.
Dry Ingredients
- 2 cups (250 g) all‑purpose flour
- 1 tablespoon baking powder
- ½ teaspoon kosher salt
- ¼ teaspoon freshly ground black pepper
Fat & Cheese
- ½ cup (115 g) cold unsalted butter, cubed
- 1 ½ cups (170 g) sharp cheddar cheese, grated
Wet Ingredients & Herbs
- ¾ cup (180 ml) cold buttermilk
- 1 large egg, lightly beaten
- ¼ cup (15 g) fresh chives, finely chopped
Each component plays a specific role: the cold butter creates steam pockets that puff the scones, while the buttermilk’s acidity tenderizes the gluten for a soft crumb. The sharp cheddar supplies a robust, salty depth, and the chives add a fresh, slightly pungent note that lifts the overall flavor. Together, they form a harmonious, savory bite that’s perfect on its own or paired with a spread.
Step-by-Step Instructions
Preparing the Dry Mix
In a large bowl whisk together flour, baking powder, salt, and black pepper. This ensures even distribution of the leavening agent and seasoning, which is crucial for a uniform rise and balanced flavor throughout each scone.
Incorporating Butter
Add the cold, cubed butter to the dry mixture. Using a pastry cutter or two forks, cut the butter into the flour until the pieces resemble coarse pea‑size crumbs. The cold butter pockets will melt during baking, creating steam that lifts the dough and yields a flaky texture.
Adding Cheese & Chives
Stir in the grated sharp cheddar and chopped chives, distributing them evenly. The cheese should be folded gently to avoid over‑mixing, which can cause the dough to become tough. The chives release their aromatic oils, infusing the scones with fresh herbaceous notes.
Forming the Wet Mixture
In a separate cup, whisk together the cold buttermilk and the beaten egg. The acidity of the buttermilk reacts with the baking powder, giving the scones a light rise, while the egg adds structure and a subtle richness.
Combining Wet and Dry
- Make a well. Create a well in the center of the dry ingredients and pour in the buttermilk‑egg mixture. Gently stir with a wooden spoon until the dough just comes together; it should look slightly shaggy and a little sticky.
- Turn out the dough. Transfer the dough onto a lightly floured surface. Pat it into a 1‑inch thick rectangle without over‑kneading—overworking will develop gluten and make the scones dense.
- Cut the scones. Using a 2‑inch round cutter, press down firmly and twist slightly to release each scone. Gather the scraps, reshape, and cut again until all dough is used. This method ensures even size and consistent baking.
- Brush with egg wash. Lightly brush the tops with a little extra beaten egg. This creates a glossy, golden crust that’s visually appealing and adds a subtle crispness.
- Bake. Place the scones on a parchment‑lined baking sheet and bake in a preheated 425°F (220°C) oven for 18‑20 minutes, or until the tops are deep golden and a toothpick inserted into the center comes out clean. The high heat encourages rapid rise and a beautiful crust.
Finishing Touches
Remove the scones from the oven and let them cool on a wire rack for 5 minutes. This brief rest lets the interior set while the crust stays crisp. Serve warm, optionally with a pat of butter or a dollop of sour cream for extra indulgence.
Tips & Tricks
Perfecting the Recipe
Keep Everything Cold. Chill the butter, buttermilk, and even the mixing bowl. Cold ingredients trap steam, which is essential for flaky layers.
Don’t Over‑Mix. Mix just until the dough comes together. Over‑mixing develops gluten, leading to a tough texture instead of a tender crumb.
Use Sharp Cheddar. Aged cheddar melts beautifully and provides the bold flavor that defines these scones.
Pre‑heat the Oven. A fully heated oven ensures the scones rise quickly, creating a light interior and a crisp top.
Flavor Enhancements
Add a pinch of smoked paprika to the dry mix for a subtle smoky undertone, or fold in a tablespoon of caramelized onions for sweet depth. A light drizzle of honey‑mustard on the warm scones adds a delightful contrast to the savory cheese.
Common Mistakes to Avoid
Avoid letting the dough sit at room temperature for too long; it can become too soft and lose its ability to create flaky layers. Also, resist the urge to use too much flour when shaping—excess flour dries out the dough and yields dense scones.
Pro Tips
Use a Lightly Floured Bench. Sprinkle just enough flour to prevent sticking; too much will alter the dough’s moisture balance.
Brush with Milk Instead of Egg. For a softer, matte finish, use a quick milk wash rather than egg wash.
Freeze Unbaked Scones. Shape and freeze the raw scones on a tray, then transfer to a bag. Bake from frozen, adding a couple of minutes to the bake time.
Serve Immediately. Scones are at their best within 15 minutes of leaving the oven; they lose their crispness as they cool.
Variations
Ingredient Swaps
Swap the sharp cheddar for Gruyère or smoked Gouda for a different flavor profile. Replace chives with finely chopped rosemary or thyme for an herbaceous twist. For a spicy kick, stir in a teaspoon of finely diced jalapeño or a pinch of cayenne pepper.
Dietary Adjustments
Use a gluten‑free all‑purpose flour blend and ensure the baking powder is gluten‑free to accommodate gluten‑intolerant guests. Substitute butter with a plant‑based margarine and choose a dairy‑free cheese alternative for a vegan version. For low‑carb, replace flour with almond flour and reduce the cheese amount slightly.
Serving Suggestions
Pair these scones with a dollop of herbed cream cheese, a spoonful of smoked salmon mousse, or a simple arugula salad tossed in lemon vinaigrette. For brunch, serve alongside poached eggs and a light hollandaise. A warm cup of tea or a cold glass of cider complements the savory richness beautifully.
Storage Info
Leftover Storage
Allow the scones to cool completely, then place them in an airtight container or resealable bag. Store in the refrigerator for up to 3 days. For longer keeping, freeze the cooled scones on a tray, then transfer to a freezer‑safe bag; they’ll maintain quality for up to 2 months.
Reheating Instructions
Reheat refrigerated scones in a preheated 350°F (175°C) oven for 8‑10 minutes, or until warmed through and the crust regains its crispness. For frozen scones, bake directly from frozen at 375°F (190°C) for 12‑15 minutes. A quick microwave burst works in a pinch, but the oven method preserves texture best.
Frequently Asked Questions
This Savory Cheddar Chive Scones recipe blends bold cheese, fresh herbs, and a light, flaky texture into a snack that feels both comforting and sophisticated. By following the detailed steps, using the tips provided, and experimenting with the suggested variations, you’ll master a versatile scone that shines at any gathering. Feel free to add your own twists—cooking is an adventure, after all. Enjoy the warm, cheesy goodness straight from the oven!