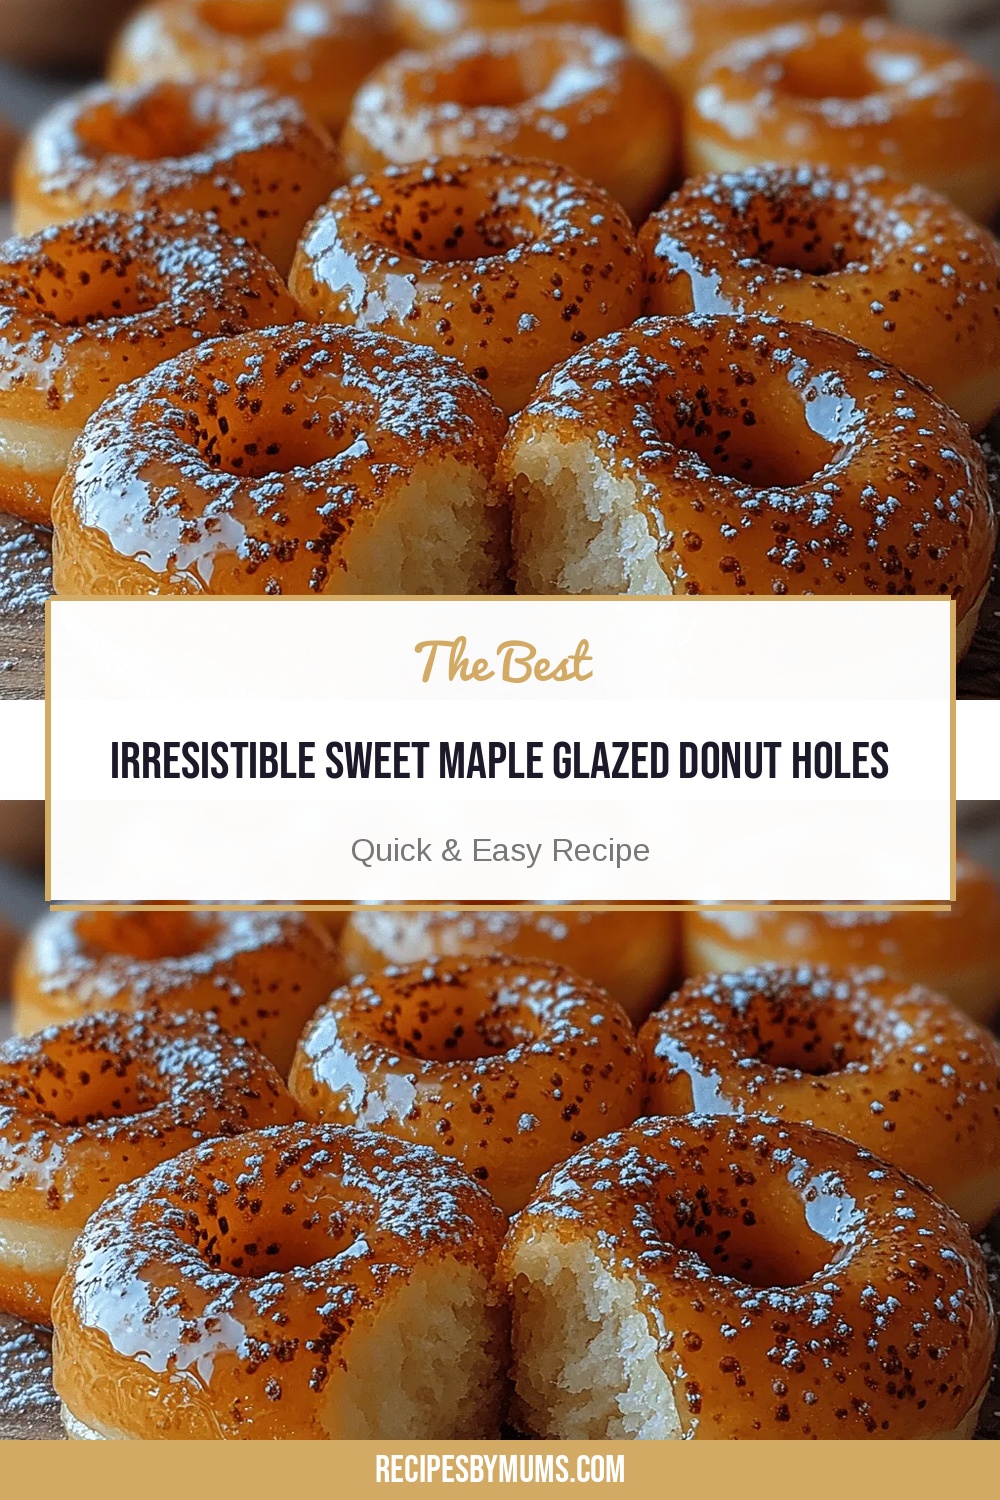
Irresistible Sweet Maple Glazed Donut Holes
 Save
Save
Imagine biting into a warm, pillowy donut hole that bursts with buttery sweetness and a glossy maple glaze—pure comfort in a bite-sized treat. These Irresistible Sweet Maple Glazed Donut Holes capture that nostalgic feeling while delivering a sophisticated flavor profile.
What makes them stand out is the perfect balance between a tender, yeast‑free dough and a glaze that’s simultaneously buttery, caramel‑rich, and lightly salty, creating depth without overwhelming sweetness.
Everyone from kids craving a fun snack to adults seeking a refined brunch addition will adore these donut holes. Serve them at holiday gatherings, weekend brunches, or as an indulgent after‑dinner treat.
The process is straightforward: mix a simple dough, pipe or spoon into bite‑size balls, fry until golden, then coat them in a quick maple glaze that sets with a beautiful sheen. Ready in under 40 minutes, they’re perfect for any occasion.
Why You'll Love This Recipe
Quick & Satisfying: From mixing to glazing, the entire recipe wraps up in under 40 minutes, giving you a fast‑track indulgence without sacrificing flavor.
Perfect Texture: The dough stays light and airy inside while the exterior stays crisp, creating that classic donut‑hole bite that’s both soft and slightly crunchy.
Maple Magic: Real maple syrup provides a natural, caramel‑like sweetness that pairs beautifully with a pinch of sea salt for a sophisticated flavor contrast.
Customizable: The base recipe welcomes endless tweaks—add cinnamon, nutmeg, or even a splash of bourbon for a personalized twist.
Tips & Tricks
Perfecting the Recipe
Temperature control. Keep oil at a steady 350°F; too hot will burn the glaze, too cool will make the holes greasy.
Uniform sizing. Use a consistent scoop size so all holes fry evenly and finish at the same time.
Rest the batter. A brief rest activates the leavening, giving a lighter crumb without extra eggs.
Flavor Enhancements
Add a dash of ground cinnamon or nutmeg to the batter for warm spice notes. For an adult twist, stir a tablespoon of bourbon into the glaze; the alcohol evaporates, leaving a subtle depth. Finish with a drizzle of melted dark chocolate for an indulgent contrast.
Common Mistakes to Avoid
Avoid over‑mixing the batter; it creates a tough texture. Also, never add the glaze while the holes are still steaming hot, as the heat can melt the glaze into a runny sauce rather than a glossy coating.
Pro Tips
Use a candy thermometer. Precise oil temperature is the secret to a perfectly crisp exterior without excess oil absorption.
Glaze in batches. Coat a few holes at a time to prevent the glaze from cooling too quickly and becoming grainy.
Dry the holes briefly. Pat the freshly fried holes with a paper towel before glazing to remove surface oil, ensuring the glaze adheres.
Variations
Ingredient Swaps
Substitute whole‑milk butter with coconut oil for a subtle tropical note, or use almond flour for a gluten‑free base. Maple syrup can be swapped for honey or agave nectar if you prefer a different sweetness profile. Adding finely chopped toasted pecans to the glaze adds crunch and nutty flavor.
Dietary Adjustments
For a vegan version, replace butter with a plant‑based margarine and use a flax‑egg (1 Tbsp ground flaxseed + 3 Tbsp water). Use oat or soy milk instead of dairy. To keep it low‑carb, swap the flour for almond flour and use a sugar‑free powdered sweetener in the glaze.
Serving Suggestions
Pair the donut holes with a dollop of vanilla Greek yogurt or a scoop of vanilla ice cream for a dessert‑style treat. They also shine on a brunch platter alongside fresh berries, whipped cream, and a hot cup of coffee. For a festive twist, drizzle with chocolate and sprinkle crushed peppermint.
Storage Info
Leftover Storage
Allow glazed donut holes to cool completely, then store them in an airtight container lined with parchment. Refrigerate for up to 3 days. For longer keeping, freeze in a single layer on a tray, then transfer to a zip‑top bag; they’ll last up to 2 months without losing texture.
Reheating Instructions
Reheat refrigerated holes in a 350°F oven for 5‑7 minutes, uncovered, to restore crispness. If frozen, bake from frozen at 350°F for 10‑12 minutes. Avoid microwaving, which can make the glaze soggy; if you must, use a low‑power setting and add a fresh drizzle of glaze afterward.
Frequently Asked Questions
Can I make the donut holes ahead of time and glaze them later?
What oil is best for frying these donut holes?
How can I make the glaze extra shiny?
Can I bake instead of fry for a healthier version?
This recipe delivers a perfect marriage of fluffy interiors and a luscious maple glaze, all in a bite‑size format that’s easy to share. With clear steps, helpful tips, and plenty of ways to customize, you’ll feel confident making these donut holes for any occasion. Feel free to experiment with spices, toppings, or alternative flours—cooking is an adventure, and these treats are your canvas. Enjoy the sweet satisfaction of homemade maple‑glazed perfection!
Irresistible Sweet Maple Glazed Donut Holes
Delicious Irresistible Sweet Maple Glazed Donut Holes
Ingredients
Main Ingredients
- 1 ½ cups all‑purpose flour
- ¼ cup granulated sugar
- 2 teaspoons baking powder
- ¼ teaspoon salt
- ½ cup whole‑milk butter, melted
- ½ cup whole milk, warmed
- 1 large egg, lightly beaten
Maple Glaze
- ½ cup pure maple syrup
- ¼ cup unsalted butter
- 1 cup powdered sugar, sifted
- ½ teaspoon vanilla extract
- Pinch of flaky sea salt
Instructions
Preparing the Dough
- Rest the batter. Let the mixture sit for 5 minutes. This allows the baking powder to activate, creating tiny air pockets that will expand during frying, ensuring a light interior.
- Heat the oil. Fill a deep‑fat fryer or a heavy pot with about 2 inches of neutral oil (vegetable or canola). Heat to 350°F (175°C); a kitchen thermometer is essential for consistency.
- Shape the holes. Using a small ice‑cream scoop or two teaspoons, drop rounded mounds of batter (about 1‑inch diameter) into the hot oil, spacing them to avoid crowding.
Frying the Donut Holes
- Drain and cool. Using a slotted spoon, transfer the donut holes to a wire rack set over a baking sheet. Sprinkle lightly with a pinch of salt while still hot to enhance flavor.
- Prepare for glazing. Let the holes rest for 2 minutes; this short pause prevents the glaze from melting the interior too quickly.
Making the Maple Glaze
- Adjust consistency. If the glaze is too thick, whisk in a teaspoon of warm milk; if too thin, add a little more powdered sugar. It should coat the back of a spoon without running.
- Glaze the holes. Dip each warm donut hole into the glaze, allowing excess to drip back into the bowl. Place glazed holes back on the wire rack to set; the glaze will firm slightly within a minute.
Similar Recipes
 Desserts
Tropical Mango Panna Cotta: An Incredible 5-Star Recipe
Learn how to make delicious Tropical Mango Panna Cotta: An Incredible 5-Star Recipe. Easy recipe with…
 Desserts
Chocolate Peanut Butter Oat Delight Cookies
Delicious Chocolate Peanut Butter Oat Delight Cookies
 Desserts
Cherry Bliss Bites Recipe: A Delightful Dessert Experience
Delicious Cherry Bliss Bites Recipe: A Delightful Dessert Experience
 Desserts
23 Enge Spider Cupcakes Recept Voor Halloween Plezier
Learn how to make delicious 23 Enge Spider Cupcakes Recept Voor Halloween Plezier. Easy recipe with…
 Desserts
Zesty Blueberry Lemon Delight Loaf: A Perfectly Refreshing Treat
Delicious Zesty Blueberry Lemon Delight Loaf: A Perfectly Refreshing Treat
 Desserts
Creamy Custard Mochi Balls: Delightfully Chewy and Smooth
Learn how to make delicious Creamy Custard Mochi Balls: Delightfully Chewy and Smooth. Easy recipe with…
 Desserts
Tropical Bliss Pineapple Condensed Milk Cake Recipe
Delicious Tropical Bliss Pineapple Condensed Milk Cake Recipe
 Desserts
Blue Christmas Truffles
Learn how to make delicious Blue Christmas Truffles. Easy recipe with step-by-step instructions.

Victoria
I cook these recipes at home before they ever land here — simple ingredients, clear steps.