Irresistible Cheesy Pepperoni Pizza Bombs
 Save
Save
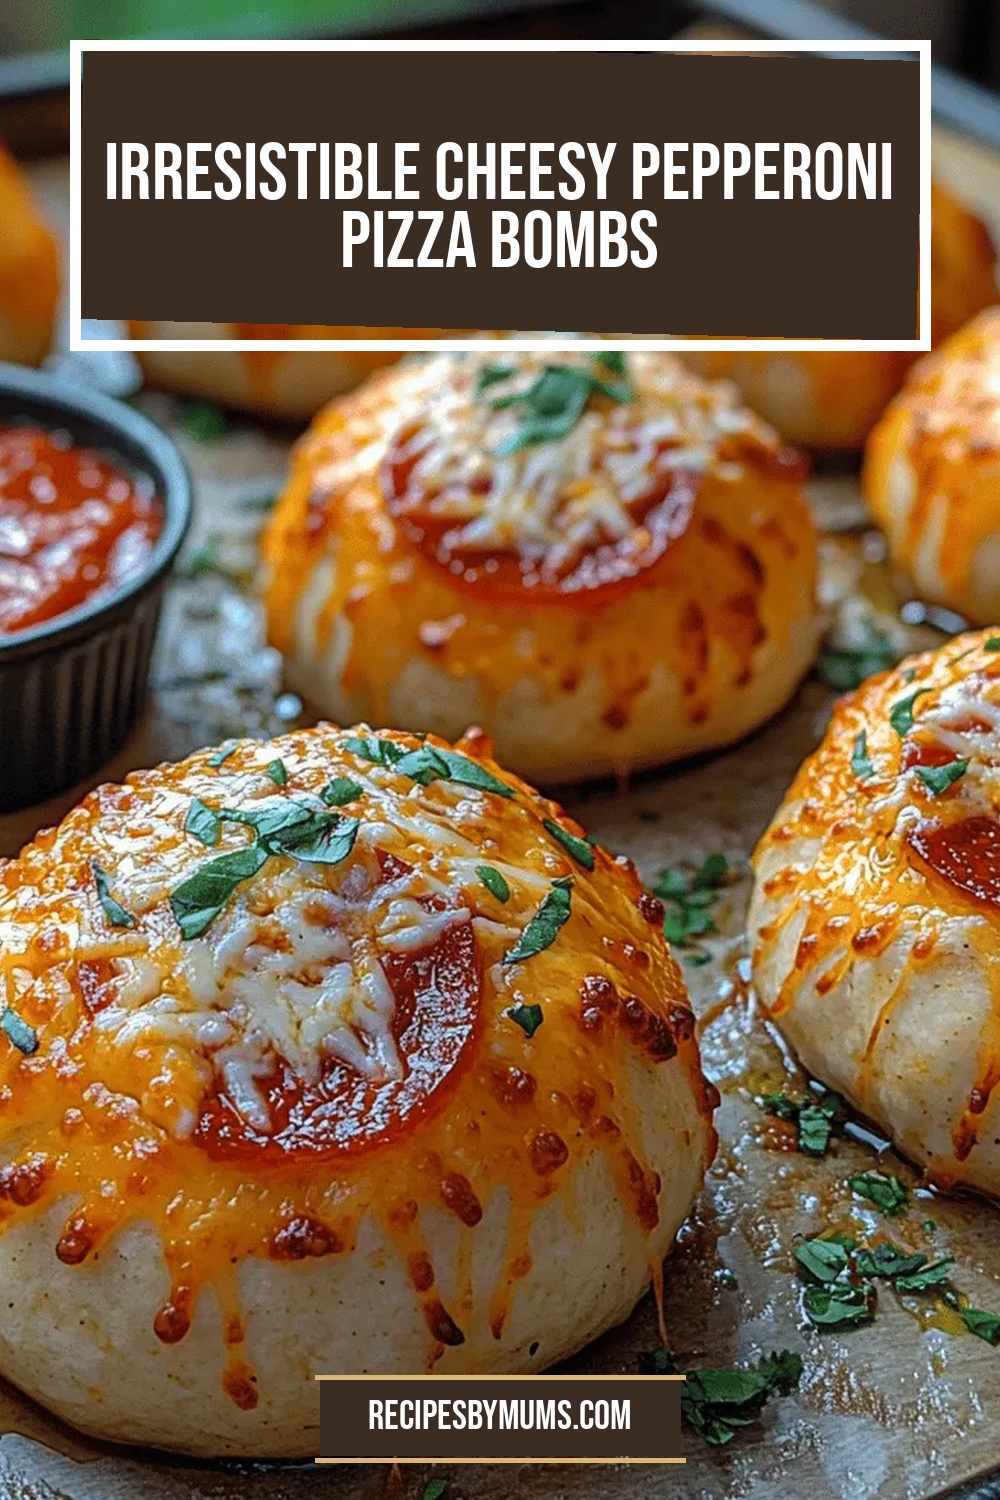
Imagine biting into a golden‑brown pocket that oozes molten mozzarella, pepperoni, and a hint of herb‑infused sauce—all in one handheld bite. Irresistible Cheesy Pepperoni Pizza Bombs turn a classic pizza night into a playful brunch experience that feels both indulgent and surprisingly easy.
What makes these bombs special is the marriage of a buttery, flaky dough with a rich, cheesy filling that mimics the flavors of a pizzeria without the oven‑to‑table wait. The pepperoni crisps just enough to add a smoky bite, while the cheese stretches like a dream.
This dish is perfect for families, brunch crowds, or anyone who loves comfort food with a twist. Serve them at weekend brunches, lazy Saturday mornings, or as a crowd‑pleasing appetizer at a casual get‑together.
The process is straightforward: roll out dough, layer pepperoni and cheese, seal, bake, and finish with a quick brush of garlic‑butter. In under half an hour you’ll have a tray of bubbling, aromatic pizza bombs ready to devour.
Why You'll Love This Recipe
Hand‑Held Pizza Perfection: Each bomb captures the classic pizza flavor profile in a bite‑size, mess‑free package, making it ideal for brunch tables where forks aren’t always handy.
Fast & Foolproof: With a simple roll‑stuff‑seal method, even novice cooks can achieve a golden crust and melty interior without any fancy equipment.
Customizable Crunch: The pepperoni can be swapped for sausage, bacon, or veggies, letting you tailor the texture and flavor to any palate.
Brunch‑Ready Energy Boost: The combination of protein, cheese, and carbs delivers a satisfying start to the day, keeping hunger at bay until lunch.
Tips & Tricks
Perfecting the Recipe
Cold Dough Works Best: Keep the dough chilled until just before you roll it out. Cold dough is less sticky and yields a flakier crust after baking.
Don’t Overfill: A thin layer of cheese prevents the dough from tearing and ensures the seam stays sealed during the high‑heat bake.
Use a Light Hand on Butter: Too much butter can cause the bombs to spread; brush just enough to coat the surface for a crisp finish.
Watch the Color: When the edges turn a deep golden‑brown, the interior cheese is guaranteed to be perfectly melted.
Flavor Enhancements
For an extra pop, drizzle a teaspoon of hot honey over the finished bombs. Sprinkle a pinch of smoked paprika on the butter glaze before baking, or fold a few thin strips of roasted red pepper into the cheese mixture for a sweet‑savory twist.
Common Mistakes to Avoid
Skipping the sealing step often leads to cheese oozing out and a soggy bottom. Also, avoid baking at a temperature lower than 400°F; the lower heat won’t create the crisp, puffed edge that defines a good bomb.
Pro Tips
Pre‑heat the Baking Sheet: Placing the dough on a hot sheet gives an instant lift, mimicking a pizza stone’s effect.
Use a Light Dusting of Cornmeal: It prevents sticking and adds a subtle crunch to the bottom.
Invest in a Good Thermometer: If you’re unsure about doneness, a quick probe into the center should read 165°F for safe pork‑based pepperoni.
Serve Immediately: The cheese stretches best while hot; reheating will diminish that signature pull.
Variations
Ingredient Swaps
Swap pepperoni for spicy chorizo, crumbled breakfast sausage, or thin‑sliced ham for a different protein profile. Replace mozzarella with a blend of cheddar and Monterey Jack for a sharper bite, or add a spoonful of ricotta for extra creaminess inside each bomb.
Dietary Adjustments
For a gluten‑free version, use a certified gluten‑free pizza dough or make a simple almond‑flour crust. To keep it dairy‑free, substitute the cheese with a high‑melting vegan mozzarella and use olive oil instead of butter for the glaze. Keto diners can replace the dough with a low‑carb cauliflower crust.
Serving Suggestions
Pair the bombs with a simple arugula salad dressed in lemon vinaigrette for a peppery contrast. A side of roasted potatoes or sweet potato hash adds heartiness, while fresh fruit or a citrus‑y yogurt parfait balances the richness for a complete brunch spread.
Storage Info
Leftover Storage
Allow any leftovers to cool to room temperature, then place them in an airtight container. Store in the refrigerator for up to 3 days. For longer keeping, arrange the cooled bombs in a freezer‑safe bag, separate with parchment, and freeze for up to 2 months.
Reheating Instructions
Reheat refrigerated bombs in a 350°F oven, covered with foil, for 10‑12 minutes, then uncover for the final 3 minutes to restore crispness. From the freezer, bake at 375°F for 18‑20 minutes, covering halfway through. A microwave works in a pinch—heat 30‑second bursts, adding a splash of broth to keep them moist.
Frequently Asked Questions
Can I make these pizza bombs ahead of time?
What if I don’t have pizza dough on hand?
How do I keep the cheese from leaking out while baking?
This Cheesy Pepperoni Pizza Bomb recipe delivers bold pizza flavor in a handheld, brunch‑ready package. With clear steps, storage tips, and plenty of variations, you have everything needed to master the dish and make it your own. Feel free to experiment with cheeses, proteins, or spices—cooking is an adventure, after all. Serve them hot, watch the cheese stretch, and enjoy every delicious bite!
Irresistible Cheesy Pepperoni Pizza Bombs
Delicious Irresistible Cheesy Pepperoni Pizza Bombs
Ingredients
Dough & Base
- 1 (12‑ounce) package refrigerated pizza dough
- 2 tablespoons unsalted butter, melted
Cheese & Filling
- 1 cup shredded mozzarella cheese
- ½ cup shredded provolone cheese
- 12 thin‑sliced pepperoni rounds
Seasonings & Finish
- 1 teaspoon dried oregano
- ½ teaspoon garlic powder
- ¼ teaspoon red pepper flakes (optional)
- Fresh parsley, chopped (for garnish)
Instructions
Assembling the Bombs
- Cut the Dough. Using a sharp knife or pizza cutter, divide the flattened dough into 8 equal squares (approximately 4×4 inches each). Uniform squares help seal the edges properly and give a consistent bite size.
- Layer the Filling. Place 2 pepperoni slices in the center of each square, then sprinkle a generous pinch of mozzarella and provolone on top. The cheese should lightly cover the pepperoni but still leave room for the dough to fold over.
- Seal the Edges. Fold each square in half diagonally, forming a triangle, then press the edges together with your fingertips. Crimp the seam by running a fork along the edge to ensure a tight seal that prevents cheese from leaking during baking.
- Brush with Butter. Mix the melted butter with garlic powder, oregano, and red pepper flakes. Brush each sealed bomb generously; this step creates a glossy, golden crust and infuses the outer layer with aromatic flavor.
- Bake to Perfection. Arrange the bombs on a parchment‑lined baking sheet, leaving a small gap between each. Bake in a preheated 400°F (200°C) oven for 15‑18 minutes, or until the tops are deep golden and the cheese inside is bubbling. A visual cue: the edges should be crisp and slightly puffed.
Similar Recipes
 Appetizers
Fresh Cottage Cheese Salad Recipe
Crisp greens, juicy tomatoes, and creamy cottage cheese combine for a bright, protein‑packed salad.
 Appetizers
Cheesy Chili Baked Potato Bites: The Ultimate Comfort Food
Delicious Cheesy Chili Baked Potato Bites: The Ultimate Comfort Food
 Appetizers
Cheesy Zucchini Fritters: A Delicious and Versatile Dish
Delicious Cheesy Zucchini Fritters: A Delicious and Versatile Dish
 Appetizers
Spinach Artichoke Chicken Dip: 7 Reasons You’ll Love It
Learn how to make delicious Spinach Artichoke Chicken Dip: 7 Reasons You’ll Love It. Easy recipe…
 Appetizers
Crunchy Mini Chicken Fajita Taco Cones: The Ultimate Guide to Flavorful Fun
Delicious Crunchy Mini Chicken Fajita Taco Cones: The Ultimate Guide to Flavorful Fun
 Appetizers
Flammkuchen-Style Stuffed Potatoes: A Delicious Twist on a Classic
Delicious Flammkuchen-Style Stuffed Potatoes: A Delicious Twist on a Classic
 Appetizers
Slow Cooker Jalapeño Corn Dip Recipe: Creamy, Cheesy, Spicy Perfection
Learn how to make delicious Slow Cooker Jalapeño Corn Dip Recipe: Creamy, Cheesy, Spicy Perfection. Easy…
 Appetizers
Sizzling Spicy Korean BBQ Meatballs: A Flavorful Journey
Delicious Sizzling Spicy Korean BBQ Meatballs: A Flavorful Journey

Victoria
I cook these recipes at home before they ever land here — simple ingredients, clear steps.