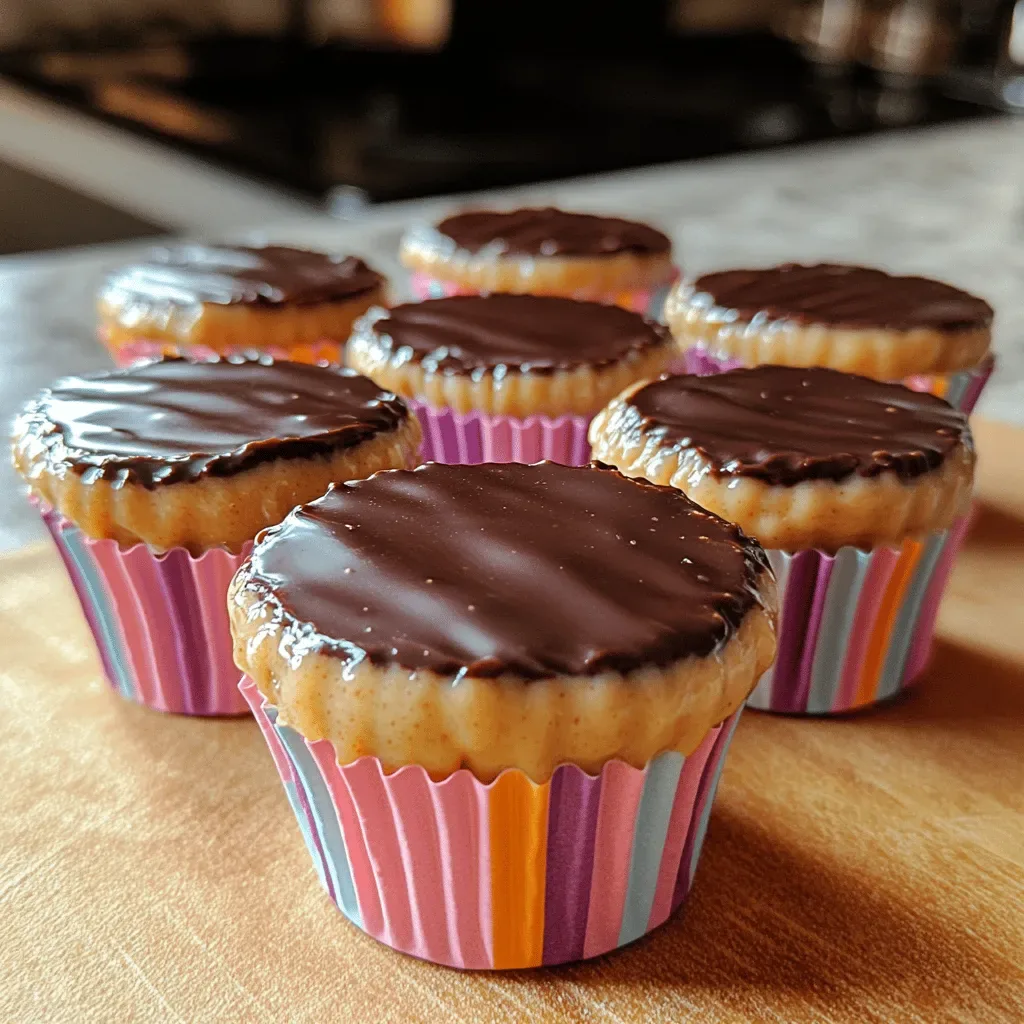
Imagine biting into a silky, tangy frozen yogurt center wrapped in a glossy dark chocolate shell, all crowned with a ribbon of natural peanut butter. That moment of pure, guilt‑free indulgence is exactly what the Frozen Yogurt Peanut Butter Cups deliver, turning a classic confection into a healthier, protein‑packed treat.
What makes this recipe stand out is the clever use of Greek‑style frozen yogurt, which provides the creamy texture of ice cream while slashing sugar and fat. Paired with antioxidant‑rich dark chocolate and heart‑healthy peanut butter, each bite feels decadent without the usual after‑taste of excess sweetness.
This dessert will win over fitness enthusiasts, parents looking for a kid‑friendly snack, and anyone craving a sweet finish after dinner. Serve it as a light finale to a dinner party or as a midday pick‑me‑up when you need a little boost.
The process is straightforward: melt chocolate, form shells in silicone molds, blend a simple frozen yogurt mixture, swirl in peanut butter, and let everything set in the freezer. With just a handful of ingredients and minimal equipment, you’ll have a freezer‑ready indulgence in under an hour.
Why You'll Love This Recipe
Guilt‑Free Sweetness: By swapping traditional ice cream for frozen yogurt, you cut calories and sugar while keeping the creamy mouthfeel you love.
Protein Power: Greek‑style frozen yogurt and peanut butter add a solid protein punch, making these cups a satisfying snack that fuels recovery.
Simple Ingredient List: Only seven core ingredients are needed, all of which are pantry‑friendly and easy to source.
Make‑Ahead Friendly: Once frozen, the cups keep for weeks, so you can prepare a batch ahead of a busy week or a special gathering.
Ingredients
The success of these frozen yogurt peanut butter cups hinges on a few high‑quality components. Dark chocolate provides a rich, slightly bitter shell that balances the tang of the yogurt. Greek‑style frozen yogurt brings a thick, creamy texture with a boost of protein. Finally, natural peanut butter adds a salty, nutty contrast that ties the flavors together. Optional sweeteners let you fine‑tune the level of sweetness without compromising the health‑forward focus.
Chocolate Shell
- 8 ounces (225 g) dark chocolate (70% cacao)
- 1 tablespoon coconut oil (optional, for shine)
Frozen Yogurt Filling
- 2 cups plain Greek‑style frozen yogurt
- 2 tablespoons honey or maple syrup (adjust to taste)
- ½ teaspoon vanilla extract
Peanut Butter Swirl
- ¼ cup natural creamy peanut butter
- 1 tablespoon powdered sugar (optional, for a smoother swirl)
These ingredients work together to create a balanced treat. The chocolate solidifies quickly, forming a sturdy cup that holds the frozen yogurt without cracking. The yogurt mixture stays soft enough to scoop yet firm enough to hold its shape when frozen. A dab of peanut butter adds richness and a visual swirl that makes each cup look as good as it tastes. Adjust the sweetener level to suit your palate, keeping the overall sugar load modest.
Step-by-Step Instructions
Melt the Chocolate
Place the dark chocolate and coconut oil in a heat‑proof bowl. Set the bowl over a pot of simmering water (double‑boiler method) and stir until fully melted and glossy, about 3‑4 minutes. Removing the bowl from heat once smooth prevents scorching and ensures a glossy finish that will harden into a crisp shell.
Form the Chocolate Cups
- Coat the Molds. Using a silicone muffin or candy mold, spoon a thin layer of melted chocolate into each cavity, tilting the mold to coat the sides evenly. The chocolate should be about 1‑2 mm thick; a thin shell freezes faster and stays crisp.
- Set the Base. Place the filled molds on a parchment‑lined tray and refrigerate for 5‑7 minutes, or until the chocolate is firm enough to handle without breaking.
- Build a Second Layer. Add a second spoonful of chocolate to each cup, again swirling to cover the sides. This reinforces the shell, preventing cracks when the frozen yogurt expands during freezing.
- Freeze the Shells. Transfer the molds to the freezer for at least 15 minutes, allowing the chocolate to fully harden before filling.
Prepare the Yogurt Filling
In a medium bowl, whisk together the frozen yogurt, honey (or maple syrup), and vanilla extract until smooth and slightly softened. This step prevents icy pockets and creates a uniform texture that will freeze evenly inside the chocolate cups.
Add Peanut Butter Swirl
- Warm the Peanut Butter. Microwave the peanut butter for 10‑15 seconds, just until pourable. Stir in powdered sugar if you desire a smoother, less sticky swirl.
- Fill the Cups. Spoon the yogurt mixture into each chilled chocolate shell, filling to about three‑quarters full. Using a small spoon, drizzle a thin line of warm peanut butter across the surface.
- Create the Swirl. With a toothpick or skewer, gently swirl the peanut butter into the yogurt, forming a marbled pattern. This visual cue also distributes flavor throughout each bite.
Final Freeze
Return the filled molds to the freezer and let them set for at least 2 hours, or until completely solid. For best texture, avoid opening the freezer door frequently during this period. Once firm, gently pop the cups out of the silicone molds and store them in an airtight container.
Tips & Tricks
Perfecting the Recipe
Use a Double Boiler. Gentle, indirect heat melts chocolate evenly, preventing scorching and preserving the chocolate’s natural snap.
Cool the Chocolate Slightly. Let the melted chocolate sit for 1‑2 minutes before pouring; this reduces the risk of thermal shock when it contacts the cold yogurt.
Don’t Over‑Mix Yogurt. Over‑whisking can incorporate air, leading to a lighter texture that may develop ice crystals during freezing.
Seal the Cups. After the final freeze, place each cup in a small zip‑top bag before storing in a container; this prevents freezer burn.
Flavor Enhancements
Add a pinch of sea salt to the chocolate for a salty‑sweet contrast, or fold in a teaspoon of finely chopped dark chocolate chips into the yogurt for extra crunch. A splash of espresso or a dash of cinnamon in the yogurt mixture deepens the flavor profile without adding sugar.
Common Mistakes to Avoid
Avoid pouring hot chocolate directly onto frozen yogurt; the heat can melt the filling and create soggy shells. Also, don’t skip the initial chilling of the chocolate shells—unfirm shells crack when the cold filling expands.
Pro Tips
Batch‑Freeze the Shells. Prepare a full tray of chocolate cups and keep them frozen; you can fill them on demand for a quick snack.
Use a Silicone Ice Cube Tray. These trays create uniform, bite‑size portions perfect for portion control and elegant presentation.
Temper the Chocolate (Optional). If you crave a glossy, snap‑ready shell, temper the chocolate using a microwave method before pouring.
Finish with a Sprinkle. A light dusting of crushed peanuts or toasted coconut adds texture and visual appeal just before serving.
Variations
Ingredient Swaps
Swap dark chocolate for white chocolate if you prefer a milder, sweeter shell, or use a blend of cocoa nibs for added crunch. For a dairy‑free version, replace frozen yogurt with coconut‑based frozen yogurt and choose almond butter instead of peanut butter. Adding a drizzle of raspberry puree after swirling introduces a fruity note.
Dietary Adjustments
To keep the recipe keto‑friendly, use a sugar‑free chocolate and replace honey with a low‑carb sweetener such as erythritol. For vegans, choose a plant‑based frozen yogurt and ensure the chocolate is dairy‑free; coconut oil already provides the necessary fat for shine.
Serving Suggestions
Serve these cups on a chilled platter with fresh berries for a pop of color, or accompany them with a dollop of whipped coconut cream for extra indulgence. Pair with a cold brew coffee for a sophisticated after‑dinner treat, or simply enjoy them straight from the freezer as a quick, energizing snack.
Storage Info
Leftover Storage
Once the cups are fully set, transfer them to an airtight container or individual freezer bags. Keep them in the freezer for up to 3 months; the chocolate shell protects the yogurt from freezer burn. If you plan to consume within a week, a simple zip‑top bag works just as well.
Reheating Instructions
These cups are meant to stay frozen, but if you prefer a softer texture, let them sit at room temperature for 5‑7 minutes before serving. For a warm twist, dip the bottom of the cup in a hot pan for 10 seconds to melt the chocolate slightly, creating a gooey rim while the interior stays chilled.
Frequently Asked Questions
This Frozen Yogurt Peanut Butter Cups recipe proves that indulgence doesn’t have to sacrifice nutrition. By combining a crisp dark chocolate shell with protein‑rich frozen yogurt and a touch of natural peanut butter, you get a dessert that satisfies cravings and fuels your body. Follow the step‑by‑step guide, experiment with the suggested variations, and store the cups for quick, guilt‑free treats any time. Let your creativity shine—add spices, swap nuts, or drizzle fruit—then enjoy every cool, creamy bite!