Deliciously Easy Mini Baked Apple Pies: A Step-by-Step Guide
 Save
Save
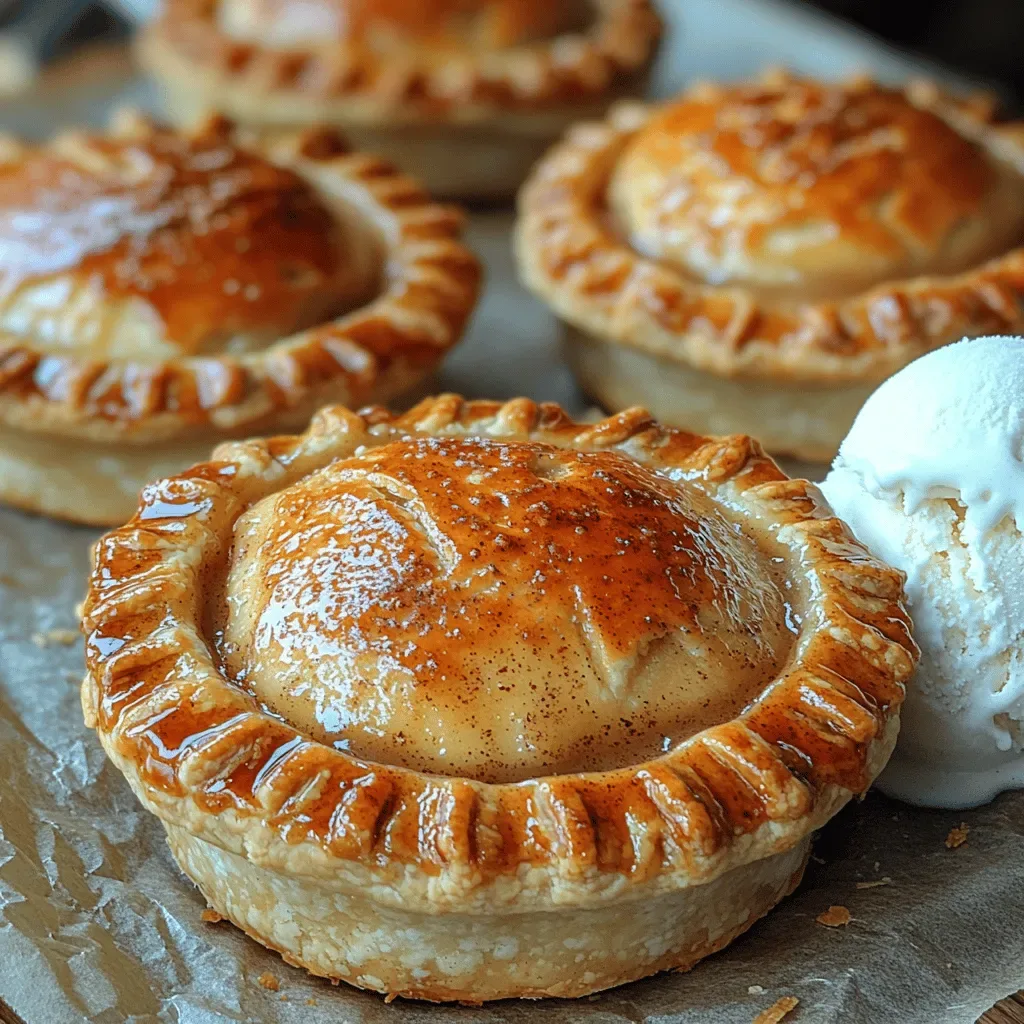
Imagine the comforting aroma of warm apples, buttery crust, and a hint of cinnamon filling your kitchen in just half an hour. These mini baked apple pies deliver that classic, nostalgic flavor in perfectly sized portions that are ideal for parties, holiday gatherings, or a cozy family dessert.
What makes this recipe stand out is the use of pre‑made pie crusts combined with a quick‑mix apple filling, so you get a flaky, golden top without hours of rolling dough. A splash of maple syrup adds depth, while a dash of nutmeg gives a subtle spice that elevates every bite.
Apple‑lovers of all ages will adore these bite‑size treats, whether served warm with a scoop of vanilla ice cream or chilled as a portable snack for picnics. They’re also perfect for school lunchboxes or as a sweet finish to a brunch spread.
The process is straightforward: prep the filling, assemble the mini pies, bake until bubbly, and let them cool just enough to handle. With only a few pantry staples and a little patience, you’ll have a dessert that looks as impressive as it tastes.
Why You'll Love This Recipe
Speedy Satisfaction: From start to finish the pies take under 45 minutes, making them an ideal last‑minute dessert that still feels special.
Portion‑Perfect: Mini sizes let guests sample without overindulging, and they’re easy to serve on a platter or in a muffin tin.
Customizable Crust: Use store‑bought puff pastry, refrigerated pie crust, or a gluten‑free alternative to match any dietary need.
Seasonal Warmth: The blend of apples, cinnamon, and maple captures the essence of fall, perfect for holidays or cozy evenings.
Tips & Tricks
Perfecting the Recipe
Use firm apples. Granny Smith or a crisp Honeycrisp hold their shape during baking, preventing a soggy bottom.
Chill the dough. Keep the pastry in the refrigerator for at least 10 minutes before cutting; cold dough puffs better in the oven.
Don’t overfill. A tablespoon of filling per cup is enough; too much liquid can make the crust soggy.
Flavor Enhancements
Add a pinch of ground ginger to the apple mixture for a warm, spicy undertone. A splash of bourbon or dark rum (about 1 tsp) deepens the caramel flavor. Finish each pie with a drizzle of caramel sauce right before serving for extra decadence.
Common Mistakes to Avoid
Avoid using overly soft apples; they release too much juice, resulting in a soggy crust. Also, don’t skip the butter brush—without it the tops stay pale and lack the signature flaky sheen.
Pro Tips
Egg wash alternative. If you prefer a shinier crust, brush with a lightly beaten egg mixed with a teaspoon of water before baking.
Use a silicone muffin pan. It releases the pies effortlessly and eliminates the need for greasing.
Pre‑heat the oven fully. A hot oven creates immediate steam, giving the pastry its lift and crisp edges.
Variations
Ingredient Swaps
Swap the classic apple for pears or a mix of apples and berries for a fruity twist. Use whole‑wheat pastry for a nuttier crust, or replace butter with coconut oil for a dairy‑free version. Maple syrup can be exchanged for honey or agave nectar if you prefer a different sweetness profile.
Dietary Adjustments
For gluten‑free pies, choose a certified gluten‑free puff pastry or make a simple almond‑flour crust. Vegan diners can substitute butter with plant‑based margarine and use coconut sugar instead of brown sugar. To keep carbs low, reduce the sugar and serve the pies with a dollop of sugar‑free whipped topping.
Serving Suggestions
Pair the mini pies with a scoop of cinnamon‑spiced ice cream or a drizzle of salted caramel sauce. A side of lightly sweetened whipped cream flavored with vanilla bean adds elegance. For a savory contrast, serve alongside a sharp cheddar cheese board for an unexpected appetizer‑dessert combo.
Storage Info
Leftover Storage
Allow any leftover pies to cool completely, then transfer them to an airtight container. Store in the refrigerator for up to 3 days. For longer keeping, wrap each pie individually in plastic wrap, place in a freezer‑safe bag, and freeze for up to 2 months. This prevents freezer burn and keeps the crust flaky.
Reheating Instructions
Reheat refrigerated pies in a pre‑heated 350°F oven for 8‑10 minutes, or until the crust regains its crispness. If using a microwave, cover the pie with a damp paper towel and heat on medium power for 30‑45 seconds, then finish under the broiler for 1 minute to restore crunch.
Frequently Asked Questions
Can I make these mini pies ahead of time?
What if I don’t have puff pastry?
How do I keep the crust from getting soggy?
What’s the best way to serve these pies for a crowd?
This mini baked apple pie recipe delivers big flavor in a bite‑size package, with a buttery crust, caramelized apple filling, and a sprinkle of spice that screams comfort. The step‑by‑step guide, storage tips, and creative variations ensure you can master it today and adapt it for any occasion. Feel free to experiment with different fruits, crusts, or toppings—cooking is your playground. Serve warm, share generously, and enjoy every golden, fragrant bite!
Deliciously Easy Mini Baked Apple Pies: A Step-by-Step Guide
Delicious Deliciously Easy Mini Baked Apple Pies: A Step-by-Step Guide
Ingredients
Pie Crust
- 2 sheets frozen puff pastry (or 1 package refrigerated pie crust)
- 1 tablespoon melted butter (for brushing)
- 1 tablespoon coarse sugar (optional topping)
Apple Filling
- 3 large apples (Granny Smith or Honeycrisp), peeled and diced
- ¼ cup brown sugar
- 2 tablespoons unsalted butter, cut into cubes
- 1 teaspoon ground cinnamon
- ¼ teaspoon ground nutmeg
- 2 teaspoons maple syrup
- 1 teaspoon fresh lemon juice
Instructions
Assembling the Mini Pies
- Roll the crust. On a lightly floured surface, unfold the puff pastry (or roll out the refrigerated crust) to a thickness of about 1/8 inch. Using a 3‑inch round cutter, cut out 12 circles and place each into the wells of a greased muffin tin.
- Fill each cup. Spoon an even tablespoon of the warm apple mixture into the center of each crust. The filling should sit just below the edge, leaving room for the top crust to seal.
- Top the pies. Cut the remaining dough into small strips (about ½ inch wide). Lay two strips over each filled cup in a cross‑hatch pattern, pressing gently to adhere. Brush the tops with melted butter and sprinkle with coarse sugar for extra crunch.
- Bake. Preheat the oven to 400°F (200°C). Place the muffin tin on the middle rack and bake for 18‑22 minutes, or until the crust is golden brown and the filling is bubbling at the edges. Visual cue: the tops should be deep amber and the pastry puffed.
- Cool slightly. Remove the tin from the oven and let the pies rest for 5 minutes. This short cooling period allows the filling to set, making it easier to pop the pies out without breaking the crust.
Similar Recipes
 Desserts
Irresistible Maple Pumpkin Spice Bundt Recipe for Fall
Learn how to make delicious Irresistible Maple Pumpkin Spice Bundt Recipe for Fall. Easy recipe with…
 Desserts
mothers day cake balls: 5 Sweet Ways to Celebrate Mom
Learn how to make delicious mothers day cake balls: 5 Sweet Ways to Celebrate Mom. Easy…
 Desserts
Churro-Style Yogurt Bites: A Delicious Twist on a Classic Treat
Delicious Churro-Style Yogurt Bites: A Delicious Twist on a Classic Treat
 Desserts
Chocolate Dipped Frozen Kiwi Recipe: A Delicious Treat
Delicious Chocolate Dipped Frozen Kiwi Recipe: A Delicious Treat
 Desserts
Strawberry Dreams Fluff Salad: A Whimsical Summer Delight
Delicious Strawberry Dreams Fluff Salad: A Whimsical Summer Delight
 Desserts
Pumpkin Cinnamon Bun Bars
Learn to bake moist pumpkin cinnamon bun bars with a buttery crust, sweet pumpkin filling, and…
 Desserts
Biscoff Cookie Butter Brownies: A Unique Indulgence
Delicious Biscoff Cookie Butter Brownies: A Unique Indulgence
 Desserts
Japanese Cotton Candy Cake Roll: A Pastel Dream to Bake
Learn how to make delicious Japanese Cotton Candy Cake Roll: A Pastel Dream to Bake. Easy…

Victoria
I cook these recipes at home before they ever land here — simple ingredients, clear steps.