Simple Chocolate Mint Cookies
 Save
Save
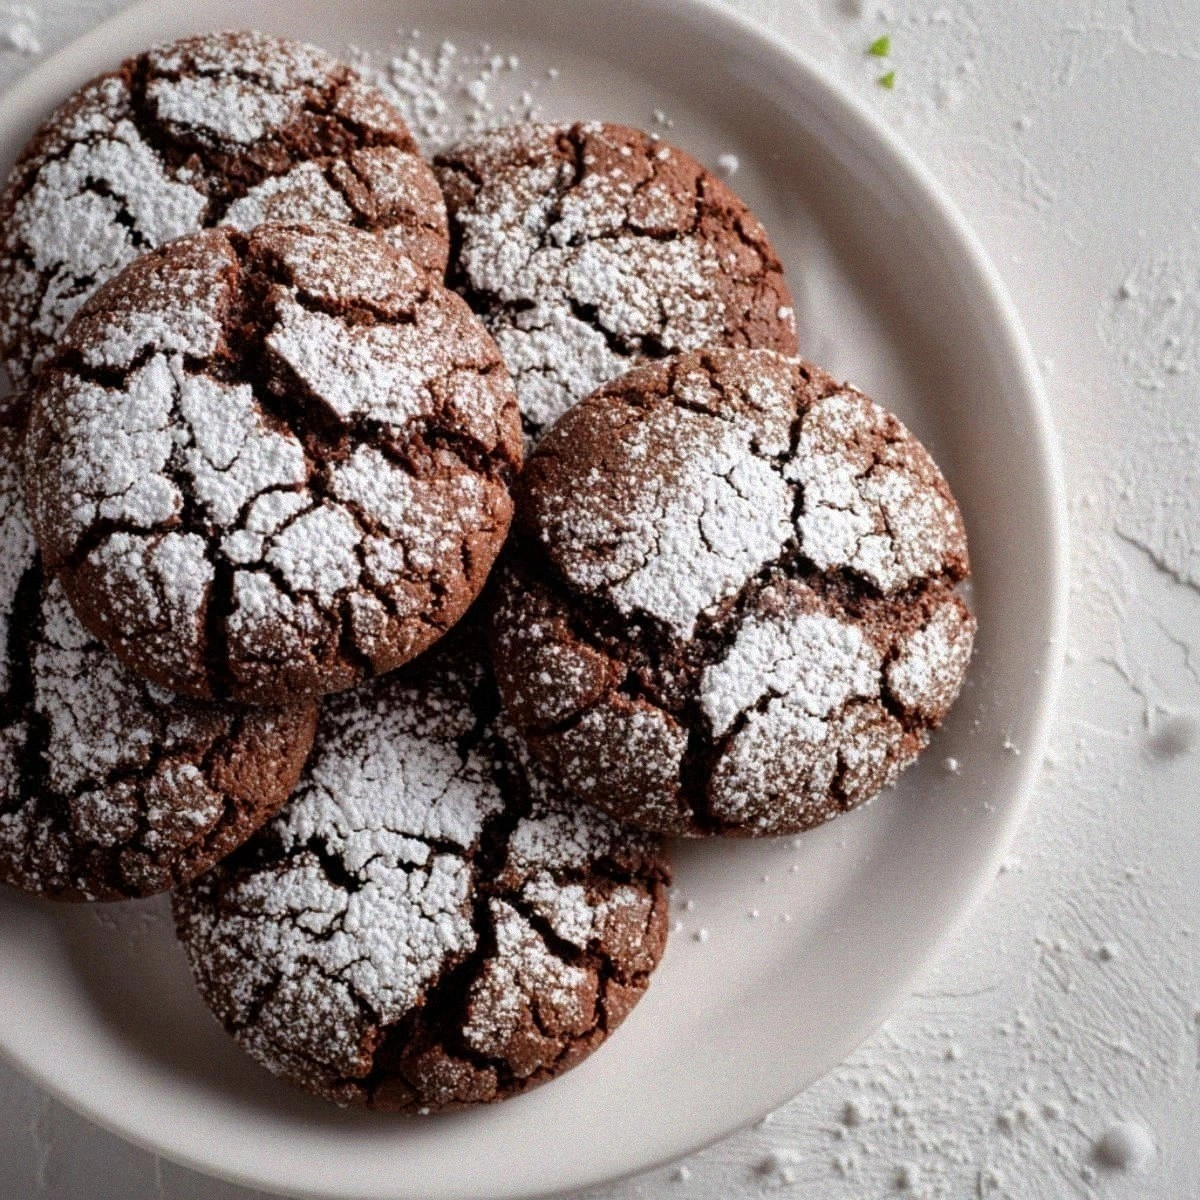
It was a chilly Saturday afternoon in late autumn, the kind of day when the wind whistles through the bare branches and the kitchen becomes the warm heart of the house. I was rummaging through my pantry, looking for a way to turn the leftover dark chocolate chips and that tiny bottle of peppermint extract into something that could make my family smile. The moment I opened the bag of chocolate, a rich, earthy aroma rose like a comforting hug, and when I added a splash of mint, the scent turned instantly refreshing, like a cool breeze after a long hike. I remember the first time I baked these cookies: the dough was glossy and dark, speckled with bright green flecks of mint chocolate, and as they baked, the kitchen filled with a perfume that was both chocolatey and minty, making my kids gather around the oven like moths to a flame. That memory is the spark behind this recipe, and I’m thrilled to share it with you so you can create the same magical moment in your own home.
What makes these Simple Chocolate Mint Cookies truly special is the balance of deep cocoa richness and bright peppermint zing, a combination that feels both indulgent and unexpectedly refreshing. The cookies have a soft, chewy center that gives way to a slightly crisp edge, a texture that sings with every bite and keeps you reaching for more. I’ve served them at holiday gatherings, after-school snacks, and even as a comforting treat on rainy evenings, and each time they disappear within minutes, leaving only crumbs and happy sighs. But wait—there’s a secret trick hidden in step four that will take the texture from good to unforgettable, and I’ll reveal it later in the instructions. Trust me, once you master that, you’ll wonder how you ever baked cookies without it.
Imagine the first time you bite into a warm cookie that melts on your tongue, releasing layers of bittersweet chocolate followed by a cool burst of mint that lingers just long enough to make you smile. The contrast of flavors is like a dance—dark chocolate leading, peppermint twirling, and together they create a harmonious rhythm that’s both familiar and exciting. This recipe is designed to be approachable for home cooks of any skill level, yet it holds enough nuance to keep seasoned bakers intrigued. From the moment you whisk the cocoa powder into the flour, to the final dusting of powdered sugar that adds a snow‑kissed finish, each step is crafted to amplify flavor and texture. And now, without further ado, here’s exactly how to make it — and trust me, your family will be asking for seconds.
🌟 Why This Recipe Works
- Flavor Depth: The combination of dark chocolate chips and mint chocolate chips creates a layered taste profile where the bitterness of the dark chocolate is softened by the sweet mint, resulting in a balanced bite that feels luxurious.
- Texture Contrast: By using both cocoa powder in the dough and whole chocolate chips, the cookies develop a tender interior while the edges turn lightly crisp, giving you that perfect chew‑to‑crunch ratio.
- Ease of Execution: The recipe requires only basic mixing techniques—creaming, whisking, and folding—so even beginners can achieve bakery‑level results without a stand mixer.
- Time Efficiency: With a total time of just 45 minutes, including a short chill, you can whip up a batch of these cookies before dinner is ready, making them ideal for spontaneous cravings.
- Versatility: The base dough is a blank canvas; you can swap the mint extract for orange zest, add chopped nuts, or drizzle with white chocolate for endless variations.
- Ingredient Quality: Using high‑quality dark chocolate and pure peppermint extract ensures that the flavors shine through without any artificial aftertaste.
- Crowd‑Pleasing Factor: The familiar flavors of chocolate and mint appeal to both kids and adults, making these cookies a safe bet for any gathering.
- Nutrition Balance: While indulgent, the recipe incorporates both brown and white sugars, providing a subtle caramel note that pairs beautifully with the mint.
🥗 Ingredients Breakdown
The Foundation
The backbone of any great cookie is the flour and cocoa mixture, and here we use 2 cups of all‑purpose flour paired with a half‑cup of unsweetened cocoa powder. The flour provides structure, while the cocoa adds depth and a velvety darkness that makes the cookies look as sophisticated as they taste. Choose a fine‑milled flour for a smoother crumb; if you have cake flour on hand, you can substitute half of the all‑purpose flour for an even more tender result. The cocoa powder should be Dutch‑processed if you want a richer color and less acidity, but natural cocoa works just as well and adds a slightly brighter note.
Aromatics & Sweeteners
The sweeteners in this recipe are a duo: ¾ cup of brown sugar and ½ cup of white sugar. Brown sugar brings moisture and a subtle caramel flavor, while white sugar contributes crispness and helps the cookies spread just enough. The butter, softened to room temperature, is the medium that carries these sugars, creating a glossy, buttery base that melts in your mouth. When you cream the butter with both sugars, you’re incorporating tiny air pockets that will later expand, giving the cookies a light lift.
The Secret Weapons
Peppermint extract is the star that lifts this cookie from ordinary to unforgettable. A single teaspoon is enough to perfume the entire batch without overwhelming the chocolate. Pair it with a teaspoon of vanilla extract, which rounds out the flavors and adds a warm, sweet undertone that balances the mint’s coolness. The baking soda acts as a leavening agent, creating that subtle rise and helping the cookies develop a tender crumb. Finally, the pinch of salt amplifies every flavor, ensuring the chocolate and mint shine without any flatness.
Finishing Touches
The final flourish comes from the chocolate chips—one cup of dark chocolate chips and one cup of mint chocolate chips. Dark chocolate provides a robust, slightly bitter backbone that pairs beautifully with the sweet sugars, while mint chocolate chips reinforce the peppermint flavor and add delightful pockets of melt‑in‑your‑mouth goodness. If you prefer a sweeter profile, you can swap the dark chips for semi‑sweet or even milk chocolate, but I recommend keeping at least half dark for that sophisticated bite. The powdered sugar, dusted after baking, adds a delicate snow‑like finish that makes the cookies look as festive as they taste.
With your ingredients prepped and ready, let's get cooking. Here's where the fun really begins...
🍳 Step-by-Step Instructions
🔐 Expert Tips for Perfect Results
The Taste Test Trick
Before you bake the full batch, scoop a single cookie, bake it, and let it cool. Taste it and note whether the mint is too subtle or just right; you can adjust the peppermint extract by a few drops for the rest of the dough. I once served a batch that was missing that mint zing, and my guests asked for “more flavor”—a simple tweak saved the day. This mini‑test also helps you gauge if you need a pinch more salt to bring out the chocolate’s depth. Trust me on this one: a quick taste check can turn a good batch into a great one.
Why Resting Time Matters More Than You Think
Allowing the dough to chill not only controls spread but also gives the cocoa and mint time to marry. The fats solidify, resulting in a cookie that holds its shape, while the flavors become more harmonious. I once skipped the chilling step, and the cookies spread thin, turning into crisp wafers rather than the chewy delights I envisioned. The best part? Even a short 15‑minute chill can make a noticeable difference in texture and flavor balance.
The Seasoning Secret Pros Won’t Tell You
A pinch of sea salt sprinkled on top just before baking can elevate the entire flavor profile, creating a subtle contrast that makes the chocolate and mint pop. Professional bakers often finish their cookies with flaky salt for that gourmet touch, and you can do the same at home with a light hand. This tiny addition also helps to cut through the sweetness, ensuring the cookies don’t feel cloying. I’ve found that even a grainy sea‑salt flake adds a delightful crunch that surprises the palate.
Baking Sheet Matters
A heavy‑duty, dark‑colored baking sheet conducts heat more evenly, giving you a uniformly browned edge without over‑baking the center. Light aluminum sheets can cause uneven spreading, especially with butter‑rich doughs. If you only have a light sheet, rotate the pans halfway through the bake to ensure even color. This simple adjustment can be the difference between a cookie that’s perfectly golden and one that’s unevenly baked.
Cooling Is Not Optional
Allowing the cookies to cool on a wire rack prevents steam from making the bottoms soggy. The air circulation keeps the underside crisp while the top stays soft. If you skip this step and place them directly on a plate, the residual heat will trap moisture, leading to a slightly gummy texture. The result? A cookie that retains its ideal chew without becoming overly soft. Patience here is key—trust the cooling process.
🌈 Delicious Variations to Try
One of my favorite things about this recipe is how versatile it is. Here are some twists I've tried and loved:
White Chocolate Raspberry Swirl
Swap the mint chocolate chips for an equal amount of white chocolate chips and fold in a tablespoon of raspberry puree. The bright pink ribbons add a fruity tang that pairs beautifully with the dark chocolate base, creating a sophisticated flavor duo.
Espresso Infused Delight
Add 1 teaspoon of finely ground espresso powder to the dry ingredients and replace half of the mint extract with a splash of coffee liqueur. The coffee notes deepen the chocolate flavor and give the cookies an adult‑friendly edge.
Nutty Crunch
Fold in ½ cup of toasted chopped hazelnuts or almonds along with the chocolate chips. The nuts add a satisfying crunch and a buttery richness that complements the mint’s coolness.
Coconut Mint Dream
Replace half of the butter with coconut oil and sprinkle shredded coconut on top before baking. The coconut adds a tropical aroma and a slightly chewy texture that makes the cookies feel like a beach‑side treat.
Spicy Chili Mint
Incorporate a pinch of cayenne pepper into the dry mix for a subtle heat that contrasts the cool mint. The spice awakens the palate and adds an unexpected depth that will impress adventurous eaters.
📦 Storage & Reheating Tips
Refrigerator Storage
Store the cooled cookies in an airtight container with a layer of parchment paper between each layer. They will stay fresh for up to 5 days, and the mint flavor actually mellows and becomes more integrated over time. If you notice any condensation, simply open the container for a few minutes to let excess moisture escape.
Freezing Instructions
For longer‑term storage, arrange the cookies in a single layer on a baking sheet and freeze until solid, then transfer them to a zip‑top freezer bag. They’ll keep for up to 3 months without losing texture. When you’re ready to enjoy them, let them thaw at room temperature for 15 minutes, then give them a quick warm‑up in a 300°F oven for 3–4 minutes to revive that fresh‑out‑of‑the‑oven softness.
Reheating Methods
To reheat a single cookie, place it on a microwave‑safe plate and warm for 10–12 seconds—just enough to melt the chocolate without drying it out. For a batch, use a preheated oven at 325°F for 5 minutes, and add a splash of milk or a drizzle of melted butter on the tray to keep them moist. The trick to reheating without drying them out? A light brush of melted butter or a tiny drizzle of milk creates steam that keeps the interior soft while the exterior crisps slightly.
❓ Frequently Asked Questions
Can I use milk chocolate instead of dark chocolate?
How strong is the mint flavor? Can I adjust it?
Do I need to chill the dough? What happens if I skip it?
Can I make these cookies gluten‑free?
Why do my cookies turn out flat?
Can I add a frosting or glaze?
How long can I keep these cookies fresh?
Can I double this recipe for a large gathering?
Recipe Card
Cover the bowl with plastic wrap and refrigerate the dough for at least 20 minutes. While the dough chills, the butter solidifies, and the flavors meld together, creating a more cohesive bite. If you’re short on time, you can let the dough sit at room temperature for 10 minutes, but the texture won’t be quite as perfect. The result? When you finally scoop the dough, it holds its shape beautifully, and the edges will stay nicely defined after baking. Patience at this stage is a small investment for a big payoff in texture.
Using a cookie scoop or a rounded tablespoon, portion out dough onto the prepared baking sheets, spacing each ball about 2 inches apart. Gently flatten each ball with the back of a spoon or your hand—don’t press too hard, or you’ll lose the airy interior. Place the sheets in the preheated oven and bake for 10–12 minutes, or until the edges are set and the tops have a faint sheen but are still soft in the center. You’ll know they’re done when the edges turn a deep, chocolate‑brown while the centers remain slightly undercooked; they’ll continue to set as they cool.
Remove the cookies from the oven and let them rest on the wire rack for 5 minutes before transferring them to a cooling rack. While still warm, dust each cookie lightly with 2 tablespoons of powdered sugar using a fine mesh sieve; this adds a delicate sweet finish and a festive look. The cookies will firm up as they cool, achieving that perfect balance of crisp edges and chewy centers. Go ahead, take a taste—your palate will be greeted by a rich chocolate base, a refreshing mint snap, and a lingering sweet whisper of powdered sugar. And the result? A batch of cookies that looks as good as it tastes, ready to be shared with family, friends, or anyone who appreciates a classic treat with a twist.
Similar Recipes
 Desserts
5 Fudgy Brownie Hearts Secrets Revealed
Learn how to make delicious 5 Fudgy Brownie Hearts Secrets Revealed. Easy recipe with step-by-step instructions.
 Desserts
Buzzy Raspberry Cheesecake Bombs Recipe
Delicious Buzzy Raspberry Cheesecake Bombs Recipe
 Desserts
Cherry Pie Crumble Bars: The Perfect Dessert
Delicious Cherry Pie Crumble Bars: The Perfect Dessert
 Desserts
Irresistible Maple Pumpkin Spice Bundt Recipe for Fall
Learn how to make delicious Irresistible Maple Pumpkin Spice Bundt Recipe for Fall. Easy recipe with…
 Desserts
Oreo Peanut Butter Cup Cheesecake: A Decadent Dessert Recipe
Delicious Oreo Peanut Butter Cup Cheesecake: A Decadent Dessert Recipe
 Desserts
Strawberry Peach Crisp
Learn how to make delicious Strawberry Peach Crisp. Easy recipe with step-by-step instructions.
 Desserts
Christmas Shortbread Cookies: 5 Steps to Festive Bliss
Learn how to make delicious Christmas Shortbread Cookies: 5 Steps to Festive Bliss. Easy recipe with…
 Desserts
Homemade Vampire Fudge: The Ultimate Spooky Treat That Disappears Fast
Learn how to make delicious Homemade Vampire Fudge: The Ultimate Spooky Treat That Disappears Fast. Easy…

Victoria
I cook these recipes at home before they ever land here — simple ingredients, clear steps.