Introduction
In the world of frozen desserts, few treats can match the delightful combination of creamy yogurt and rich peanut butter. Enter the Frozen Yogurt Peanut Butter Cups—a deliciously satisfying treat that merges the wholesome goodness of yogurt with the nutty richness of peanut butter. This recipe not only appeals to your taste buds but also offers a guilt-free indulgence that you can enjoy any time of the day.
Frozen treats have seen a surge in popularity, especially as people seek healthier alternatives to traditional ice cream. The appeal of frozen yogurt lies in its lower fat content and the nutritional benefits of yogurt, such as probiotics that support gut health. When combined with peanut butter, known for its protein and healthy fats, these frozen yogurt cups become a powerhouse of flavor and nutrition. The interplay of creamy, nutty, and sweet flavors, along with varying textures from the crunchy peanut butter and smooth yogurt, creates a delightful dessert experience.
Understanding the Appeal of Frozen Yogurt Peanut Butter Cups
Homemade frozen treats are taking the culinary world by storm, driven by a growing trend towards healthier dessert options. Consumers are becoming increasingly aware of the ingredients they consume, leading them to seek out recipes that not only satisfy their sweet cravings but also promote better health. With the Frozen Yogurt Peanut Butter Cups, you can indulge without the fear of compromise, knowing exactly what goes into your treat.
One of the primary advantages of making frozen desserts at home is the ability to control the ingredients. Unlike many store-bought options that are often laden with artificial flavors, preservatives, and excessive sugars, homemade frozen yogurt cups allow you to choose wholesome ingredients that suit your dietary needs. This is especially important for those with specific dietary restrictions or preferences, such as vegans, gluten-free eaters, or individuals looking to reduce sugar intake.
The versatility of flavors and ingredients in frozen desserts is another significant draw. With this recipe, you can customize your Frozen Yogurt Peanut Butter Cups to fit your taste preferences. Whether you prefer a hint of chocolate, a dash of vanilla, or the addition of fruit, the possibilities are endless. This adaptability not only makes the recipe fun to prepare but also ensures that everyone can enjoy their perfect version of this frozen delight.
Ingredients Breakdown
Creamy Peanut Butter
At the heart of our Frozen Yogurt Peanut Butter Cups lies the creamy peanut butter. Peanut butter is not just a tasty addition; it comes with an array of health benefits. Rich in protein, healthy fats, and essential vitamins and minerals, peanut butter can be a nutritious part of your diet when consumed in moderation. It provides energy and helps keep you satiated, making it an excellent base for our dessert.
When selecting peanut butter for this recipe, it is crucial to choose natural, unsweetened varieties. These typically contain just peanuts and a bit of salt, steering clear of added sugars and oils that can compromise the healthfulness of your treat. By using high-quality peanut butter, you ensure that your Frozen Yogurt Peanut Butter Cups are as nutritious as they are delicious.
Sweeteners: Honey vs. Maple Syrup
To sweeten our peanut butter mixture, we have the option of using honey or maple syrup, both of which offer unique flavor profiles and nutritional benefits. Honey is a natural sweetener that provides antioxidants and may have antibacterial properties, while maple syrup is also a rich source of antioxidants and minerals like manganese and zinc.
When comparing the two, honey generally has a higher sweetness level than maple syrup, so you may need to adjust the quantities based on your personal taste. For those with dietary restrictions, alternatives such as agave nectar or stevia can also be used to achieve the desired sweetness without added sugars. This flexibility makes it easy to tailor the recipe to suit your specific health goals.
Vanilla Extract and Sea Salt
A splash of vanilla extract is essential in enhancing the flavors of our Frozen Yogurt Peanut Butter Cups. Vanilla has a unique ability to elevate the sweetness of other ingredients, making your dessert taste even more indulgent without the need for excessive sugar. Furthermore, the aromatic notes of vanilla contribute to a richer overall flavor experience.
Sea salt plays a critical role in this recipe as well. A pinch of salt not only balances the sweetness but also amplifies the nutty flavor of the peanut butter. This contrast between sweet and salty is what makes these frozen cups so irresistible.
Greek Yogurt
Greek yogurt is the star of our frozen base, and for good reason. It offers a creamy texture, making it the perfect ingredient for frozen desserts. Packed with protein and probiotics, Greek yogurt contributes to a healthy gut and helps keep you full longer. When using Greek yogurt in your Frozen Yogurt Peanut Butter Cups, you have the choice between plain and flavored varieties. While plain yogurt allows for more control over sweetness and flavor, flavored options can add an exciting twist to your dessert.
If you’re looking to add a fruity element, consider using flavored Greek yogurt—such as strawberry or banana—while still maintaining the core ingredients of peanut butter and vanilla. This flexibility encourages creativity in the kitchen and allows you to experiment with different flavor combinations.
Chocolate Chips and Coconut Oil
To finish off our Frozen Yogurt Peanut Butter Cups, we turn to chocolate chips and coconut oil. The type of chocolate you choose can significantly impact the flavor and health profile of your dessert. Dark chocolate, for instance, is rich in antioxidants and has less sugar than milk chocolate, making it a healthier choice. However, if you prefer the creaminess of milk chocolate, feel free to use it; the key is to find a balance that suits your taste.
Coconut oil is an essential ingredient for achieving a smooth and glossy chocolate coating. When melted and combined with chocolate chips, coconut oil helps create a silky texture that adheres beautifully to the frozen cups. Additionally, coconut oil solidifies when chilled, ensuring that your peanut butter cups maintain their shape when frozen.
Step-by-Step Instructions
Now that we’ve covered the ingredients, it’s time to dive into the preparation process. The first step in creating your Frozen Yogurt Peanut Butter Cups is to prepare the peanut butter mixture.
1. Preparation of the Peanut Butter Mixture:
– Start by gathering your creamy peanut butter, sweetener of choice (honey or maple syrup), vanilla extract, and a pinch of sea salt.
– In a medium mixing bowl, combine 1 cup of creamy peanut butter, 2 tablespoons of honey or maple syrup, 1 teaspoon of vanilla extract, and a pinch of sea salt.
– Using a spatula or a hand mixer, blend these ingredients until they form a smooth, creamy consistency. Taste the mixture and adjust the sweetness if necessary, adding more honey or syrup according to your preference.
As you prepare this decadent peanut butter mixture, the anticipation of the delightful frozen treat to come builds. The rich aroma of peanut butter mingling with the sweet notes of vanilla fills the air, signaling the deliciousness that awaits.
In this first part of our Frozen Yogurt Peanut Butter Cups recipe, we’ve explored the foundational elements that make these treats so appealing. From understanding the health benefits of the ingredients to preparing the peanut butter mixture, you’re well on your way to creating a frozen dessert that’s both satisfying and nutritious. Stay tuned for the next steps, where we’ll assemble our cups and take them to the freezer, transforming your delicious mixture into a frozen delight that everyone can enjoy!
Key Techniques for Achieving a Smooth Texture
Creating the perfect Frozen Yogurt Peanut Butter Cups requires attention to detail, especially when it comes to texture. A smooth and creamy consistency is essential for the ultimate experience. Here are some techniques to help you achieve that velvety texture:
Spoon into Liners
Using mini muffin liners is essential for shaping your frozen yogurt cups. Start by placing the liners in a mini muffin tin. When spooning in the peanut butter mixture, use a small cookie scoop or a tablespoon to help control the amount you add. This ensures even filling and prevents overflow. Fill each liner about halfway, leaving enough space for the yogurt layer to be added on top.
Tips for Filling Mini Muffin Tins Effectively
– Use a Silicone Spatula: A silicone spatula allows for easy scraping and helps you evenly distribute the peanut butter mixture into each liner.
– Gentle Tapping: After filling, gently tap the muffin tin on the counter to settle the mixture. This helps eliminate air bubbles and ensures a uniform layer.
– Chill Between Layers: If your peanut butter layer is too soft, consider chilling the tin for a few minutes before adding the yogurt layer. This will allow the peanut butter to firm up slightly and provide a better base for the yogurt.
Freezing the Base
Proper freezing is crucial to achieving the right texture in your Frozen Yogurt Peanut Butter Cups. Once you have filled the liners with the peanut butter mixture, place the muffin tin in the freezer.
Importance of Proper Freezing Time for Texture
Allow the cups to freeze for at least 30 minutes. This initial freezing time helps solidify the peanut butter layer, making it easier to add the yogurt layer without mixing the two. If you skip this step, you risk creating a messy blend that won’t hold its shape when served.
Making the Yogurt Layer
The yogurt layer is what makes these peanut butter cups a refreshing and creamy treat. To achieve the right consistency, you’ll want to follow these techniques:
Techniques for Achieving the Right Consistency in Yogurt
– Choose Full-Fat Yogurt: For a creamier finish, opt for full-fat Greek yogurt or any other yogurt variety you prefer. Greek yogurt will provide a thicker texture, while regular yogurt will yield a softer consistency.
– Mix Thoroughly: In a bowl, combine the yogurt with a sweetener of your choice (like honey or maple syrup) and vanilla extract. Use a whisk to mix until smooth, ensuring there are no lumps.
– Adjust Sweetness: Taste the mixture before adding it to the cups. Depending on your preference, you might want to adjust the sweetness level. Remember, the chocolate coating will add sweetness too.
Layering the Components
Layering is essential not just for taste but also for presentation. Here’s how to layer your Frozen Yogurt Peanut Butter Cups for the best results:
The Importance of Layering and Presentation
– Uniform Layers: Once the peanut butter layer has set, carefully spoon the yogurt mixture on top. Aim for an even layer, filling each liner to the top. This presentation creates a beautiful contrast between the peanut butter and yogurt.
– Smooth the Top: Use a small offset spatula to smooth the yogurt layer, ensuring it is flat and even. This step enhances the visual appeal and makes for a clean finish when the cups are unmolded.
– Final Freeze: After layering, return the muffin tin to the freezer and allow the cups to freeze for at least another hour, ensuring everything is fully set.
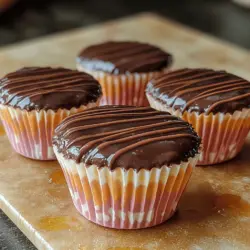
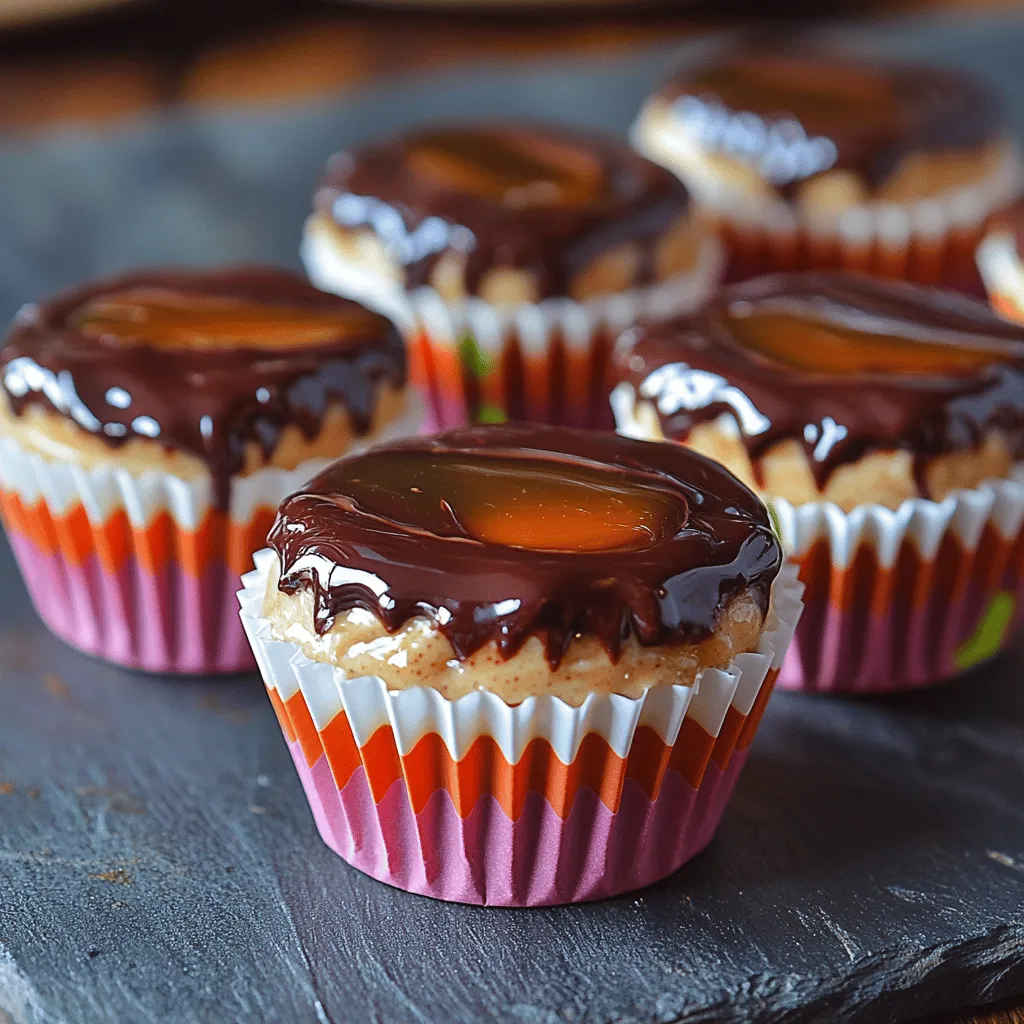
Chocolate Coating Process
The final touch to your Frozen Yogurt Peanut Butter Cups is the chocolate coating. A smooth, glossy chocolate layer not only adds flavor but also elevates the overall look.
Tips for Melting Chocolate Without Burning
– Double Boiler Method: Use a double boiler to melt your chocolate. This method involves placing a heatproof bowl over a pot of simmering water. Stir the chocolate frequently to prevent it from burning.
– Microwave Option: If you prefer the microwave, melt the chocolate in short bursts of 15-20 seconds, stirring in between until fully melted. Be cautious not to overheat.
Achieving a Smooth Finish for the Chocolate Layer
– Coat Evenly: Once the chocolate is melted, carefully dip the bottom of each frozen cup into the chocolate or spoon a layer over the top. Tap gently to remove excess chocolate.
– Drizzle for Decoration: For a decorative touch, reserve a small amount of melted chocolate to drizzle over the tops of the cups after coating. This adds visual interest and makes them look more artisanal.
Serving Suggestions
Now that you’ve created these delightful Frozen Yogurt Peanut Butter Cups, it’s time to think about how to serve them.
Creative Ways to Present the Frozen Yogurt Peanut Butter Cups
– Garnish with Fresh Fruits: Serve the cups on a platter garnished with fresh berries or banana slices. This not only adds a pop of color but also enhances the flavor profile.
– Sauces and Dips: Pair with a drizzle of chocolate sauce, caramel, or a fruit puree for added flavor. A side of berry compote can make for a delightful dip.
Suggestions for Different Occasions
– Parties: These cups make a perfect addition to any dessert bar at parties. Their bite-sized nature allows guests to enjoy them without feeling overly indulgent.
– Healthy Snacks: Keep a stash in your freezer for a quick snack that satisfies sweet cravings while being healthy.
– Healthy Desserts: These cups are an excellent alternative to traditional ice cream desserts, suitable for family gatherings or casual get-togethers.
Nutritional Information
Understanding the nutritional profile of your Frozen Yogurt Peanut Butter Cups helps you enjoy them guilt-free.
Breakdown of Calories and Nutritional Benefits Per Serving
– Each cup contains approximately 100-120 calories, depending on the specific ingredients used.
– Packed with protein from the yogurt and healthy fats from the peanut butter, these treats provide a balanced snack option.
Comparison to Other Popular Frozen Desserts
When compared to traditional ice cream, these peanut butter cups are lower in sugar and fat while offering a rich flavor. They are also a great source of probiotics if using yogurt with live cultures.
Discuss Potential Dietary Modifications
– Vegan Option: Substitute traditional yogurt with a plant-based yogurt alternative and ensure your chocolate is dairy-free.
– Gluten-Free: This recipe is naturally gluten-free, making it a suitable option for those with gluten sensitivities.
Storage and Shelf Life
To maintain the quality of your Frozen Yogurt Peanut Butter Cups, proper storage is essential.
Best Practices for Storing Frozen Yogurt Cups
– Use Airtight Containers: After the cups are completely frozen, transfer them to an airtight container. This will prevent freezer burn and maintain flavor.
– Label and Date: It’s helpful to label your container with the date they were made. This can help you keep track of freshness.
How to Maintain Flavor and Texture Over Time
– Consume Within a Month: For optimal taste and texture, aim to consume your frozen yogurt cups within a month. While they can last longer, the quality may diminish.
– Thawing Tips: When ready to enjoy, let the cups sit at room temperature for a few minutes to soften slightly before serving. This ensures a creamy texture.
Conclusion
In conclusion, making your own Frozen Yogurt Peanut Butter Cups is a simple yet satisfying endeavor that results in a deliciously healthy dessert. With easy-to-follow steps and customizable options, you can cater to your personal tastes and dietary needs. The joy of creating these treats from scratch, knowing exactly what goes into them, is immensely rewarding.
Encourage your friends and family to join in the fun of making these delightful cups, and enjoy the satisfaction that comes with indulging in a homemade dessert that is both nutritious and tasty. Whether you’re serving them at a party, enjoying them as a snack, or simply looking for a healthier dessert option, these Frozen Yogurt Peanut Butter Cups are sure to impress. So gather your ingredients, follow the steps, and dive into a deliciously creamy world of flavors!