Delectable No-Bake S’mores Cups
 Save
Save
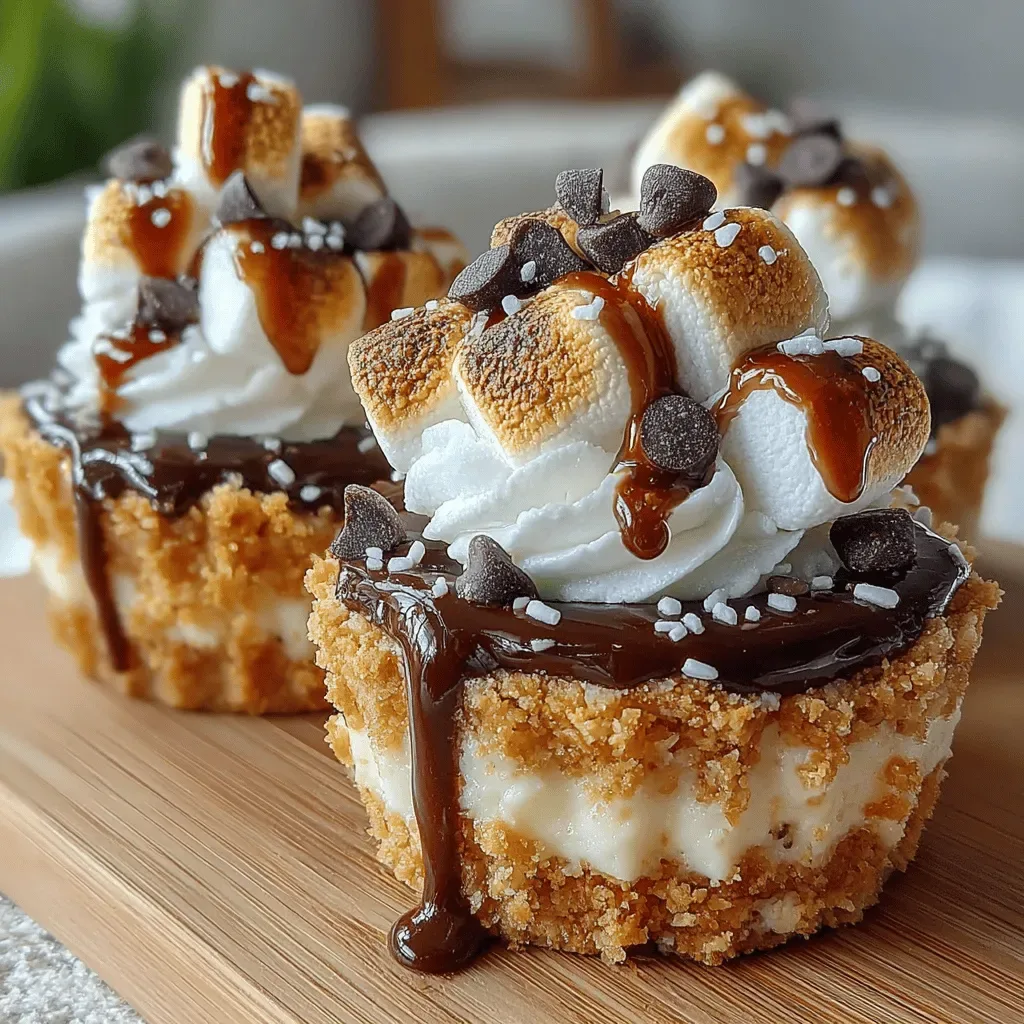
Imagine the classic campfire treat turned into a portable, elegant dessert that never needs an oven. These Delectable No‑Bake S’mores Cups capture the gooey marshmallow, melty chocolate, and crunchy graham cracker in a single‑serve cup that looks as good as it tastes.
What makes them special is the layered texture: a buttery graham‑cracker base, a silky chocolate ganache, and a toasted marshmallow crown that you can finish under a broiler for that perfect caramelized finish—all without turning on the stove.
Kids, teens, and adults alike will love them at birthday parties, movie nights, or any gathering where you want a nostalgic treat with a sophisticated twist. They’re also perfect for a quick after‑dinner indulgence when you crave something sweet but don’t want to heat up the kitchen.
The process is straightforward: crush the crackers, press them into cups, melt chocolate with cream, spoon the ganache, top with marshmallows, and give a brief flash of heat to toast the tops. In under twenty minutes you’ll have a crowd‑pleasing dessert ready to serve.
Why You'll Love This Recipe
Zero‑Bake Simplicity: All the magic happens without an oven, so you can whip up a batch even in a dorm kitchen or on a hot summer day when you’d rather keep the oven off.
Customizable Layers: Each component can be tweaked—add a splash of liqueur to the ganache or sprinkle toasted nuts for crunch—making every cup uniquely yours.
Portable Presentation: Served in individual ramekins or silicone cups, they’re easy to transport to picnics, potlucks, or bedtime snack raids without messy plates.
Instant Nostalgia: The familiar s’mores flavor triggers happy campfire memories, while the elegant presentation feels grown‑up enough for adult gatherings.
Tips & Tricks
Perfecting the Recipe
Use fresh graham crackers. Fresh crackers give a buttery texture; stale ones can become overly crumbly and won’t bind as well.
Cool ganache slightly before topping. Let the ganache sit for 2‑3 minutes after whisking; this prevents the marshmallows from sinking.
Press crust firmly. A compact base stops the ganache from sliding and gives a satisfying crunch.
Broil in short bursts. Keep the oven door slightly ajar and watch the marshmallows; they can go from golden to burnt in seconds.
Flavor Enhancements
Add a splash of peppermint extract to the ganache for a festive twist, or stir in a pinch of smoked sea salt for depth. For a richer mouthfeel, swirl in a teaspoon of caramel sauce just before the marshmallows go under the broiler.
Common Mistakes to Avoid
Skipping the brief cooling of the ganache often causes the marshmallows to sink, ruining the layered look. Also, avoid using low‑fat chocolate; it won’t set properly and will become grainy. Finally, don’t over‑broil—once the marshmallows are lightly browned, they’re done.
Pro Tips
Make a ganache glaze. Reserve a tablespoon of warm ganache, drizzle it over the finished cups for a glossy finish that adds visual appeal.
Use silicone cups. They release the dessert cleanly and can go straight from the fridge to the broiler without cracking.
Chill before serving. After broiling, let the cups chill for 5 minutes; this firms the ganache while keeping the marshmallow warm.
Toast the crust. Lightly toast the graham‑cracker base for 5 minutes at 300°F before pressing; it adds an extra layer of crunch.
Variations
Ingredient Swaps
Swap the classic graham crackers for chocolate wafer crumbs for a richer base, or use almond flour mixed with butter for a gluten‑free crust. Replace semi‑sweet chocolate with dark 70% cacao for a more intense flavor, or try white chocolate for a milder, sweeter profile.
Dietary Adjustments
For a dairy‑free version, use coconut cream instead of heavy cream and dairy‑free chocolate. Substitute butter with coconut oil in the crust. Vegan marshmallows are now widely available and work perfectly for the toasted topping.
Serving Suggestions
Pair each cup with a scoop of vanilla bean ice cream or a dollop of whipped coconut cream for contrast. A drizzle of salted caramel or a sprinkle of crushed pretzels adds texture. For a festive twist, top with a dusting of powdered cocoa or edible gold flakes.
Storage Info
Leftover Storage
Allow the cups to cool completely, then cover each ramekin with plastic wrap and place them in an airtight container. Store in the refrigerator for up to 3 days. For longer keeping, freeze the cups (without the marshmallow topping) in sealed containers for up to 2 months; thaw in the fridge before adding fresh marshmallows.
Reheating Instructions
Reheat refrigerated cups in a 300°F oven for 8‑10 minutes, or until the ganache is soft and the marshmallows are lightly toasted again. If you prefer a quicker method, microwave each cup for 20‑30 seconds, then finish under a broiler for 30 seconds to restore the toasted surface.
Frequently Asked Questions
Can I make these cups ahead of time?
What if I don’t have a broiler?
Can I substitute the marshmallows with something else?
This No‑Bake S’mores Cup recipe delivers the beloved campfire flavor in a refined, single‑serve format that’s quick, adaptable, and endlessly fun. From the buttery crust to the glossy ganache and toasted marshmallow crown, each step is designed for maximum taste with minimal fuss. Feel free to experiment with swaps, toppings, or dietary tweaks—creativity is the secret ingredient. Gather your favorite cups, toast the marshmallows, and enjoy a nostalgic bite of summer anytime you please.
Delectable No-Bake S’mores Cups
Delicious Delectable No-Bake S’mores Cups
Ingredients
Crust
- 1 ½ cups graham cracker crumbs
- 3 tablespoons unsalted butter, melted
- 2 tablespoons granulated sugar
Chocolate Ganache
- 8 ounces semi‑sweet chocolate, finely chopped
- ½ cup heavy cream
- 1 tablespoon unsalted butter
- 1 teaspoon vanilla extract
Marshmallow Topping
- 12 large marshmallows, cut in half
- 1 tablespoon brown sugar
- Pinch of sea salt
Optional Extras
- Chocolate shavings for garnish
- Crushed peanuts or pretzels
Instructions
Preparing the Crust
- Mix the crust. Use a fork to blend the crumbs, butter, and sugar until fully combined. The butter should coat every crumb for a cohesive base.
- Press into cups. Evenly distribute the mixture among eight ramekins or silicone cups, pressing firmly with the back of a spoon or your fingertips.
Making the Chocolate Ganache
- Heat the cream. Warm the cream until tiny bubbles form around the edges; do not let it boil.
- Combine with chocolate. Pour the hot cream over the chocolate, wait 60 seconds, then whisk until the mixture is silky.
- Add butter and vanilla. Stir in butter until melted, then mix in vanilla extract for aroma.
Assembling the Cups
- Fill the cups. Use a small ice‑cream scoop or spoon to distribute the ganache evenly.
- Level the surface. Gently tap the ramekin on the counter to smooth any peaks.
Adding the Marshmallow Topping
- Place marshmallows. Position one half‑marshmallow in the center of each cup.
- Brush with sugar. Drizzle a tiny amount of brown sugar over each marshmallow, allowing it to cling.
Similar Recipes
 Desserts
Peanut Butter Spider Cookies That Kids Will Adore This Halloween
Learn how to make delicious Peanut Butter Spider Cookies That Kids Will Adore This Halloween. Easy…
 Desserts
Apple Pie Cinnamon Roll Casserole Delight
Learn how to make delicious Apple Pie Cinnamon Roll Casserole Delight. Easy recipe with step-by-step instructions.
 Desserts
Warm Blackberry Sage Glazed Cookies
Delicious Warm Blackberry Sage Glazed Cookies
 Desserts
Zesty Blueberry Lemon Bliss Bars: A Refreshing Delight
Delicious Zesty Blueberry Lemon Bliss Bars: A Refreshing Delight
 Desserts
Silly Rat Cakes: Easy 7-Step Recipe for Whimsical Rodent Desserts
Learn how to make delicious Silly Rat Cakes: Easy 7-Step Recipe for Whimsical Rodent Desserts. Easy…
 Desserts
Homemade Vampire Fudge: The Ultimate Spooky Treat That Disappears Fast
Learn how to make delicious Homemade Vampire Fudge: The Ultimate Spooky Treat That Disappears Fast. Easy…
 Desserts
Chilled Delight: Frozen Caramel Apple Cream Bars
Delicious Chilled Delight: Frozen Caramel Apple Cream Bars
 Desserts
Indulge in Tropical Bliss: A Delightful Mango Chia Pudding Recipe
Delicious Indulge in Tropical Bliss: A Delightful Mango Chia Pudding Recipe

Victoria
I cook these recipes at home before they ever land here — simple ingredients, clear steps.