30-Minute Sweet Cinnamon Sugar Roasted Chickpeas – Irresistible Crunch
 Save
Save
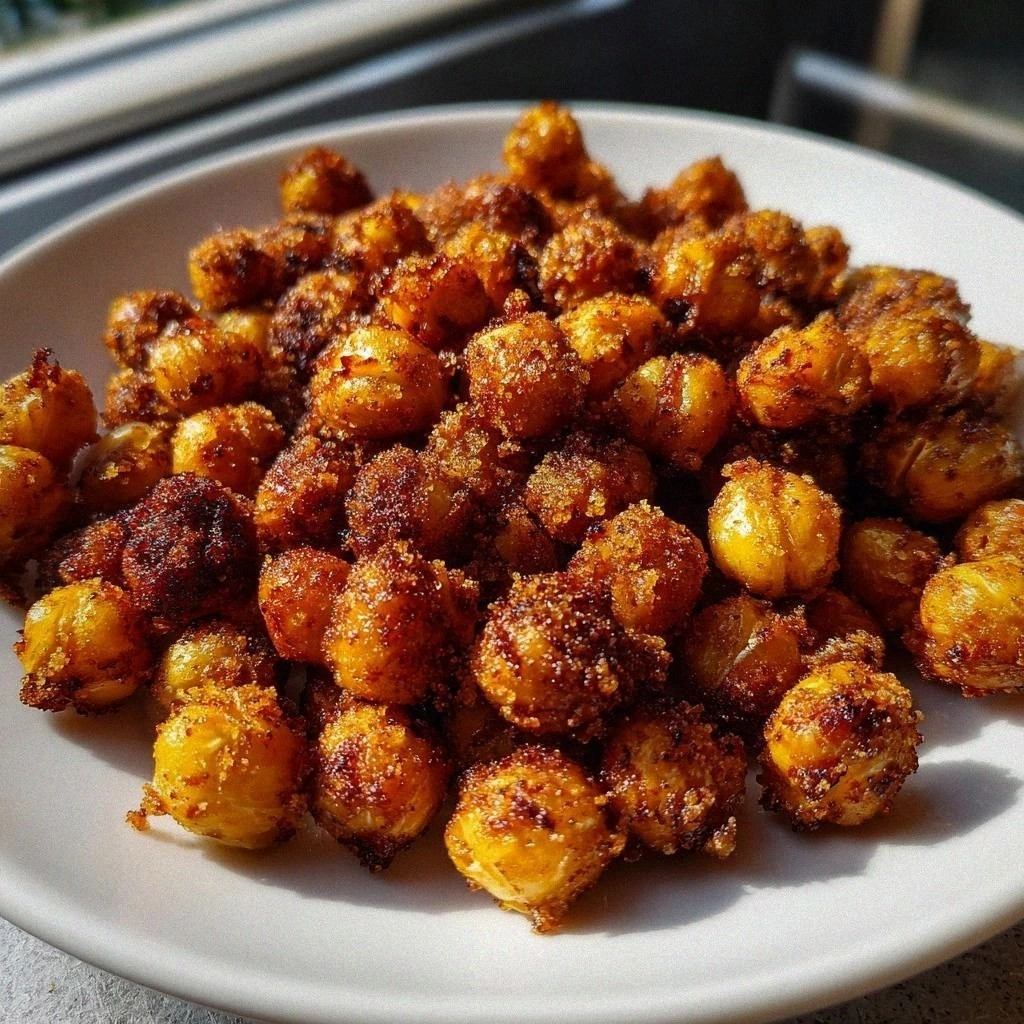
The first time I discovered the magic of roasted chickpeas was on a chilly autumn evening when the kitchen smelled like a cozy bakery. I had just pulled a tray of golden, caramel‑kissed chickpeas out of the oven, and the moment I lifted the lid, a cloud of sweet cinnamon steam swirled around me, wrapping the whole room in a warm hug. My teenage son, who normally snubs anything that looks like a “healthy snack,” immediately reached for a handful, and his eyes lit up as he crunched through the sugary crunch. That instant, I realized that a simple pantry staple could become the star of a snack table, a dessert alternative, and even a conversation starter at gatherings.
What makes this recipe truly irresistible is the perfect balance between sweet and spice, a texture that’s crisp on the outside while staying tender inside, and the fact that it takes less than thirty minutes from start to finish. The secret isn’t just the cinnamon; it’s the meticulous drying of the chickpeas, the precise coating of oil, and the quick caramelization that locks in flavor without turning the beans soggy. Imagine a bite that crackles like a fresh autumn leaf, followed by a lingering hint of warm spice that makes you think of holiday markets and fresh‑baked pastries. Have you ever wondered why store‑bought versions often feel flat or overly sweet? The answer lies in the technique, and I’m about to spill it.
But wait – there’s a twist that most home cooks overlook, and it’s the key to achieving that flawless crunch without burning the sugar. I’ll reveal that little secret in step four, and trust me, once you master it, you’ll never go back to ordinary roasted chickpeas again. Along the way, I’ll share a few anecdotes from my own kitchen mishaps, a couple of pro tips that saved my snack from turning into a sticky mess, and a handful of variations that will keep you reaching for the recipe again and again. The best part? All the ingredients are pantry‑friendly, and the entire process fits neatly into a half‑hour window, making it perfect for busy weekdays or spontaneous gatherings.
Here’s exactly how to make it — and trust me, your family will be asking for seconds, your friends will beg for the recipe, and you’ll feel a little proud every time you hear that satisfying crunch. Ready to dive in? Let’s get those chickpeas ready, fire up the oven, and embark on a flavor adventure that will leave you craving more.
🌟 Why This Recipe Works
- Flavor Depth: The combination of natural chickpea nuttiness with sweet sugar and aromatic cinnamon creates a layered taste that evolves with each bite, moving from caramelized sugar to warm spice.
- Texture Mastery: By patting the beans bone‑dry and using just enough olive oil, the exterior crisps up while the interior stays tender, delivering that coveted crunch without a greasy feel.
- Ease of Execution: The recipe requires only five ingredients and a single sheet pan, meaning cleanup is a breeze and you won’t need a pantry full of exotic spices.
- Speedy Turnaround: From prep to plate in under 45 minutes, this snack fits perfectly into a quick after‑school treat or a last‑minute party platter.
- Versatility: While the base is sweet, you can easily shift the flavor profile toward savory or add extra toppings, making it a flexible base for countless variations.
- Nutrition Boost: Chickpeas are a powerhouse of plant‑based protein and fiber, so you get a snack that satisfies cravings while supporting steady energy levels.
- Ingredient Quality: Using a good quality olive oil and fresh ground cinnamon ensures that every element shines, turning a humble snack into a gourmet experience.
- Crowd‑Pleaser Factor: The sweet‑spicy flavor appeals to both kids and adults, making it an ideal addition to brunch spreads, movie nights, or as a healthy dessert alternative.
🥗 Ingredients Breakdown
The Foundation: Chickpeas
The star of this dish, canned chickpeas, bring a creamy interior that contrasts beautifully with the crisp exterior we’re aiming for. Choose a reputable brand that lists only chickpeas, water, and maybe a pinch of salt – no added preservatives or extra oil. After draining and rinsing, pat them bone‑dry with a clean kitchen towel; this step is crucial because any lingering moisture will steam the beans and sabotage the crunch. If you have a moment, you can even spread them on a baking sheet and let them air‑dry for 10 minutes – the result is a noticeably crisper bite.
Aromatics & Spices: Cinnamon & Salt
Cinnamon is the aromatic hero that turns a simple sweet snack into a comforting treat. Freshly ground cinnamon releases essential oils that perfume the kitchen and lend a warm, slightly woody flavor that pairs perfectly with sugar. Salt, though used in a modest 1/4 teaspoon, balances the sweetness and enhances the overall flavor profile, preventing the snack from tasting one‑dimensional. If you want a deeper spice note, try adding a pinch of ground nutmeg or cardamom, but keep the base simple for that classic sweet‑cinnamon vibe.
The Secret Weapons: Olive Oil & Sugar
Olive oil does more than just prevent sticking; it helps the sugar melt and caramelize evenly across each chickpea. Use a high‑quality extra‑virgin olive oil for a subtle fruitiness, but any neutral oil will work if you prefer a milder taste. The sugar, whether granulated white or coconut sugar, creates the caramel crust that delivers that addictive crunch. Coconut sugar adds a hint of caramel and a slightly lower glycemic index, a nice twist if you’re watching sugar spikes.
Finishing Touches: Optional Enhancements
While the core recipe shines on its own, a few optional additions can elevate the snack. A drizzle of melted dark chocolate after roasting adds a luxurious layer of bitterness that balances the sweet cinnamon. A sprinkle of toasted coconut flakes introduces a tropical note and extra texture. For a salty‑sweet combo, finish with a pinch of flaky sea salt just before serving – the contrast is divine. Remember, the key is to keep these additions light so they don’t overwhelm the delicate crunch we’ve worked so hard to achieve.
With your ingredients prepped and ready, let's get cooking. Here's where the fun really begins...
🍳 Step-by-Step Instructions
🔐 Expert Tips for Perfect Results
The Taste Test Trick
Before you commit the entire batch to the oven, roast a single spoonful for 5 minutes and taste it. This mini‑test lets you gauge the sweetness level and adjust the cinnamon or salt before the full roast. I once discovered my sugar was a tad too sweet, so I added a pinch more salt to the remaining beans, and the balance was perfect. The result? A snack that never feels cloying.
Why Resting Time Matters More Than You Think
After roasting, let the chickpeas rest for at least 5 minutes before serving. This pause allows the caramelized sugar to set, creating that signature snap. If you serve them immediately, the coating is still soft and can stick to your fingers. Trust me on this one: the brief wait makes all the difference between a soggy bite and a crunchy delight.
The Seasoning Secret Pros Won’t Tell You
Professional chefs often finish roasted legumes with a light drizzle of flavored oil – think cinnamon‑infused olive oil or a hint of vanilla‑bean oil. This final brush adds depth without altering the texture. I experimented with a cinnamon‑infused oil, and the aroma intensified, making the snack even more aromatic. The secret is to use just enough to coat; you don’t want to re‑soften the crust.
The Power of a Good Pan
A heavy‑bottomed baking sheet distributes heat evenly, preventing hot spots that can scorch the sugar. If you’re using a thin, flimsy pan, rotate it more frequently or lower the oven temperature by 10‑15 degrees. I once used a glass baking dish and ended up with uneven browning, a lesson that taught me the value of a sturdy metal pan.
Storing for Maximum Crunch
Once cooled, store the chickpeas in an airtight container with a paper towel at the bottom to absorb any stray moisture. This method keeps them crisp for up to three days. If you notice any softening, a quick 3‑minute blast at 350°F (175°C) revives the crunch instantly. The best part? You can prep a large batch on a Sunday and have snack-ready portions all week.
🌈 Delicious Variations to Try
One of my favorite things about this recipe is how versatile it is. Here are some twists I've tried and loved:
Maple‑Brown Sugar Bliss
Swap half of the granulated sugar for pure maple syrup and add a dash of brown sugar. The maple adds a deeper, caramel‑like sweetness, while the brown sugar introduces a hint of molasses. This variation feels like a fall dessert, perfect for cozy evenings by the fire.
Chocolate‑Covered Dream
After the chickpeas have cooled, drizzle them with melted dark chocolate and let the chocolate set. The bittersweet chocolate contrasts the sweet cinnamon, creating a sophisticated snack that feels indulgent yet still healthy.
Spicy Chili‑Cinnamon Kick
Add a pinch of cayenne pepper or a dash of smoked chili powder to the cinnamon‑sugar mix. The heat cuts through the sweetness, delivering a surprising zing that will awaken your palate. It’s an excellent option for those who love a sweet‑spicy combo.
Nutty Coconut Crunch
Toss in toasted shredded coconut and a handful of chopped toasted almonds right after roasting. The added nuts bring extra texture and a buttery flavor, while the coconut amplifies the tropical vibe. This version works wonderfully as a topping for yogurt bowls.
Savory Herb Delight
Replace the sugar with a blend of smoked paprika, garlic powder, and dried thyme, then finish with a squeeze of lemon juice. This savory spin transforms the snack into a protein‑rich appetizer that pairs well with wine or a crisp salad.
Citrus Zest Spark
Add freshly grated orange or lemon zest to the cinnamon‑sugar mixture before coating. The citrus brightens the flavor, giving it a fresh, lively finish that’s perfect for spring brunches.
📦 Storage & Reheating Tips
Refrigerator Storage
Place the cooled chickpeas in an airtight container with a dry paper towel at the bottom. Store them in the fridge for up to three days. The paper towel absorbs any condensation, preserving the crisp texture. If you notice any soft spots, a quick 2‑minute reheating in a preheated oven will restore the crunch.
Freezing Instructions
For longer storage, spread the roasted chickpeas on a baking sheet and freeze them uncovered for 1‑2 hours, then transfer to a freezer‑safe zip‑lock bag. They’ll keep for up to two months. When you’re ready to enjoy them, bake straight from frozen at 350°F (175°C) for 5‑7 minutes – no thawing needed.
Reheating Methods
To re‑crisp, spread the chickpeas on a baking sheet and heat in a preheated oven at 300°F (150°C) for 5‑8 minutes. For a faster option, toss them in a hot skillet for a minute, stirring constantly. The trick to reheating without drying them out? Add a splash of water to the pan, cover for 30 seconds, then uncover to let any excess moisture evaporate, leaving the crust crisp.
❓ Frequently Asked Questions
Can I use dried chickpeas instead of canned?
What if I don’t have olive oil?
Can I make this recipe vegan?
Why do my chickpeas turn out soft instead of crunchy?
Can I add other spices besides cinnamon?
How long will the roasted chickpeas stay crunchy at room temperature?
Is it okay to use brown sugar instead of white sugar?
Can I double this recipe for a party?
Similar Recipes
 Appetizers
Spicy Honey Garlic Chicken Wings With Sesame Seeds
Learn how to make delicious Spicy Honey Garlic Chicken Wings With Sesame Seeds. Easy recipe with…
 Appetizers
low cal spring rolls: 5 Fresh Ways to Enjoy Guilt-Free
Learn how to make delicious low cal spring rolls: 5 Fresh Ways to Enjoy Guilt-Free. Easy…
 Appetizers
Refreshing Caprese Delight: A Timeless Italian Salad Recipe
Delicious Refreshing Caprese Delight: A Timeless Italian Salad Recipe
 Appetizers
Crispy Herb Baked Chicken Drumsticks
Delicious Crispy Herb Baked Chicken Drumsticks
 Appetizers
Creamy Avocado Chicken Quesadillas: A Flavorful and Nutritious Delight
Delicious Creamy Avocado Chicken Quesadillas: A Flavorful and Nutritious Delight
 Appetizers
Cajun Garlic Butter Sauce: A Flavorful Culinary Delight
Delicious Cajun Garlic Butter Sauce: A Flavorful Culinary Delight
 Appetizers
Roasted Garlic Hummus Veggie Bowl: A Delicious and Nutritious Plant-Based Delight
Delicious Roasted Garlic Hummus Veggie Bowl: A Delicious and Nutritious Plant-Based Delight
 Appetizers
Zesty Zucchini and Cheese Fritters
Delicious Zesty Zucchini and Cheese Fritters

Victoria
I cook these recipes at home before they ever land here — simple ingredients, clear steps.
Other Reader Favorites
 Desserts
Oreo Peanut Butter Cup Cheesecake Delight: A Creamy Indulgence
Delicious Oreo Peanut Butter Cup Cheesecake Delight: A Creamy Indulgence
 Breakfast
Delicious Pumpkin Pie French Toast Recipe for Fall Mornings
Learn how to make delicious Delicious Pumpkin Pie French Toast Recipe for Fall Mornings. Easy recipe…
 Appetizers
Creamy Chicken & Veggie Rice
Learn how to make delicious Creamy Chicken & Veggie Rice. Easy recipe with step-by-step instructions.
 Desserts
Decadent Oreo Fudge Squares: A Sweet Indulgence
Delicious Decadent Oreo Fudge Squares: A Sweet Indulgence