Tropical Bliss Fruit Leather: A Delectable Homemade Snack

WANT TO SAVE THIS RECIPE?

Introduction

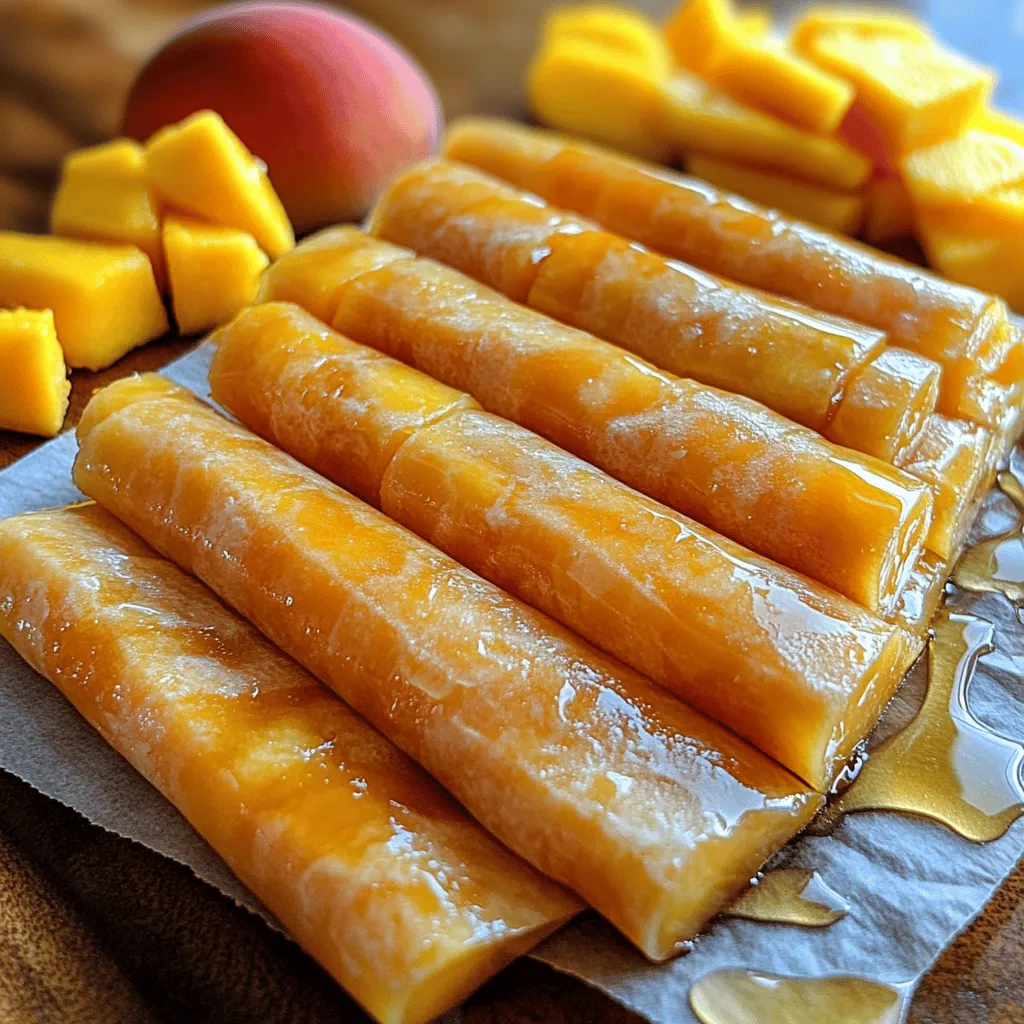
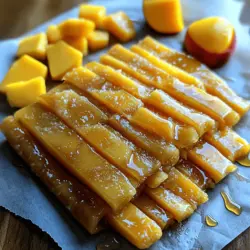
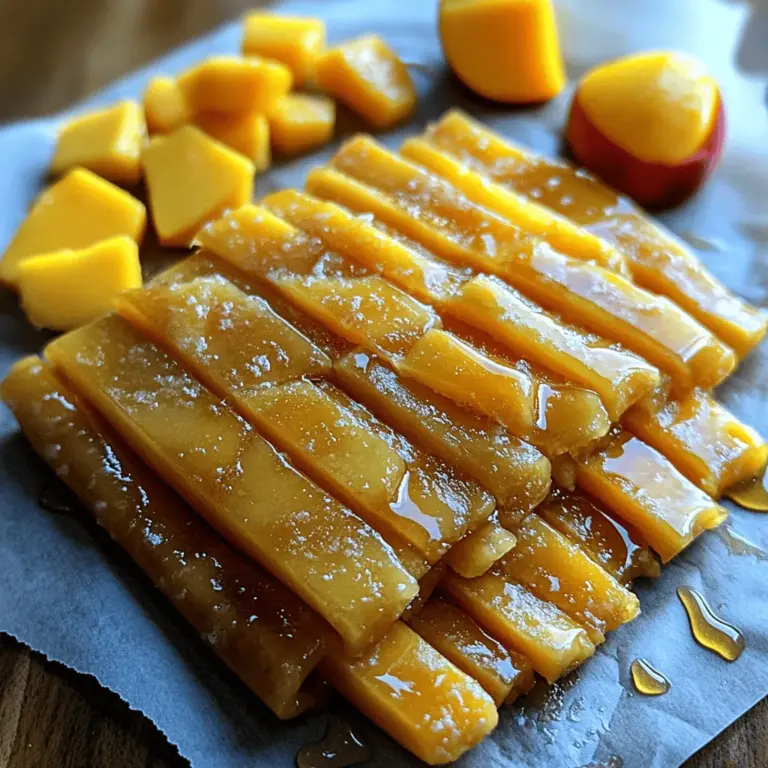
In today’s health-conscious world, snacks that are both tasty and nutritious are in high demand. One delightful option that has gained popularity is fruit leather, a chewy, flavorful snack made from pureed fruit. Not only is fruit leather a healthy alternative to sugary, processed snacks, but it also offers the chance to enjoy the vivid flavors of fresh fruits in a convenient form. Among the myriad of fruit leather recipes, the Tropical Bliss Fruit Leather stands out with its vibrant combination of mangoes and peaches, transporting your taste buds straight to a sunny paradise.

This recipe for Tropical Bliss Fruit Leather is not just about indulging in tropical flavors; it’s also about celebrating the natural sweetness and health benefits of ripe fruits. By making fruit leather at home, you gain complete control over the ingredients, allowing you to customize flavors to your liking while avoiding additives and preservatives found in many store-bought snacks. Whether you are looking for a quick on-the-go snack for yourself or a healthy treat for your kids, this homemade fruit leather is a fantastic choice.

Understanding Fruit Leather

Fruit leather, often called fruit roll-ups, is essentially a concentrated, chewy version of fruit puree. The history of fruit leather dates back centuries, with various cultures around the world using different methods to preserve fruits. From the ancient Greeks and Romans who dried fruits in the sun to the modern-day methods using dehydrators and ovens, this snack has evolved into a beloved treat that bridges generations.

When it comes to nutritional benefits, homemade fruit leather excels compared to its commercial counterparts. Store-bought fruit leathers often contain added sugars, artificial flavors, and preservatives that can compromise health benefits. In contrast, by making fruit leather at home, you can harness the full nutritional profile of the fruits used. For instance, mangoes are rich in vitamins A and C, while peaches provide a good source of vitamins C and E, fiber, and a variety of antioxidants.

For optimal flavor and texture, it is crucial to use ripe, fresh fruits. Not only will they ensure the best taste, but they will also provide the necessary natural sweetness that makes fruit leather so enjoyable. The sweetness of ripe fruits can be further enhanced with a touch of honey or maple syrup, balancing out the flavors and creating a deliciously satisfying snack.

Ingredients Breakdown

Creating the Tropical Bliss Fruit Leather involves a harmonious blend of simple, natural ingredients. Below is a detailed look at each component that contributes to this delightful snack:

Ripe Mangoes: Mangoes are often referred to as the “king of fruits,” and for good reason. Not only are they sweet and juicy, but they are also packed with essential nutrients. A medium-sized mango typically contains about 150 calories and is a rich source of vitamin C, vitamin A, and dietary fiber. Their tropical flavor contributes a luscious base to the fruit leather, making it both delicious and nutritious.

Ripe Peaches: Peaches complement mangoes beautifully, adding a touch of floral sweetness and a soft texture. These stone fruits are low in calories but high in vitamins, particularly vitamin C and vitamin A, as well as other antioxidants that promote skin health and digestion. The combination of peaches and mangoes creates a balanced flavor profile that enhances the overall taste of the fruit leather.

Honey vs. Maple Syrup: When sweetening your fruit leather, you have the option of choosing between honey and maple syrup. Both natural sweeteners have their unique qualities. Honey, with its floral notes, can enhance the fruit’s flavor but is not suitable for vegans. On the other hand, maple syrup offers a rich, earthy sweetness and is a great alternative for those avoiding animal products. Depending on your dietary needs and taste preferences, you can choose the sweetener that best suits your recipe.

Lemon Juice: A splash of lemon juice serves multiple purposes in this recipe. Firstly, it provides a refreshing acidity that balances out the sweetness of the fruits. Secondly, lemon juice acts as a natural preservative, helping to maintain the vibrant color and freshness of the fruit leather. The acidity also enhances the overall flavor profile, making each bite more delightful.

Ground Ginger: While optional, ground ginger can add a unique warmth and spice to the fruit leather. Known for its anti-inflammatory properties and digestive benefits, ginger complements the tropical flavors beautifully. If you’re a fan of a little zing in your snacks, consider adding a teaspoon of ground ginger to elevate the taste.

Salt: A pinch of salt may seem insignificant, but it plays a vital role in enhancing the sweetness of the fruit. Salt helps to balance flavors, making the fruit leather taste more intense and satisfying. Just a small amount can elevate the overall experience of this chewy treat.

Preparation Steps for Tropical Bliss Fruit Leather

Now that you have a good understanding of the ingredients, it’s time to dive into the preparation process for your Tropical Bliss Fruit Leather. Here’s a step-by-step guide to help you create this delicious snack:

Selecting and Preparing Ripe Mangoes and Peaches

The first step in preparing your fruit leather is to select the best mangoes and peaches. Look for fruits that are slightly soft to the touch and have a pleasant aroma, indicating ripeness.

1. Mangoes: Start by peeling the ripe mangoes and removing the pit. Cut the mango flesh into chunks for easier blending.

2. Peaches: Similarly, wash the peaches thoroughly, remove the pits, and chop them into small pieces. If you prefer, you can peel the peaches, but leaving the skin on adds additional fiber and nutrients.

Blending Tips for Achieving the Desired Consistency

Once you have your fruits prepared, it’s time to blend them into a smooth puree:

1. Combine the Fruits: Add the chopped mangoes and peaches into a blender or food processor.

2. Blending: Blend until you achieve a smooth consistency. Depending on your blender, this may take a minute or two. If necessary, stop occasionally to scrape down the sides to ensure all fruit is blended evenly.

3. Adjusting Thickness: If the mixture seems too thick, you can add a tablespoon of water or more lemon juice to help it blend smoothly.

Discussing the Sweetening Process

After achieving the desired fruit puree consistency, it’s time to sweeten it according to your taste:

1. Sweetening: Start by adding honey or maple syrup to the fruit puree. A good starting point is about 2-4 tablespoons, but this can be adjusted based on your preferences and the natural sweetness of the fruits.

2. Taste Test: Blend the mixture again and taste to see if it meets your sweetness preference. Keep in mind that the sweetness will intensify slightly as it dehydrates, so it’s okay for it to be a bit less sweet than you desire.

3. Balancing Flavors: Add the lemon juice and a pinch of salt to the mixture, blending once more to combine all ingredients thoroughly. Taste again and adjust the sweetness or acidity if necessary.

Importance of Using Parchment Paper or Silicone Mats in Preparation

Once you have your fruit puree ready, it’s essential to prepare your drying surface:

1. Choosing Your Surface: You can either use a dehydrator or an oven to dry your fruit leather. For both methods, choose parchment paper or silicone mats to line your trays or baking sheets. This prevents sticking and makes it easier to peel the fruit leather once it’s dried.

2. Spreading the Mixture: Pour the fruit puree onto your lined trays, spreading it evenly with a spatula to about 1/8 to 1/4 inch thick. A uniform thickness ensures even drying.

Dehydration Process

The dehydration process is critical for achieving that perfect chewy texture in your Tropical Bliss Fruit Leather. Depending on whether you use a dehydrator or an oven, the drying times may vary.

1. Using a Dehydrator: Set your dehydrator to 135°F (57°C) and dry for about 6 to 8 hours. Check the leather periodically for doneness; it should be flexible but not sticky to the touch.

2. Using an Oven: If you opt for the oven, preheat it to the lowest setting (usually around 170°F or 77°C). Place the trays in the oven and leave the door slightly ajar to allow moisture to escape. The drying process may take anywhere from 4 to 8 hours, so keep an eye on it as it gets close to the finish line.

By following these steps and tips, you’ll be well on your way to creating your very own Tropical Bliss Fruit Leather, a flavorful and nutritious snack that can be enjoyed by the whole family. Stay tuned for the next part, where we will delve into finishing touches, storage tips, and more delightful variations to elevate your fruit leather experience.

In today's health-conscious world, snacks that are both tasty and nutritious are in high demand. One delightful option that has gained popularity is fruit leather, a chewy, flavorful snack made from pureed fruit. Not only is fruit leather a healthy alternative to sugary, processed snacks, but it also offers the chance to enjoy the vivid flavors of fresh fruits in a convenient form. Among the myriad of fruit leather recipes, the <strong>Tropical Bliss Fruit Leather</strong> stands out with its vibrant combination of mangoes and peaches, transporting your taste buds straight to a sunny paradise.” /></p>
</p>
<h3>Overview of the Dehydration Method</h3>
</p>
<p>Creating your own Tropical Bliss Fruit Leather is a delightful way to enjoy the essence of summer fruits all year round. The dehydration method is central to this process, transforming fresh, juicy fruit into a chewy, flavorful snack. By removing moisture, we prevent spoilage and create a concentrated flavor that captures the essence of the fruit. The easiest way to achieve this at home is using your oven, which efficiently mimics the conditions of a dehydrator.</p>
</p>
<h4>Importance of Low Oven Temperatures for Drying Fruit Leather</h4>
</p>
<p>When dehydrating fruit leather, maintaining a low oven temperature is crucial. Typically, a range of 140°F to 170°F is ideal for this process. A lower temperature ensures that the fruit dries evenly without cooking, preserving its vibrant flavor and nutrients. High temperatures can lead to uneven drying and might scorch the fruit, resulting in an unpleasant taste and texture.</p>
</p>
<h4>How Propping the Oven Door Helps in Moisture Release</h4>
</p>
<p>One effective technique during the drying process is propping the oven door ajar. By doing this, you allow moisture to escape freely, which enhances the dehydration process. This simple trick improves airflow within the oven, preventing the build-up of steam that can compromise the texture of your fruit leather. A wooden spoon or a folded kitchen towel can serve as a prop, creating a small gap for steam to vent while still retaining heat.</p>
</p>
<h3>Duration and Signs of Readiness</h3>
</p>
<p>The drying process for your Tropical Bliss Fruit Leather will typically take anywhere from 4 to 8 hours, depending on your oven and the thickness of the fruit puree. However, the best way to gauge readiness is by checking the texture and stickiness of the leather.</p>
</p>
<h4>What to Look for When Checking for Doneness</h4>
</p>
<p>To determine if your fruit leather is done, look for the following signs:</p>
</p>
<p>1. <strong>Texture</strong>: The leather should be firm yet slightly tacky to the touch. It should not feel wet or overly sticky.</p>
<p>2. <strong>Appearance</strong>: The color should remain vibrant, indicating that the nutrients and flavor have been preserved.</p>
<p>3. <strong>Peeling</strong>: You should be able to peel the fruit leather easily from the parchment paper or baking sheet without tearing.</p>
</p>
<p>If it feels too moist or sticky, it likely needs more time in the oven. Conversely, if it feels dry and brittle, it may have dried out too much, so keep a close eye on it as it approaches the end of the drying time.</p>
</p>
<h3>Cooling and Storing Your Fruit Leather</h3>
</p>
<p>Once your Tropical Bliss Fruit Leather is done, the cooling process is essential for maintaining its perfect texture.</p>
</p>
<h4>Importance of Cooling Before Cutting to Maintain Texture</h4>
</p>
<p>Allow the fruit leather to cool completely before cutting it into strips or shapes. This cooling period helps set the texture, making it easier to handle and less likely to stick together when rolled.</p>
</p>
<h4>Best Practices for Cutting and Rolling Fruit Leather</h4>
</p>
<p>To cut and roll your fruit leather:</p>
</p>
<p>1. <strong>Use a sharp knife or scissors</strong>: This ensures clean cuts and prevents tearing.</p>
<p>2. <strong>Cut into strips or desired shapes</strong>: Aim for uniform sizes to make it easy to roll and store.</p>
<p>3. <strong>Roll tightly but not too tight</strong>: When rolling the strips, keep them snug but avoid squeezing too hard, which could cause them to break.</p>
</p>
<h3>Proper Storage Methods to Maximize Shelf Life and Maintain Flavor</h3>
</p>
<p>Proper storage is key to preserving the flavor and texture of your homemade fruit leather. Once cut and rolled, wrap each piece in parchment paper or wax paper. Store them in an airtight container or a resealable plastic bag in a cool, dark place. If stored properly, your Tropical Bliss Fruit Leather can last for up to six months.</p>
</p>
<h3>Flavor Variations and Customization Options</h3>
</p>
<p>One of the best aspects of making your own fruit leather is the freedom to customize flavors according to your preferences.</p>
</p>
<h4>Suggestions for Substituting or Adding Different Fruits</h4>
</p>
<p>While the combination of peaches and mangoes creates a delightful tropical flavor, consider experimenting with other fruits. Pineapple adds a tangy sweetness, while bananas provide creaminess. You can also blend in fruits like kiwi or papaya for a unique twist.</p>
</p>
<h4>Exploring Different Sweeteners and Spices for Personalized Flavors</h4>
</p>
<p>You can adjust the sweetness of your fruit leather by incorporating different sweeteners. Honey, agave syrup, or maple syrup can enhance the natural sweetness of the fruits. Additionally, spices such as cinnamon, nutmeg, or even a hint of chili powder can elevate the flavor profile of your Tropical Bliss Fruit Leather, adding a delightful kick.</p>
</p>
<h4>How to Create Themed Fruit Leather Combinations</h4>
</p>
<p>Consider creating themed combinations for special occasions. For instance, a mixed berry blend featuring strawberries, blueberries, and raspberries can bring a burst of color and flavor, while a citrus infusion with orange and lemon zest can offer a refreshing tang. The possibilities are endless!</p>
</p>
<h3>Serving Suggestions for Tropical Bliss Fruit Leather</h3>
</p>
<p>Once you’ve whipped up your Tropical Bliss Fruit Leather, there are numerous ways to enjoy it.</p>
</p>
<h4>Creative Ways to Enjoy Fruit Leather</h4>
</p>
<p>1. <strong>As a Standalone Snack</strong>: Enjoy it on its own as a chewy, healthy treat.</p>
<p>2. <strong>Pairing Suggestions with Nuts or Yogurt</strong>: For a satisfying snack, pair your fruit leather with a handful of nuts for crunch, or enjoy it alongside yogurt for a delightful contrast in texture.</p>
<p>3. <strong>Incorporating into Lunch Boxes or Hiking Snacks</strong>: Pack pieces of fruit leather in lunch boxes or take them along on hikes for an energy-boosting snack that’s easy to carry and eat.</p>
</p>
<h3>Health Benefits of Homemade Fruit Leather</h3>
</p>
<p>Homemade fruit leather is not only delicious but also offers significant health benefits when compared to commercial snacks.</p>
</p>
<h4>Caloric Comparison with Commercial Snacks</h4>
</p>
<p>Many commercial fruit leathers are laden with added sugars and preservatives, making them less healthy than homemade versions. By making your own, you can significantly reduce the calorie count and control the ingredients.</p>
</p>
<h4>Nutritional Advantages of Using Whole Fruits</h4>
</p>
<p>Using whole fruits means you retain the fiber, vitamins, and minerals essential for good health. Unlike processed snacks, homemade fruit leather provides a concentrated source of nutrients without the additives.</p>
</p>
<h4>Benefits of Controlling Added Sugars and Preservatives</h4>
</p>
<p>When you prepare your own fruit leather, you have the power to decide how much sugar (if any) to add. This control allows you to create a healthier snack that fits your dietary needs and preferences, making it an excellent choice for families looking to reduce sugar intake.</p>
</p>
<h3>Conclusion</h3>
</p>
<p>Creating your own Tropical Bliss Fruit Leather is a rewarding experience that allows you to indulge in healthy, delicious snacks made from fresh, wholesome ingredients. With the ability to customize flavors and control what goes into your food, this recipe not only satisfies your cravings but also aligns with a nutritious lifestyle.</p>
</p>
<p>We encourage you to explore the recipe and its variations, whether you decide to try other fruits, experiment with spices, or create themed combinations. The joy of making this delightful treat at home extends beyond just enjoying it yourself; it’s also a wonderful way to share nutritious goodies with your loved ones. So roll up your sleeves, gather your fruits, and embark on a flavorful adventure with your Tropical Bliss Fruit Leather!</p>
</div>

In today's health-conscious world, snacks that are both tasty and nutritious are in high demand. One delightful option that has gained popularity is fruit leather, a chewy, flavorful snack made from pureed fruit. Not only is fruit leather a healthy alternative to sugary, processed snacks, but it also offers the chance to enjoy the vivid flavors of fresh fruits in a convenient form. Among the myriad of fruit leather recipes, the Tropical Bliss Fruit Leather stands out with its vibrant combination of mangoes and peaches, transporting your taste buds straight to a sunny paradise.

Mango Peach Fruit Leather

Discover the joy of making your own Tropical Bliss Fruit Leather, a delicious and nutritious snack that captures the vibrant flavors of ripe mangoes and peaches. This homemade treat is easy to prepare and allows you to control the ingredients, ensuring a wholesome alternative to store-bought snacks. Packed with vitamins and fiber, this chewy delight is perfect for on-the-go snacking or a healthy treat for kids. Elevate your snack game and enjoy the taste of summer year-round!

Ingredients
  

2 ripe mangoes, peeled and diced

2 ripe peaches, pitted and diced

2 tablespoons honey or maple syrup (adjust based on sweetness preference)

1 tablespoon lemon juice

1/2 teaspoon ground ginger (optional for a hint of spice)

A pinch of salt

Instructions
 

Prep the Fruit: In a blender or food processor, combine the diced mangoes and peaches. Blend until smooth. If desired, you can leave some small pieces for texture.

    Sweeten the Mixture: Add honey or maple syrup, lemon juice, ground ginger (if using), and a pinch of salt to the blended fruit. Blend again until all ingredients are well incorporated.

      Prepare the Baking Sheet: Line a large baking sheet with parchment paper or a silicone baking mat. This will help prevent the fruit leather from sticking.

        Pour and Spread: Pour the fruit mixture onto the lined baking sheet. Using a spatula, spread it evenly to about 1/8-inch thickness. Ensure it’s spread evenly for consistent drying.

          Dehydrate: Preheat your oven to the lowest temperature setting (usually around 140°F or 60°C). Place the baking sheet in the oven and prop the door open slightly with a wooden spoon to allow moisture to escape.

            Dry the Leather: Let the fruit mixture dry for 6 to 8 hours. Check periodically; the fruit leather is ready when it is no longer tacky and can be easily peeled off the parchment.

              Cool and Cut: Once dried, remove the baking sheet from the oven and allow the fruit leather to cool completely. Use kitchen scissors or a sharp knife to cut it into strips.

                Store Properly: Roll each strip in parchment paper and store in an airtight container. Stored properly, it can last for up to a month!

                  Prep Time, Total Time, Servings: 15 minutes | 8 hours | 12 strips

                    WANT TO SAVE THIS RECIPE?

                    Leave a Comment

                    Recipe Rating