Crispy Buttermilk Fried Chicken Recipe
Fried chicken holds a special place in the culinary traditions of many cultures around the world. From the Southern United States to Korea and beyond, this crispy, savory dish is celebrated for its irresistible flavor and satisfying crunch. Whether served at family gatherings, picnics, or casual weeknight dinners, fried chicken is a timeless comfort food that brings people together. Among the countless methods of preparing this beloved dish, the buttermilk marinade technique stands out for its ability to enhance both flavor and tenderness.
The use of buttermilk in fried chicken recipes is not just a trend; it is a time-honored practice that dates back generations. The natural acidity of buttermilk tenderizes the chicken, making it exceptionally juicy while also infusing it with rich depth of flavor. As the chicken soaks in the buttermilk, the proteins break down, resulting in a melt-in-your-mouth texture that pairs perfectly with the crispy coating. This method is particularly appealing to home cooks and professional chefs alike, as it yields consistently delicious results.
In this article, we will take you through the ins and outs of making crispy buttermilk fried chicken, from understanding the essential ingredients to mastering the marination process and preparing the perfect coating. This dish is not only a feast for the taste buds but also an opportunity to create lasting memories around the dinner table.
Understanding the Ingredients
To create the ultimate crispy buttermilk fried chicken, it is essential to select the right ingredients. Each component plays a crucial role in achieving the perfect balance of flavor and texture.
Chicken
When it comes to frying chicken, the choice of cuts can greatly influence the final dish. The most popular parts used for fried chicken include legs, thighs, wings, and breasts. Each cut has its unique flavor profile and texture:
– Chicken Legs: Known for their rich flavor and juiciness, chicken legs are a favorite for frying. The dark meat is tender and remains moist even after cooking, making it an excellent choice for those who enjoy a full-bodied flavor.
– Chicken Thighs: Similar to legs, thighs are dark meat and offer a slightly more robust taste. Their higher fat content ensures that they remain juicy and tender, even when cooked at high temperatures.
– Chicken Wings: These are perfect for those who like a crispier bite. Wings are often favored for parties and gatherings and can be easily coated in a variety of sauces after frying.
– Chicken Breasts: While they are leaner than dark meat cuts, chicken breasts can be fried to perfection with the right technique. Marinating is especially important for breasts to ensure they don’t dry out during cooking.
Selecting a mix of these cuts can provide a range of flavors and textures, making your fried chicken experience even more enjoyable.
Buttermilk
Buttermilk is the star of the show when it comes to marinating chicken. This fermented dairy product is not only a key ingredient in many baking recipes but also serves as a versatile marinade for meats. The acidity in buttermilk helps to break down the proteins in the chicken, resulting in a tender and juicy final product. Additionally, buttermilk adds a slight tang that enhances the overall flavor profile of the fried chicken.
For those looking to add a little extra kick, incorporating hot sauce into the buttermilk marinade can provide a delightful spicy contrast to the richness of the chicken. This step is optional, but it can elevate the dish to new heights, especially for those who appreciate a bit of heat.
Spices and Seasonings
The flour mixture used to coat the chicken is equally important. A well-seasoned coating can make all the difference in creating a flavorful crust that complements the tender meat. Common spices and seasonings for the coating include:
– Salt and Pepper: These are essential for enhancing the natural flavors of the chicken and should be generously included in the flour mixture.
– Garlic Powder: Adds a savory depth that pairs beautifully with fried chicken.
– Onion Powder: Provides a subtle sweetness and complexity to the flavor.
– Paprika: This spice not only adds color but also contributes a mild sweetness and a hint of smokiness.
– Cayenne Pepper: If you’re looking to spice things up, a dash of cayenne can bring the heat and make the flavor profile more dynamic.
– Dried Herbs: Options like thyme, oregano, or rosemary can add an aromatic touch that elevates the dish.
By customizing the blend of spices, you can create a unique flavor profile that reflects your personal taste preferences.
The Marination Process
Marinating the chicken in buttermilk is a crucial step that should not be overlooked. This process not only infuses the meat with flavor but also ensures that it remains juicy during frying.
Importance of Marinating
The act of marinating chicken in buttermilk allows the flavors to penetrate deeply, resulting in a dish that is more than just crispy on the outside. The longer the chicken sits in the marinade, the more tender and flavorful it becomes. A minimum of 4 hours is recommended, but for optimal results, consider marinating overnight. This extended time allows the buttermilk to work its magic, ensuring that each piece of chicken is packed with flavor.
Step-by-Step Instructions for Marinating Chicken
1. Combine Buttermilk and Optional Hot Sauce: In a large bowl, pour in enough buttermilk to fully submerge the chicken pieces. If desired, whisk in hot sauce for an added kick. The amount of hot sauce can be adjusted based on your heat preference.
2. Prepare the Chicken: Trim any excess fat from the chicken pieces and pat them dry with paper towels. This step is important to ensure that the marinade adheres properly.
3. Submerge the Chicken: Add the chicken pieces to the buttermilk mixture, making sure each piece is fully coated. Use your hands or tongs to ensure that all surfaces are covered.
4. Cover and Refrigerate: Once the chicken is well-coated, cover the bowl with plastic wrap or transfer the chicken and marinade to a resealable plastic bag. Place it in the refrigerator for at least 4 hours, or overnight for best results.
5. Remove from Marinade: When ready to fry, take the chicken out of the fridge. Allow the excess buttermilk to drip off, but do not rinse the chicken, as you want the marinade to cling to the surface for optimal coating.
By following these steps, you’ll set the stage for a successfully crispy and flavorful buttermilk fried chicken that is sure to impress family and friends alike.
Preparing the Coating
While the chicken marinates, you can prepare the seasoned flour mixture that will form the crispy exterior. This coating is vital for achieving that coveted crunch.
Importance of Creating a Flavorful Coating
A well-seasoned coating not only adds texture but also enhances the overall taste of the fried chicken. The crunch from the coating should complement the tender meat inside, creating a harmonious balance that elevates each bite.
Step-by-Step Instructions for Preparing the Seasoned Flour Mixture
1. Gather the Dry Ingredients: In a large mixing bowl, combine all-purpose flour with your chosen spices. Start with about 2 cups of flour and adjust as needed based on the amount of chicken you are frying.
2. Whisk Together: Use a whisk to thoroughly combine the flour and spices. This step ensures that the seasonings are evenly distributed throughout the flour, so each piece of chicken receives a consistent flavor.
3. Taste and Adjust: Before coating the chicken, taste the flour mixture. This is your chance to adjust the seasoning according to your preference. If you prefer a spicier coating, consider adding more cayenne or paprika.
4. Set Aside: Once the flour mixture is well-combined and seasoned to your liking, set it aside until the marinated chicken is ready for coating.
By preparing the seasoned flour while the chicken marinates, you’re ensuring that the frying process goes smoothly and efficiently, resulting in perfectly crispy buttermilk fried chicken that is sure to be a hit at your next meal.
In the next part of this article, we will delve into the frying techniques that will help you achieve the perfect golden-brown crust while keeping the chicken tender and juicy inside. Stay tuned as we continue on this culinary journey to make the ultimate crispy buttermilk fried chicken.
Overview of Frying Methods: Deep Frying vs. Pan Frying
When it comes to frying chicken, two popular methods stand out: deep frying and pan frying. Each technique has its own merits and can yield delicious results.
Deep Frying involves submerging the chicken completely in hot oil. This method produces an incredibly crispy exterior while ensuring the meat stays juicy and tender inside. The high oil temperature creates a quick seal, locking moisture in and resulting in succulent chicken.
Pan Frying, on the other hand, uses less oil and requires turning the chicken periodically. This method can be just as effective, particularly for smaller batches, and allows for more control over the cooking process. While it might not achieve the same level of crispiness as deep frying, pan frying is an excellent option for those looking to use less oil or prefer a more hands-on approach.
Both methods can produce mouthwatering fried chicken, but for our crispy buttermilk fried chicken recipe, we recommend deep frying for the ultimate texture and flavor.
Detailed Instructions on How to Heat the Oil Properly for Optimal Frying
Before you start frying, it’s essential to prepare your oil correctly. Here’s how to do it:
1. Choose the Right Oil: Select an oil with a high smoke point, such as vegetable oil, canola oil, or peanut oil. These oils can withstand high temperatures without burning, ensuring a clean fry.
2. Fill Your Pot or Deep Fryer: If you’re using a pot, fill it with enough oil to submerge the chicken but leave space to avoid overflow. Aim for about 2 to 3 inches of oil.
3. Heat the Oil: Use a thermometer to monitor the oil temperature. Heat the oil over medium-high heat until it reaches 350°F (175°C). This temperature is crucial for achieving that perfect crispy coating. If the oil is too cool, the chicken will absorb excess oil and become greasy; if it’s too hot, the coating can burn before the chicken is fully cooked.
4. Test the Oil: If you don’t have a thermometer, you can test the oil by dropping in a small piece of bread. If it sizzles and turns golden brown in about 60 seconds, your oil is ready for frying.
Tips on Avoiding Overcrowding in the Fryer
Overcrowding the frying pot is a common mistake that can ruin your crispy buttermilk fried chicken. When you add too much chicken at once, the temperature of the oil drops, resulting in uneven cooking and soggy coatings.
To prevent this, fry the chicken in batches. Depending on the size of your pot or fryer, aim to cook no more than 3 to 4 pieces at a time. This will help maintain the oil’s temperature and ensure each piece gets the attention it deserves.
Coating and Frying the Chicken
Step-by-Step Guide on Coating the Chicken
Now that your oil is heated, it’s time to prepare the chicken for frying.
1. Remove Excess Buttermilk: Take each piece of chicken from the buttermilk marinade and let any excess drip off. You want a thin layer of buttermilk on the chicken to help the flour adhere without being too gloppy.
2. Dredging in the Flour Mixture: In a large bowl, combine all-purpose flour with your chosen seasonings (salt, pepper, garlic powder, paprika, etc.). Dredge each piece of chicken in the flour mixture, ensuring it’s fully coated. Shake off any excess flour to avoid clumping.
3. Techniques to Ensure an Even Coating:
– Use one hand for the wet process (handling the chicken) and the other for the dry (coating with flour) to keep things tidy.
– Press the flour mixture onto the chicken firmly to create a more substantial crust.
Detailed Frying Instructions
1. Frying the Chicken: Carefully lower each piece of coated chicken into the hot oil, skin side down. Avoid splashing hot oil.
2. How Long to Fry the Chicken: Fry the chicken for approximately 12 to 15 minutes, depending on the size of the pieces.
3. Signs of Doneness: The chicken is done when it reaches a golden-brown color and an internal temperature of 165°F (74°C). Use a meat thermometer to check the temperature in the thickest part of the chicken, avoiding bones.
4. Turning the Chicken: If you’re frying larger pieces, turn them halfway through the cooking process to ensure even browning.
Draining and Resting the Chicken
Once your chicken is golden brown and cooked through, it’s time to remove it from the oil.
1. Importance of Draining Excess Oil: Use a slotted spoon or tongs to transfer the fried chicken to a wire rack set over a baking sheet. This allows excess oil to drain away and keeps the chicken crispy. Avoid placing the chicken directly on paper towels, as this can trap steam and soften the coating.
2. Recommended Resting Time: Let the fried chicken rest for at least 5 to 10 minutes before serving. This resting period allows the juices to redistribute throughout the meat, resulting in a more tender bite.
Serving Suggestions
Now that your crispy buttermilk fried chicken is ready, it’s time to think about presentation and sides.
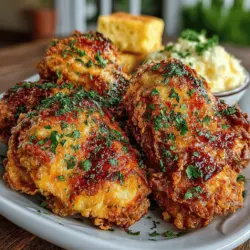
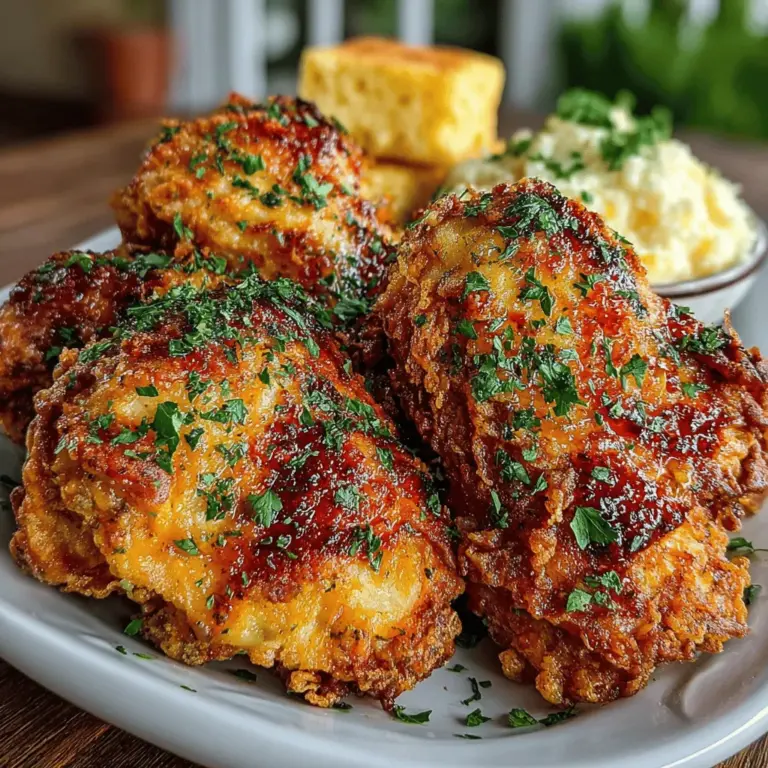
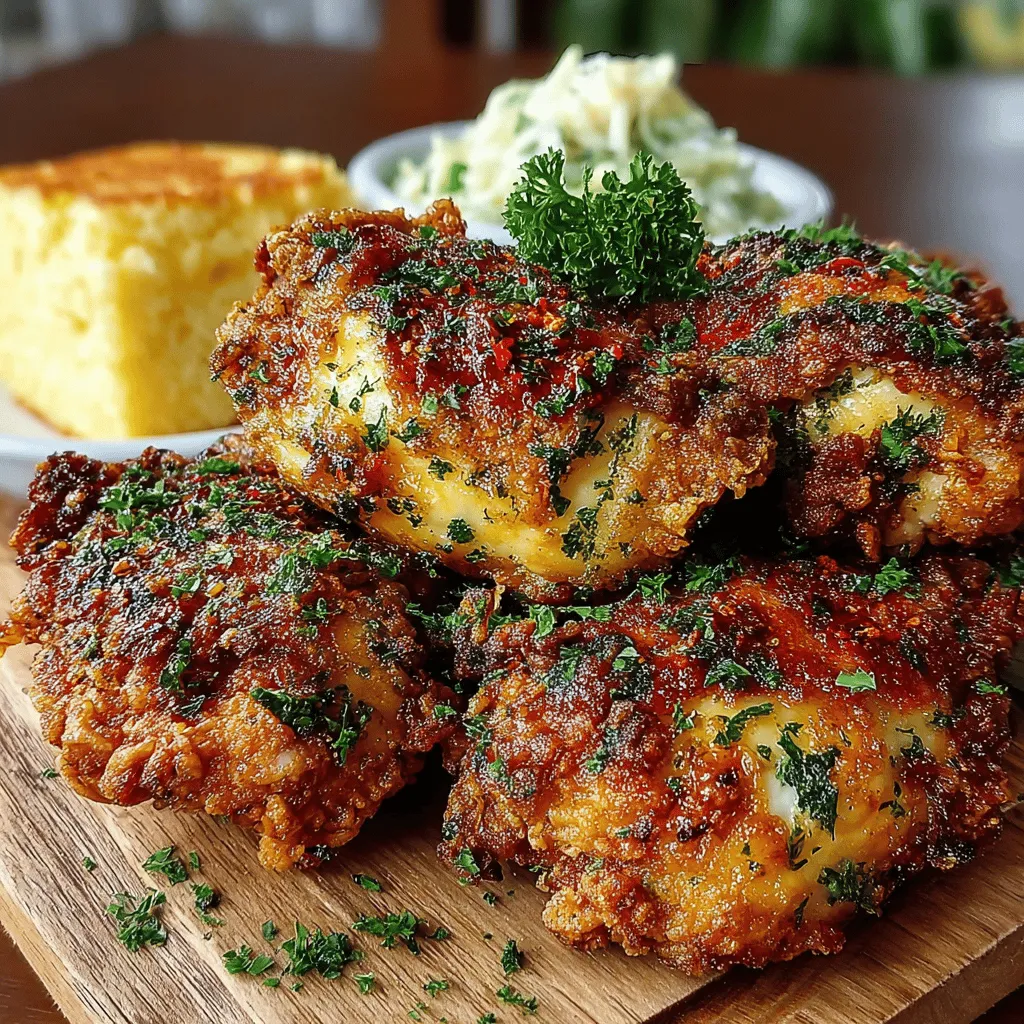
Presentation Ideas for Serving Crispy Buttermilk Fried Chicken
– Platter Presentation: Arrange the fried chicken pieces neatly on a large platter, garnished with fresh herbs like parsley or thyme for a pop of color.
– Individual Servings: Serve the chicken alongside individual portions of dipping sauces or small sides for a fun, interactive meal.
Recommended Side Dishes
Fried chicken pairs wonderfully with a variety of sides. Consider these classic accompaniments:
– Coleslaw: The crunch and tanginess of coleslaw balance the richness of fried chicken perfectly.
– Cornbread: Sweet, buttery cornbread is a traditional side that complements the savory flavors.
– Mashed Potatoes: Creamy mashed potatoes with gravy create a comforting and hearty meal.
Suggestions for Sauces or Dips
Enhance your meal with some delicious dipping options:
– Honey: A drizzle of honey adds a delightful sweetness that contrasts beautifully with the salty chicken.
– Hot Sauce: For those who enjoy a kick, a side of hot sauce can elevate the flavor profile.
– Ranch Dressing: Creamy ranch dressing is a classic pairing that works well with the crispy texture of the chicken.
Conclusion
Creating homemade crispy buttermilk fried chicken is not just a cooking task; it’s a labor of love that results in a dish cherished by many. The process, from marinating the chicken in buttermilk to achieving the perfect golden crust, is incredibly satisfying.
This recipe allows for experimentation with various spices and sides, encouraging you to make the meal uniquely yours. Whether you’re preparing a family dinner or hosting a gathering with friends, serving this delicious fried chicken will surely impress.
Remember, the joy of cooking lies in sharing your creations with loved ones. So gather around the table, enjoy your crispy buttermilk fried chicken, and relish the moment together.