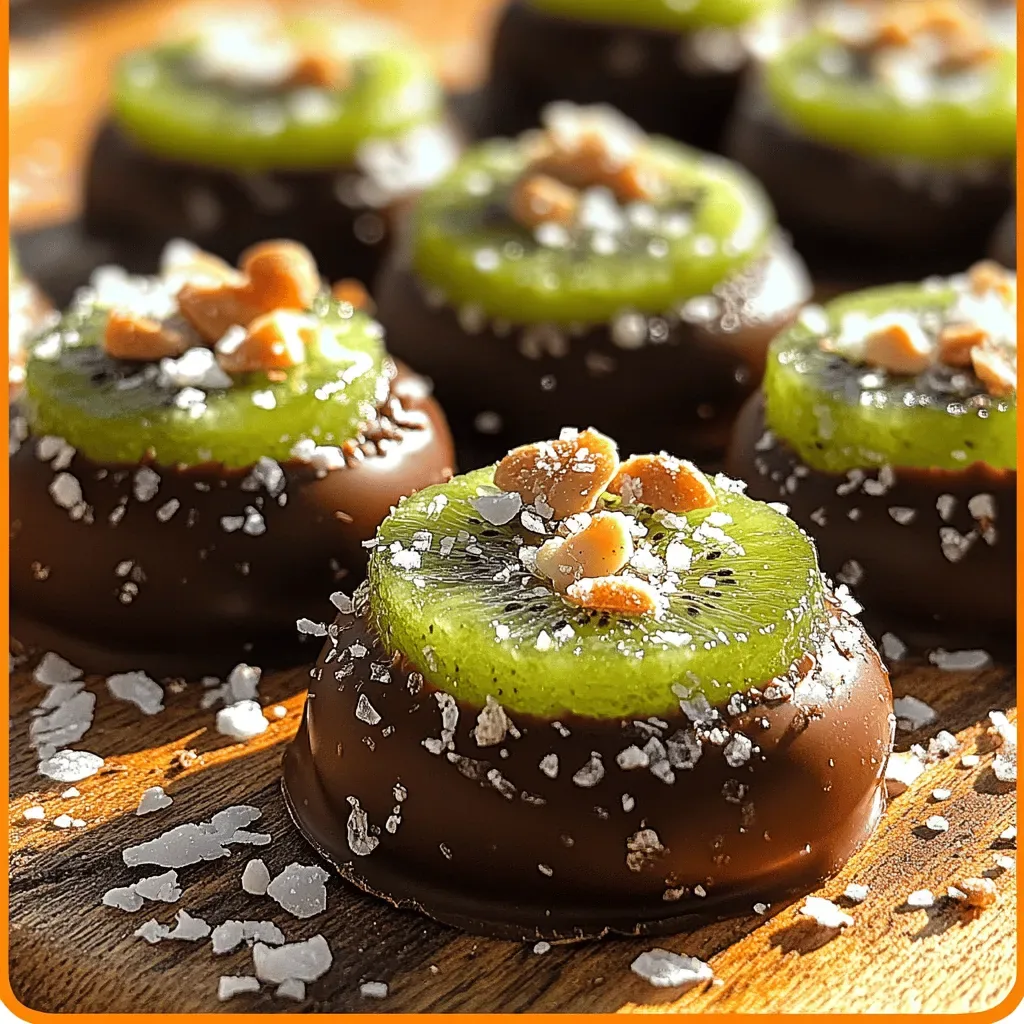
Choco-Kiwi Bliss Bites: A Unique Treat to Delight Your Taste Buds

WANT TO SAVE THIS RECIPE?

In the world of delightful treats, the Choco-Kiwi Bliss Bites stand out for their unique combination of flavors and textures. This recipe marries the refreshing tartness of ripe kiwis with the rich sweetness of semi-sweet chocolate, creating a blissful snack that’s perfect for any occasion. Whether you’re looking to impress guests at a gathering or simply satisfy your sweet tooth, these bites are not only delicious but also visually appealing. The vibrant colors of the kiwi contrasted with the glossy chocolate make this dessert a feast for the eyes as well as the palate.

The Choco-Kiwi Bliss Bites are more than just a treat; they represent a perfect balance of health and indulgence. Kiwis are packed with essential vitamins and minerals while chocolate, particularly in its semi-sweet form, can be enjoyed in moderation as a rich source of antioxidants. These bites are an excellent choice for those who are health-conscious but don’t want to compromise on flavor or experience.

In this article, we will explore the ingredients that bring this recipe to life, the step-by-step preparation process, and the nutritional benefits that make Choco-Kiwi Bliss Bites a must-try recipe. Let’s dive into the details and start our journey to creating these delightful treats.

Understanding the Ingredients

Ripe Kiwis: The Star of the Recipe

Kiwis are the heart and soul of the Choco-Kiwi Bliss Bites. Their bright green flesh and unique flavor profile offer a refreshing contrast to the sweetness of chocolate. But kiwis are not just delicious; they are also incredibly nutritious. Rich in vitamin C, vitamin K, vitamin E, potassium, and fiber, kiwis are known for their numerous health benefits. They boost the immune system, aid digestion, and can even help improve sleep quality.

When selecting kiwis for this recipe, it’s crucial to choose the perfect ripe fruit. A ripe kiwi should yield slightly to gentle pressure, indicating that it is juicy and ready to eat. Avoid kiwis that feel overly soft or have blemishes, as these may indicate overripeness. For an optimal experience, look for kiwis that have a vibrant color and a smooth, unblemished skin.

Semi-Sweet Chocolate Chips: Sweetness Defined

No dessert is complete without chocolate, and for our Choco-Kiwi Bliss Bites, semi-sweet chocolate chips are the perfect choice. Their rich flavor complements the tartness of the kiwis beautifully, offering a harmonious balance of sweet and sour. Semi-sweet chocolate chips are versatile and commonly used in various desserts, making them a pantry staple for many bakers.

Beyond their delightful taste, semi-sweet chocolate also comes with health benefits when consumed in moderation. It’s packed with antioxidants, which can help reduce inflammation and lower the risk of chronic diseases. Additionally, the presence of flavonoids in chocolate may contribute to heart health by improving blood flow and lowering blood pressure. Choosing high-quality chocolate can enhance the overall flavor of the bites, so opt for brands that use minimal additives.

Coconut Oil: A Flavor Enhancer

To achieve that smooth, glossy finish on our chocolate coating, we’ll incorporate coconut oil into our melting process. Coconut oil serves multiple purposes in this recipe. It not only helps to thin the chocolate for easy dipping, but it also adds a subtle richness that enhances the overall flavor of the Choco-Kiwi Bliss Bites.

The health benefits of coconut oil are worth noting, too. It contains medium-chain triglycerides (MCTs), which have been shown to boost metabolism and provide quick energy. Additionally, coconut oil has antimicrobial properties and can support heart health. When choosing coconut oil, opt for virgin or extra-virgin varieties to ensure maximum flavor and health benefits.

Sea Salt: A Flavor Elevation

While it may seem counterintuitive to add salt to a dessert, a sprinkle of sea salt can elevate the flavors in chocolate significantly. The addition of sea salt enhances the sweetness of the chocolate while also drawing out the natural flavors of the kiwi. This contrast creates a more complex and satisfying taste experience.

Salt is known for its ability to amplify flavors, and in the realm of desserts, it can help balance sweetness and acidity. When using sea salt, consider a flaky variety such as Maldon or fleur de sel, which can provide a delightful texture and burst of flavor in each bite.

Optional Garnishes: Crushed Nuts and Shredded Coconut

To further customize your Choco-Kiwi Bliss Bites, consider adding optional garnishes such as crushed nuts or shredded coconut. These toppings can introduce additional flavors and textures, making each bite even more delightful.

Nuts, such as almonds or pistachios, can provide a satisfying crunch and healthy fats, while shredded coconut adds a tropical flair and chewy texture. Both options also contribute to the nutritional profile of the bites, making them even more wholesome. Feel free to experiment with different combinations to find your perfect blend of flavors.

Step-by-Step Preparation of Choco-Kiwi Bliss Bites

Now that we’ve outlined the essential ingredients, let’s dive into the step-by-step preparation process for creating Choco-Kiwi Bliss Bites. This section will guide you through each stage, ensuring you achieve the best possible results.

Preparing the Kiwi Slices

The first step in creating your Choco-Kiwi Bliss Bites is to prepare the kiwi slices. Start by selecting ripe kiwis, as previously discussed. Here’s how to peel and slice them:

1. Peeling the Kiwis: Using a sharp knife, carefully slice off both ends of the kiwi. This will create a stable base for peeling. Next, run the knife along the curvature of the kiwi to remove the skin. Take care to avoid cutting too deeply, as you want to keep as much of the fruit intact as possible.

2. Slicing Uniformly: Once peeled, slice the kiwi into rounds, aiming for a thickness of about 1/4 inch. Uniform slices ensure even coating with chocolate and a consistent texture. If you’re comfortable, you can use a mandoline slicer for precision. Just be sure to keep your fingers clear of the blade!

3. Arranging the Slices: Place the kiwi slices on a parchment-lined baking sheet, ensuring they are not touching. This preparation step is crucial for the next phase, where we will freeze the slices.

Freezing the Kiwi Slices

After preparing the kiwi slices, the next step is to freeze them. Freezing is essential for achieving the right texture when coated with chocolate. Here’s how to do it effectively:

1. Freezing Process: Place the baking sheet with the kiwi slices in the freezer for about 1-2 hours. This will firm up the slices, allowing them to hold their shape when dipped in warm chocolate.

2. Best Practices for Freezing Fruits: Make sure the kiwi slices are not stacked on top of each other, as this can lead to clumping. If you plan to make a larger batch, consider freezing the slices in single layers, then transferring them to a resealable bag once fully frozen. This will prevent them from sticking together and allow for easy access later on.

Melting the Chocolate

While the kiwi slices are freezing, it’s time to melt the semi-sweet chocolate chips. This step requires a bit of attention to ensure the chocolate is smooth and ready for dipping. Here’s how to melt chocolate safely:

1. Choosing the Method: You can melt chocolate using either a microwave or a double boiler. For the microwave, place the chocolate chips in a microwave-safe bowl and heat in 30-second intervals, stirring between each interval until smooth. If using a double boiler, set a heatproof bowl over a pot of simmering water, ensuring the bottom of the bowl does not touch the water, and stir until the chocolate is melted.

2. Stirring and Monitoring Temperature: Whether using a microwave or double boiler, it’s crucial to stir the chocolate frequently. This not only helps distribute the heat evenly but also prevents overheating, which can cause the chocolate to seize. Aim for a temperature around 110°F (43°C) for optimal melting.

3. Incorporating Coconut Oil: Once the chocolate is melted, stir in the coconut oil. This will help achieve a glossy finish and enhance the chocolate’s texture. Mix until the coconut oil is fully incorporated, and the chocolate is smooth and creamy.

With the kiwi slices frozen and the chocolate melted, you are now ready to assemble your Choco-Kiwi Bliss Bites. Stay tuned for the next part of the recipe, where we’ll guide you through the exciting process of dipping and garnishing these delightful treats.

Kiwis are the heart and soul of the Choco-Kiwi Bliss Bites. Their bright green flesh and unique flavor profile offer a refreshing contrast to the sweetness of chocolate. But kiwis are not just delicious; they are also incredibly nutritious. Rich in vitamin C, vitamin K, vitamin E, potassium, and fiber, kiwis are known for their numerous health benefits. They boost the immune system, aid digestion, and can even help improve sleep quality.

Preparing for Dipping

Before diving into the luscious world of chocolate-dipped kiwi slices, it’s essential to ensure that your setup is efficient and organized. The right preparation can make the dipping process smooth and enjoyable.

How to Use Skewers or Toothpicks Effectively

Using skewers or toothpicks is a practical way to handle kiwi slices during dipping. Here’s how to do it effectively:

1. Choose the Right Size: Select skewers or toothpicks that are sturdy enough to hold the kiwi slices without breaking. Wooden skewers are ideal for larger slices, while toothpicks work well for bite-sized pieces.

2. Insert with Care: Gently insert the skewer or toothpick into the center of each kiwi slice, ensuring it goes deep enough to provide stability but not so deep that it pierces through the other side.

3. Prepare a Dipping Station: Set up a designated area for dipping with a bowl of melted chocolate and a tray lined with parchment paper for placing the dipped slices. This organization helps streamline the process and keeps your workspace tidy.

Tips for Making the Dipping Process Easier

To make dipping a breeze, consider these handy tips:

Melt Chocolate Wisely: If you’re melting chocolate in the microwave, do so in short intervals (15-30 seconds), stirring in between to avoid scorching. Alternatively, use a double boiler for more control over the melting process.

Maintain Chocolate Consistency: If the chocolate thickens as you dip, add a teaspoon of coconut oil or vegetable oil to maintain a smooth consistency, allowing for easier coverage of the kiwi slices.

Work in Batches: Dip several slices at once to speed up the process. This allows you to maintain the temperature of the chocolate without needing to reheat frequently.

Dipping the Kiwi Slices

Now that you’re prepared, it’s time to dip those kiwi slices into the rich chocolate.

Step-by-Step Dipping Instructions

1. Melt the Chocolate: Begin by melting your choice of chocolate—dark, milk, or white—until it’s smooth and glossy.

2. Dip the Kiwi: Hold the skewer or toothpick and dip the kiwi slice into the melted chocolate. Ensure the chocolate covers the kiwi generously but doesn’t overflow.

3. Twist and Rotate: As you remove the kiwi slice from the chocolate, twist it gently to allow excess chocolate to drip back into the bowl. This technique helps maintain an even coating.

4. Place on Tray: Carefully place the dipped kiwi slices onto the prepared parchment-lined tray. If desired, you can dip only half of the slice for a decorative touch.

Techniques for Controlling Chocolate Coverage

Controlling how much chocolate adheres to the kiwi is crucial for both presentation and taste. Here are a few techniques:

Half-Dip: For a visually appealing look, dip only half of the kiwi slice. This not only showcases the vibrant green of the kiwi but also balances the sweetness of the chocolate.

Drizzle Technique: After dipping, drizzle additional melted chocolate over the top for a more artistic presentation. Use a small piping bag or a fork to create pretty patterns.

Sprinkle While Wet: If you plan to add toppings like crushed nuts or coconut, sprinkle them immediately after dipping while the chocolate is still wet to ensure they adhere well.

Adding Garnish

Once the kiwi slices are dipped, it’s time to enhance their appearance and flavor with garnishes.

Methods for Applying Crushed Nuts or Shredded Coconut

1. Crushed Nuts: Choose your favorite nuts such as almonds, peanuts, or pistachios. Crush them into small pieces and sprinkle them over the chocolate while it’s still wet. This adds both texture and a nutty flavor that pairs beautifully with the kiwi and chocolate.

2. Shredded Coconut: For a tropical twist, use unsweetened shredded coconut. After dipping the kiwi, roll the slice in shredded coconut or sprinkle it generously on top to create a delightful contrast with the chocolate.

Creative Ideas for Garnishing

Flaky Sea Salt: A sprinkle of flaky sea salt on top of the chocolate can elevate the flavor profile, balancing the sweetness with a touch of saltiness.

Drizzled Chocolate: Use a contrasting chocolate (if you dipped in dark chocolate, use white, and vice versa) to create a beautiful drizzle pattern over the top of the dipped kiwi.

Colorful Sprinkles: For a fun, festive look, add colorful sprinkles to the chocolate before it sets. This is especially appealing for parties or children’s snacks.

Chilling for Firmness

After garnishing, chilling the bites is crucial for achieving the perfect texture.

Importance of Chilling for Texture

Chilling allows the chocolate to harden and set, which not only enhances the visual appeal but also makes for a more enjoyable eating experience. Properly chilled Choco-Kiwi Bliss Bites will have a delightful snap when bitten into, contrasting nicely with the juicy kiwi.

Optimal Chilling Times for Best Results

Chill Duration: Place the tray of dipped and garnished kiwi slices in the refrigerator for at least 30 minutes. This will ensure the chocolate sets completely.

Storage: If you’re not consuming them immediately, store the chilled bites in an airtight container in the refrigerator. They can last for up to a week, though they’re best enjoyed fresh.

Serving Suggestions for Choco-Kiwi Bliss Bites

Once your Choco-Kiwi Bliss Bites are ready, presentation can elevate their appeal.

Creative Ways to Serve Choco-Kiwi Bliss Bites

Platter Presentation: Arrange the bites on a decorative platter, varying the arrangement for visual interest. Use fresh kiwi slices or mint leaves as garnish around the edges for a pop of color.

Individual Servings: For a more sophisticated touch, serve each bite in mini cupcake liners. This is perfect for parties or gatherings, allowing guests to easily grab their own treats.

Plating Suggestions for Parties or Events

Tiered Cake Stand: Use a tiered cake stand to display the Choco-Kiwi Bliss Bites at parties. This not only saves space but also adds an elegant touch to your dessert table.

Themed Decor: For themed events, consider decorating the serving area to match the season or occasion with complementary colors and decorations.

Pairing Recommendations

Pairing these delightful bites with the right beverages or snacks can enhance the overall experience.

Suggested Beverages or Other Snacks That Complement the Bites

Refreshing Beverages: Pair your Choco-Kiwi Bliss Bites with refreshing drinks like iced green tea, coconut water, or fruity smoothies. These options enhance the flavor without overpowering the sweetness of the chocolate.

Savory Snacks: Serve alongside savory snacks such as cheese platters or crackers. The contrast between sweet and savory can create an exciting culinary experience.

Themed Pairings for Different Occasions

Summer Parties: For summer gatherings, serve with a tropical punch or fruit-infused water, emphasizing the refreshing elements of the kiwi.

Winter Celebrations: During the winter months, hot chocolate or spiced apple cider can complement the chocolate kiwi bites beautifully, creating a comforting treat.

Nutritional Benefits of Choco-Kiwi Bliss Bites

Choco-Kiwi Bliss Bites aren’t just a delightful treat; they also offer some nutritional benefits.

Healthy Snacking

These bites can be part of a balanced diet due to their wholesome ingredients.

Nutrient-Rich Kiwi: Kiwi is packed with vitamin C, fiber, and antioxidants, making it a nutritious choice for snacking. Pairing it with dark chocolate adds antioxidants and healthy fats, contributing to overall well-being.

Controlled Ingredients: By making these bites at home, you can control the quality of chocolate and the amount of added sugars, making them a healthier alternative to store-bought snacks.

Portion Control and Serving Sizes

Understanding portion sizes is key to enjoying these treats responsibly.

Serving Size: A reasonable serving size would be 2-3 bites, allowing you to indulge without overdoing it.

Mindful Indulgence: Enjoying these bliss bites mindfully can help satisfy your sweet tooth while providing nutritional benefits, making them a great choice for health-conscious individuals.

Conclusion

Choco-Kiwi Bliss Bites offer a perfect blend of health and indulgence, making them an excellent choice for anyone looking to satisfy their sweet cravings without compromising on nutrition. With simple ingredients and an easy preparation process, these delightful bites are sure to become a favorite in your dessert repertoire. Whether enjoyed as a refreshing snack or a party treat, they embody the joy of combining unique flavors to create something truly special. Embrace the bliss of Choco-Kiwi Bliss Bites and treat yourself and your loved ones to this deliciously satisfying recipe.

Kiwis are the heart and soul of the Choco-Kiwi Bliss Bites. Their bright green flesh and unique flavor profile offer a refreshing contrast to the sweetness of chocolate. But kiwis are not just delicious; they are also incredibly nutritious. Rich in vitamin C, vitamin K, vitamin E, potassium, and fiber, kiwis are known for their numerous health benefits. They boost the immune system, aid digestion, and can even help improve sleep quality.

Chocolate Dipped Frozen Kiwi

Discover the delicious joy of Choco-Kiwi Bliss Bites, a unique treat that combines the refreshing tartness of ripe kiwis with rich semi-sweet chocolate. These delightful bites are not just visually appealing but also packed with nutrients. Perfect for parties or a sweet indulgence, this recipe offers a balance of health and flavor. Explore the step-by-step process to create these delicious treats that are sure to delight your taste buds and impress your guests!

Ingredients
  

4 ripe kiwis

1 cup semi-sweet chocolate chips

1 tablespoon coconut oil

1/4 teaspoon sea salt

1/2 cup crushed nuts (almonds or hazelnuts) or shredded coconut (optional for garnish)

Skewers or toothpicks (for dipping)

Instructions
 

Prep the Kiwis: Peel the kiwis and slice them into thick rounds (about 1/2 inch each). You should get around 10-12 slices depending on the size of the kiwis.

    Freeze the Kiwi Slices: Arrange the kiwi slices on a parchment-lined baking sheet in a single layer. Place the baking sheet in the freezer for about 1 hour or until the slices are completely frozen.

      Melt the Chocolate: In a microwave-safe bowl, combine the semi-sweet chocolate chips and coconut oil. Microwave in 30-second intervals, stirring in between, until the mixture is smooth and fully melted.

        Prepare for Dipping: Remove the frozen kiwi slices from the freezer. Insert a skewer or toothpick into each slice to make dipping easier.

          Dip the Kiwi: Dip each frozen kiwi slice halfway into the melted chocolate, allowing the excess chocolate to drip off. If you like, sprinkle sea salt on top of the melted chocolate for an extra flavor kick.

            Add Garnish: Before the chocolate sets, dip the edges in the crushed nuts or shredded coconut for added texture and flavor.

              Chill Again: Place the chocolate-dipped kiwis back on the parchment-lined baking sheet. Return them to the freezer for about 30 minutes or until the chocolate is firm.

                Serve: Once set, remove the skewers or toothpicks and serve the Choco-Kiwi Bliss Bites immediately or store them in an airtight container in the freezer for up to 2 weeks.

                  Prep Time, Total Time, Servings: 15 minutes | 2 hours | 4 servings

                    WANT TO SAVE THIS RECIPE?

                    Leave a Comment

                    Recipe Rating