Introduction
Imagine taking a bite of your beloved childhood breakfast cereal and transforming it into a rich, luscious dessert that brings back all those warm, nostalgic memories. Welcome to the world of Cinnamon Toast Crunch Cheesecake, a delightful fusion of iconic breakfast flavors and classic dessert elements. This indulgent cheesecake captures the essence of the popular cinnamon cereal, combining its sweet and spicy notes with the creamy texture of a traditional cheesecake.
What makes this recipe so appealing is not only its unique flavor profile but also its accessibility. With just a handful of ingredients and straightforward steps, you can whip up this cheesecake for any occasion, whether it’s a birthday celebration, a cozy family gathering, or simply a well-deserved treat for yourself. The balance of richness and familiarity makes it a beloved choice among dessert enthusiasts of all ages, ensuring that every bite is a delightful reminder of sweeter times.
Understanding the Ingredients
To craft the perfect Cinnamon Toast Crunch Cheesecake, it’s essential to understand the key components that come together to create this unique and delicious dessert. Each ingredient plays a crucial role in developing the cheesecake’s flavor and texture, making it a standout choice for any dessert table.
The Crust: A Crunchy Foundation
The foundation of any great cheesecake is its crust, and for this recipe, we take a delightful twist by using Cinnamon Toast Crunch cereal as the base. Not only does this choice infuse the crust with a burst of cinnamon flavor, but it also adds a satisfying crunch that contrasts beautifully with the creamy filling.
To create this crunchy foundation, we combine crushed Cinnamon Toast Crunch cereal with granulated sugar and melted butter. The sugar enhances the cereal’s sweetness, while the melted butter acts as a binding agent, ensuring that the crust holds together perfectly when pressed into the cheesecake pan. The result is a flavorful, crispy crust that provides a delightful texture contrast to the silky smooth filling.
The Cheesecake Filling: Creamy and Flavorful
The heart of the Cinnamon Toast Crunch Cheesecake lies in its creamy filling, where cream cheese takes center stage. Cream cheese is vital for achieving that signature cheesecake texture—rich, smooth, and incredibly indulgent. Its tangy flavor also complements the sweetness of the cereal crust, creating a harmonious balance.
In addition to cream cheese, we add granulated sugar to sweeten the filling and vanilla extract for a hint of warmth that enhances the overall flavor profile. Ground cinnamon is, of course, essential in echoing the beloved taste of Cinnamon Toast Crunch, while sour cream plays a pivotal role in adding creaminess and a slight tang that elevates the cheesecake even further.
Eggs are another key ingredient in the filling. They contribute to the cheesecake’s structure and richness, ensuring that the filling sets properly while remaining creamy and smooth. The careful balance of these ingredients is what makes this cheesecake truly exceptional.
The Topping: Adding the Finishing Touches
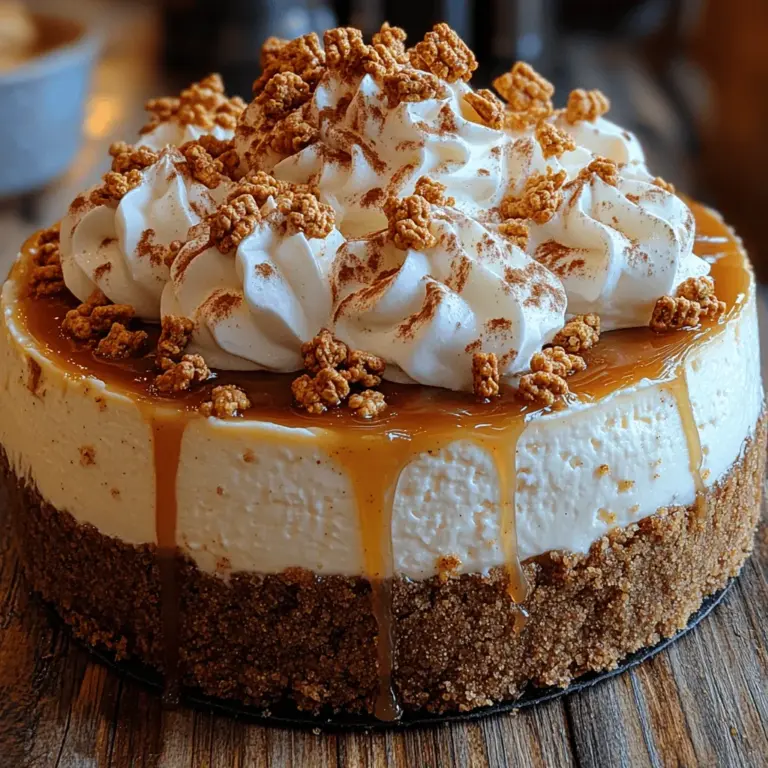
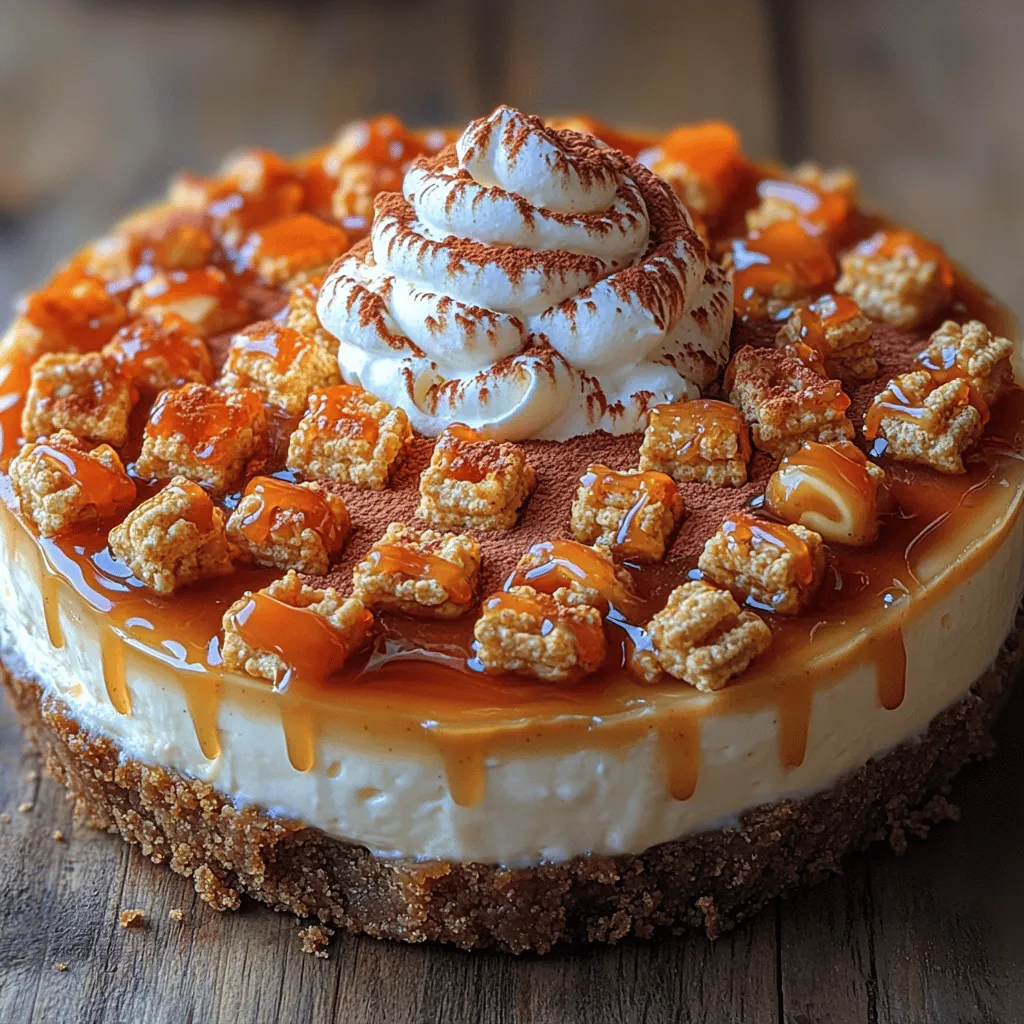
No cheesecake is complete without a delightful topping, and for our Cinnamon Toast Crunch Cheesecake, we recommend a generous layer of whipped cream. This light and airy topping not only adds a touch of elegance but also balances the richness of the cheesecake, making each bite feel indulgent yet light.
To enhance the visual appeal and texture of the dessert, we sprinkle additional Cinnamon Toast Crunch cereal on top of the whipped cream. This not only makes for a stunning presentation but also reinforces the cereal’s flavor throughout the dessert.
For those looking to take their cheesecake to the next level, consider drizzling optional toppings like caramel or chocolate sauce over the whipped cream and cereal garnish. These additions can enhance the dessert’s decadence and introduce new flavor dimensions that complement the original cinnamon taste.
Step-by-Step Instructions for a Perfect Cheesecake
Now that we’ve explored the essential components that make up this decadent Cinnamon Toast Crunch Cheesecake, it’s time to dive into the step-by-step instructions that will guide you through the baking process. Each step is designed to ensure that your cheesecake turns out perfectly every time, so let’s get started!
Step 1: Prepare the Crust
1. Preheat your oven to 350°F (175°C). This ensures that your cheesecake bakes evenly.
2. Crush the Cinnamon Toast Crunch cereal into fine crumbs. You can do this by placing the cereal in a zip-top bag and rolling over it with a rolling pin or using a food processor for a finer texture.
3. Mix the crushed cereal with granulated sugar in a medium bowl.
4. Pour in the melted butter and stir until the mixture is well combined and resembles wet sand.
5. Press the mixture firmly into the bottom of a 9-inch springform pan, creating an even layer. Use the bottom of a flat measuring cup to pack it tightly and smoothly.
6. Bake the crust in the preheated oven for about 10 minutes, or until it’s lightly golden. Remove it from the oven and allow it to cool while you prepare the filling.
Step 2: Make the Cheesecake Filling
1. In a large mixing bowl, beat the cream cheese with an electric mixer on medium speed until it’s smooth and creamy, about 2-3 minutes. Make sure there are no lumps.
2. Add the granulated sugar and continue to beat until fully incorporated.
3. Mix in the vanilla extract and ground cinnamon, ensuring everything is well combined.
4. Add the sour cream and mix until the filling is creamy and smooth.
5. Add the eggs one at a time, mixing on low speed just until each egg is incorporated. Be careful not to overmix, as this can lead to a denser cheesecake.
6. Once all the eggs are mixed in, scrape down the sides of the bowl and give the batter a final gentle mix to ensure uniformity.
Step 3: Combine and Bake
1. Pour the cheesecake filling into the cooled crust, smoothing the top with a spatula.
2. Bake the cheesecake in the preheated oven for 45-55 minutes, or until the edges are set and the center is slightly jiggly. It will firm up as it cools.
3. Once baked, turn off the oven and crack the oven door open, allowing the cheesecake to cool gradually for about 1 hour. This helps prevent cracking.
4. After an hour, remove the cheesecake from the oven and let it cool to room temperature before transferring it to the refrigerator.
These initial steps set the foundation for a delightful dessert that marries the joy of breakfast with the elegance of a classic cheesecake. Stay tuned for the final steps and tips to ensure your Cinnamon Toast Crunch Cheesecake is a resounding success!
Prepping the Oven and Crust
The first step in crafting your Cinnamon Toast Crunch Cheesecake is preparing the oven and the crust. Preheating your oven to 325°F (160°C) is essential. An adequately preheated oven ensures that your cheesecake bakes evenly, preventing the edges from overcooking while the center remains undercooked. This step is crucial in achieving that perfect, creamy texture that a cheesecake is known for.
Preparing the Crust
To create the crust, you will need 2 cups of Cinnamon Toast Crunch cereal, crushed into fine crumbs, and 1/2 cup of unsalted butter, melted. The unique flavor of the cereal provides a nostalgic touch reminiscent of breakfast, while the butter binds the crumbs together for a delightful crunch.
1. Crush the Cereal: Begin by placing the Cinnamon Toast Crunch in a food processor and pulsing until it reaches a fine crumb consistency. If you don’t have a food processor, you can also place the cereal in a resealable plastic bag and crush it using a rolling pin.
2. Combine Ingredients: In a mixing bowl, combine the crushed cereal with the melted butter. Stir until all the crumbs are evenly coated with butter.
3. Form the Crust: Pour the crumb mixture into a 9-inch springform pan. Using your fingers or the bottom of a measuring cup, firmly press the mixture into the bottom and slightly up the sides of the pan to create an even layer. Ensure that the pressure is consistent to avoid weak spots that could break apart after baking.
4. Pre-Bake the Crust: Place the crust in the preheated oven and bake for 10 minutes. This pre-baking step helps set the crust, giving it a firm base for the creamy filling. After it’s done, let it cool while you prepare the filling.
Crafting the Cheesecake Filling
The filling is the star of the show, and getting it right is essential for a smooth, delicious cheesecake. For this recipe, you will need 24 ounces of cream cheese, softened, 1 cup of sugar, 1 teaspoon of vanilla extract, 3 large eggs, and 1/2 cup of sour cream.
Mixing Techniques
1. Beat the Cream Cheese: In a large mixing bowl, beat the softened cream cheese with an electric mixer on medium speed until it’s smooth and creamy. This step is crucial because lump-free cream cheese is the foundation of a creamy filling.
2. Add Sugar and Vanilla: Gradually add the sugar and vanilla extract to the cream cheese, mixing until well combined. This gradual incorporation helps to prevent overmixing, which can introduce unnecessary air into the batter and lead to cracks during baking.
3. Incorporate the Eggs: Add the eggs one at a time, mixing on low speed after each addition. This gentle mixing prevents the eggs from incorporating too much air, which is essential for avoiding cracks. You want to achieve a silky texture without overworking the batter.
4. Mix in Sour Cream: Finally, fold in the sour cream using a spatula for a richer taste and creamier texture. This ingredient enhances the cheesecake’s flavor and contributes to its smooth mouthfeel.
Once the filling is well combined and smooth, pour it over the cooled crust, smoothing the top with a spatula.
Baking and Cooling the Cheesecake
Now it’s time to bake your cheesecake. Place the springform pan on the center rack of your preheated oven.
Optimal Baking Times and Temperatures
Bake the cheesecake for 55 to 65 minutes. You’ll know it’s done when the edges are set, but the center still has a slight jiggle. A slight jiggle indicates that the cheesecake will continue to set as it cools, ensuring a creamy texture without being overly firm.
Cooling in the Oven
Once the baking time is complete, turn off the oven and crack the door open, allowing the cheesecake to cool in the oven for about 1 hour. This gradual cooling process helps prevent cracks on the surface by reducing temperature shock. After an hour, remove the cheesecake from the oven and let it cool at room temperature for an additional 30 minutes before refrigerating.
Chilling for Best Results
Chilling is a crucial step in the cheesecake-making process. For the best flavor and texture, refrigerate the cheesecake for at least 4 hours, though overnight is ideal. This resting period allows the flavors to meld beautifully and the cheesecake to set properly, making it easier to slice.
Ideal Chilling Times
For maximum flavor and texture, aim to chill your cheesecake for 6 to 8 hours. This extended chilling time enhances the creamy consistency and allows the cinnamon flavor to permeate throughout the cheesecake.
Serving Suggestions
When it comes to serving your Cinnamon Toast Crunch Cheesecake, presentation is key. Here are some delightful serving suggestions:
1. Slicing: For neat slices, use a sharp knife dipped in hot water, wiping it clean between cuts. This technique helps maintain the smooth edges of each slice.
2. Toppings: Consider adding a dollop of whipped cream on top of each slice for added richness. You can also sprinkle extra crushed Cinnamon Toast Crunch cereal on top for a crunchy finish.
3. Garnishes: Fresh cinnamon sticks or a light dusting of ground cinnamon can elevate the cheesecake’s visual appeal, making it more inviting.
4. Occasions: This cheesecake is perfect for various occasions, whether it’s a family gathering, holiday celebration, or even a casual get-together with friends. Its unique flavor profile appeals to both kids and adults alike, making it a crowd-pleaser.
Conclusion
The Cinnamon Toast Crunch Cheesecake is more than just a dessert; it’s an experience that combines nostalgia with indulgence. Each bite delivers the comforting flavors of your favorite childhood cereal, wrapped in a velvety cheesecake that’s perfect for sharing. Whether you’re serving it at a party or enjoying it on a cozy evening at home, this cheesecake brings joy and satisfaction to every occasion.
Creating this delightful dessert is accessible for both novice and experienced bakers. With a few simple steps, you can achieve a stunning cheesecake that will impress your family and friends. So gather your ingredients, roll up your sleeves, and dive into the delicious world of homemade cheesecakes. You’ll be glad you did!
